The advantages of such housing for guinea pigs
Furry rodent shelving has many different benefits. The structure, like ordinary furniture, is easily matched to the interior. If you focus on the surrounding environment when creating a structure and developing its design, then the pig rack will become a real decoration of the room. Inside such a home there is a place to place everything that a pig needs to be happy:
- privacy shelters;
- feeders and drinkers;
- stairs;
- tunnels, etc.
There is no need to make playgrounds separate from the main housing - all attractions and sports equipment can be placed on the same or different levels of the rack. The pig will be able to have fun any time she wants. The presence of several floors allows you to create a multi-room house for the animal with areas for a specific purpose - a bedroom, a dining room, a playroom, etc. Transparent front sides provide a good overview, you can keep an eye on your pet and control where exactly it is and what it is doing.
The dimensions of the rack and, again, its multi-level nature make it possible to accommodate more than one pig in such a house. In this kind of “cottage”, rodents will not fight for territory - there is enough space for everyone. And, if something happens, the neighbors will be able to go to different rooms.
Compared to a regular cage, the shelving design makes much less noise when the pig is getting busy. In addition, through the walls and ceilings of such a structure, debris (particles of bedding, filler, etc.) practically does not get out, unlike the bars of the cage, through which all small elements fly out.
Drinking fountain
Such a device can serve not only to quench the thirst of animals, but also become an original accent in the home interior. The design consists of a water bowl, a filter, a diffuser and a drinking bowl located at the top. Additionally, it is equipped with a decorative sprinkler, especially popular with native breeds (Maine Coons, Kuril Bobtails, Siberian cats).
Continuous circulation of liquid is ensured by a mini-pump powered by a USB cable. More advanced models may contain backlighting and an indication of the level of remaining water in the tank.
Cost – 2400 rub.
Cage Making Guide
So, if a terrarium or a purchased enclosure with a pen does not suit you, then you can always make a house for a rodent on your own. Moreover, if you have good instructions, you can make a large enclosure with a pen, equipped with additional shelving.
Required tools and materials
- corrugated cardboard (quantity depends on the drawing); metal grill with small mesh size; plastic cable ties; adhesive tape; knife; scissors; meter or tape measure; pencil.
Drawing up a drawing
Drawing for manufacturing the structure
As you already understand, the size of an enclosure with a pen for an animal should be large, naturally, if space in the apartment allows. Taking this into account, it is necessary to make a corresponding drawing. In fact, there are many options for making an enclosure with a pen, we will consider one of them. A version of the drawing is shown above.
Assembly instructions
In accordance with the drawing, draw the base on the material, in this case corrugated cardboard. It is better to use corrugated cardboard for an enclosure with a pen because it is a multilayer material. Thus, if you cut through only one layer, this material will bend well. The red lines in the drawing mark those places of the first layer that need to be cut, and the black lines indicate what needs to be cut off completely; this can be done using a regular knife. When the cutting process is completed, you should begin assembling the structure; in this case, keep in mind that the protruding edges of the sides must be securely fixed with tape. This way you get a rectangular box, the height of the sides will be 15 cm if you make the designs in accordance with our drawing. Of course, the dimensions can be increased if necessary. You should install iron bars along the entire perimeter of the future home for the rodent; they should be cut into panels 0.3 m in size. The edges should be processed if necessary and bent in such a way that your pet does not get hurt during close contact. The metal panels themselves should be connected using ties prepared in advance, and they should also be fixed in the middle. All sides must be assembled separately, this is done so that the so-called walls can be adjusted to size. Then the lattice elements must be fastened together using ties, and they must be connected at right angles. You can also use plywood as a base, but this material will be less durable. As for the arrangement, in this regard, the cage must be equipped with everything necessary, in particular bedding, a drinking bowl, a feeding trough, a hay barn, etc. It all depends on the imagination.
One more point: if you have several rodents, and you do not want to keep them in one cage for certain reasons, then you can use racks. The rack can be small or large, like in pet stores. Racks are convenient because you can house several pigs in one place without taking up much space. But the rack is not so easy to find, and not everyone can make it with their own hands. You will also find photos of the racks below. Actually, the manufacturing procedure itself is not particularly complicated; anyone can handle it.
So, what you need to consider:
The cage must be equipped with everything necessary, otherwise the pet will not feel comfortable. For the bottom, use corrugated cardboard, plastic or other durable material that the pig cannot chew through. The iron for the grill must be as strong as possible, otherwise your pet will chew through it without any problems. Clean the cage regularly to prevent bacteria and disease. The cage must be made in such a way that it can be disassembled and washed without any problems; take this into account when assembling. The larger the space, the more comfortable the animal is. The air temperature in the room where the rodent is kept should be around 22 degrees. It shouldn't be too hot or cold here.
What should a home be like for a guinea pig?
A guinea pig is a fairly large animal compared to, for example, a hamster, so a more spacious home is required. The minimum dimensions of a shelter in which an animal can stay in relative comfort are 30*20*20 cm. A house for a rodent must have a set of certain characteristics:
- wide entrance;
- space;
- harmlessness;
- safety;
- good ventilation.
You should also take into account the peculiarities of the anatomical structure of these animals. Guinea pigs have a very fragile spine, so falling even from a small height can have fatal consequences. Two-story structures are extremely undesirable in a pet's cage.
Wide entrance
Considering the size of the animal, the entrance hole to the house should be at least 9-10 cm wide and the same size in height. If you plan to house several animals in one house, then there should be two entrances so that the animals do not crowd in the passage.
Space
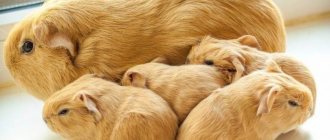
As mentioned above, the minimum dimensions of the shelter for one animal are 30*20*20 cm. If several animals live in one cage, the length and width of the house should be increased. For adult pigs, you can provide separate houses - in addition to comfort, this will help avoid quarrels over territory, especially among males. For a female with cubs, a common house is suitable, which should be more spacious than for a solitary animal.
How many guinea pigs do you have?
Harmlessness
One of the most important criteria. Pigs taste absolutely everything that comes into their field of vision. The material from which the house is made must be non-toxic and suitable for grinding teeth. The exception is fabric houses - pigs do not try to gnaw them, except perhaps the frame on which the fabric is stretched.
Safety
No less important parameter than harmlessness. The pig house should not be too high so that the animal is not injured if it accidentally falls. This is especially true for structures with a flat roof, which animals love to climb. Multi-tiered structures are not suitable for guinea pigs, the same goes for ladders and transitions from one level to another.
Good ventilation
Not every animal can be trained to relieve itself in a certain place. Most likely, the pig will fulfill all its natural needs in the house. Therefore, it is advisable to provide the structure not only with an entrance, but also with a ventilation hole on the opposite or one of the side walls.
The house can be made from different materials
Aviary dimensions and procedure
Before you start making, you should decide what size the pen will be.
Based on this, the minimum sizes are:
- for one animal - 1 meter by 80 cm;
- for two animals – one and a half meters by 80 cm;
- three pets will need about 1.7 m by 80 cm;
- if there are four or more pigs - 2 m by 80 cm.
When building, you need to take into account that the height must be at least 15 cm.
Once the dimensions have been determined, work can begin:
- Mark and draw the shape of the enclosure (its base).
- Measure 15 cm on each side. Connect the lines. These will be the sides of the pen.
- Cut carefully, following the line markings.
- Assemble the frame along the cuts.
- Fold the edges.
- Bend the parts that protrude. Cover them with tape.
As a result, there should be a box in front of you, only without a top. Now you need a metal mesh, the sides are assembled from it:
- The mesh is cut into pieces of the required size. The height of the walls should be twice the height of the pallet.
- Finish the edges to ensure there are no jagged edges or sharp corners.
- Connect the parts using a cable tie.
- Do not tie it very tightly, otherwise there will be a skew on the other side of the enclosure.
A corrugated cardboard pallet is placed inside a metal body, so the dimensions must correspond exactly.
This is what the finished version of the enclosure looks like
Also, the bottom should be additionally lined with rubberized mats - they can be washed frequently.
It is a good idea to purchase plastic pallets, as long as they are the right size.
If plastic is used in the construction of the enclosure, it must be covered with a PVC mat to prevent the pigs from gnawing
It is important for the owner to remember that it does not matter whether the enclosure is purchased or made independently. The main thing is that your pet feels happy and comfortable.
Best solutions
The best decision would be to buy an enclosure made taking into account all the needs of guinea pigs. Such cages have a plastic bottom, which is equipped with a pull-out tray. This feature will make it easy to clean up your pet’s home, and the plastic sides will prevent sawdust from flying around the room.
The walls are made of metal, and special places are equipped with fasteners for feeders and drinkers.
Enclosures presented in pet stores can be equipped with a second tier. This adds more space for your guinea pig to move around. The two-story structure allows you to place many passages inside the enclosure and divide the space into zones.
How to make a hammock house
To make a house you will need:
- durable fabric 130 cm long and at least 30 cm wide;
- pieces of fabric 35 cm long and 25 cm wide;
- sling 200 cm;
- 4 carabiners for fastening;
- bias binding 150 cm long;
- a piece of rectangular plywood 30 cm long;
- thread, needle, centimeter and scissors.
For a piece of fabric 130 cm long, fold the edge with the outer side inward and hem it, leaving one side free. Plywood is inserted into the resulting pocket. You can use thick cardboard instead of plywood. Softer cardboard or padding polyester is wrapped into the other edge of the long sheet. It turns out two pockets. The free edges of the pockets are sewn together. The part of the product with plywood will be the floor of the house.
To strengthen the walls and roof, you need to cut the sling into two equal parts. The edges of the sling are burned to prevent unraveling. Each part is sewn along the walls and ceiling along the edges of the product.
Smaller pieces of fabric are sewn so that they form the walls and ceiling. The end result should be a square shape.
The frame of the house is ready. To make an entrance, you need to make a round hole in the rectangular shape of the fabric. This will be the entrance. It is better to process the edges of the hole or trim it with tape. The fabric itself is sewn from the end of the product. You can simply cover the back wall with fabric, or you can make another entrance there. It is better to make the entrance hole with a diameter of at least 15 centimeters. You can cut a circle by folding the fabric in half twice so that the center of the hole is in the resulting corner. Then cut off this corner at a distance of 7.5 cm from the edge. When you unfold the fabric, you will get a round hole.
Carabiners are sewn to the slings with strong ribbons or laces. The product is ready for use. All that remains is to hang the hammock in the cage at a height convenient for the pig.
There are different variations of hammock houses. They can be made cylindrical or in the form of tents.
Rodents prefer a house more than other types of hammocks because they can hide in it and relax from prying eyes.
Does a guinea pig need a house in a cage?
There are several opinions on this matter. Of course, a guinea pig needs some kind of shelter where the animal can hide when scared, or rest if desired. But as to whether it should be a full-fledged house, a canopy or a sleeping bag, opinions differ.
The choice largely depends on the character of the pet. If the animal is tame, affectionate and willing to make contact with its owner, it is quite acceptable to equip the cage with a full-fledged house.
However, the behavior of the animal should be observed. On forums dedicated to caring for guinea pigs, some owners complain that after the animal was given a house, it became less sociable and began to avoid human society. At the same time, the animal spent almost all the time in the house and categorically did not want to be handled.
To avoid such a situation, breeders advise equipping the guinea pig’s home with a full-fledged shelter no earlier than 2-3 months after the animal appears in the house. During this period, the animal adapts and gets used to the company of people.
As an alternative, it is recommended to equip the cage with a hammock, which will also act as a canopy. Hang it at a low height (about 10-12 cm), and the animal will receive not only a comfortable bed, but also a roof under which it can hide if necessary. In this case, the animal is in the owner’s field of vision and can observe him.
You can make your own home
Simple wire cutters
The most primitive device is very similar to ordinary scissors. Only one of its cutting surfaces is equipped with a small notch with a sharp edge. Using such a device is easy, provided you have some skill and experience. For young dogs, nail trimming is always stressful. They do not want to sit quietly, they strive to tear the paw out of the owner’s hands and in every possible way complicate the process. So Litbro.ru will not recommend such a gadget to novice dog breeders. The risk of causing serious physical injury to your pet is too great. Well, for experienced owners who have used similar tools more than once, nothing better can be desired. Cheap and very effective.
Cost – 35 – 72 rubles.
More advanced versions of hand cutters offer expanded functionality.
Although their main part, in the old fashioned way, is based on two cutting surfaces. Service additions imply only human convenience. Models with rounded ends, a container for cut claws and lighting have proven themselves very well. The fact is that some dogs have the habit of looking for clipped ends on the floor and eating them. Sharp, bent cuttings can damage the stomach wall and cause bleeding. A small “waste collection” effectively solves this problem.
Price – 636 rub.
Another gadget from the line of simple nippers has comfortable ergonomic handles that allow you to securely hold the tool while trimming nails.
This is important when the animal gets nervous and breaks out.
We pay attention to one more detail - the expansion spring. It fixes the cutting surfaces in the open state, which makes the operation somewhat easier.
Otherwise, the functions of the device duplicate all the features of its predecessors. To properly shorten claws, you must have the skill and achieve unquestioning obedience from your dog or cat.
Cost – 229.93 rubles.
Purchased and DIY cage
Whether to buy a cage for your rodent or make one yourself depends on the financial situation and personal preferences of the owners. If you have the finances, you can choose nickel-plated metal products in the store, which will differ:
- long service life;
- spacious dimensions;
- attractive appearance.
Such a cell is almost impossible to damage. As for the materials for making terrariums, the following is used:
- organic glass;
- getinax;
- synthetic materials.
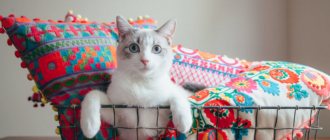
Ryzhik in a hammock
All these materials are durable, hygienic and safe. In addition, they are resistant to mechanical damage and chemical elements.
The bottom of the cage must be strong. It is best if it is made of high-quality and environmentally friendly plastic.
Attention! Cages made from combined materials are not particularly durable. Despite their low cost, it is better to opt for other products. As for the option of making your own cage, here you can build a structure of any size and from different materials
As for the option of making a cage yourself, here you can build a structure of any size and from different materials.
The advantages of making a rodent cage yourself include:
- saving your own savings. You can make a spacious and easy-to-use house for a whole family of guinea pigs;
- interesting shapes and designs. When manufactured independently, the product can be given any shape and different types of structures can be made. This can be a two-level housing with stairs and various shelters;
- aesthetic appearance. Properly designed housing for rodents will harmoniously fit into any room interior.
Another advantage of a homemade cage is that over time you can improve the design by adding new levels or a house.
As for the shape, the animal cage can be made in the shape of the letter L, vertical, horizontal and even multi-story. From the remaining materials after assembling the cage, it will be possible to make a house, a crib, or a feeding trough.
The main thing is to competently develop a drawing, select materials, and stock up on free time.
Moving toys
From the name it is clear that these objects can be moved, pushed, rotated, moved around the cage and beyond.
House keys
It is worth noting that the presence of toys in a chinchilla’s cage is mandatory. In their absence, the animal will have nowhere to expend energy, which can lead to many bad habits. For example, some animals chew out their fur out of boredom.
walking ball
A convenient device that allows the animal to walk around the apartment without the risk of being lost or crushed. It’s better to buy a wheel than to walk around your living space while walking; a lot of tragedies happen, they are quick and you can’t always keep track of them. Walking balls are a fairly new invention. They are available in different sizes for different types of rodents.
The ball is closed with a lid, the animal rolls around the whole house, moving its paws, and the translucent walls of the ball allow the animal to see everything that is happening around it. When purchasing and using a walking ball, ensure its strength and be extremely careful when closing the lid!
Flaws:
- ventilation holes usually cannot provide sufficient circulation of air inside, which is why the animal begins to suffocate after a while;
- Frequent cases of overheating of animals inside such balls are known.
Hanging toys
Initially, such devices were offered for birds, but chinchillas also happily accept these trinkets
Particular attention is drawn to pendants that shake, wobble, rattle and ring - rodents like to push them and swing them from side to side. Sometimes they even try to taste the thing
Toy with a bell
The only disadvantage of rattles is that they create excessive noise, since chinchillas usually like to play in the dark. To prevent the ringing from annoying you, it is better to take the toy out of the cage before going to bed, giving both yourself and the animal a rest.
Rotating wheel
Chinchillas are simply crazy about wheels in a cage - they can run around inside for hours without leaving the product even while sleeping.
There are 4 main types:
- wooden;
- plastic;
- metal;
- aluminum.
Advantages of making a wheel yourself
There are two main reasons why you should make your own wheel for a chinchilla:
- Opportunity to save. A DIY chinchilla wheel is an excellent opportunity to protect yourself from wasting money on a unit that is sold at high prices in pet stores.
- Quality assurance. You will definitely be sure that all the parts and elements of the toy for your pet were made from high-quality materials.
In fact, making your own wheel is not difficult. This way you can express your love and care to the little furry animal.
How to do it yourself
A self-made enclosure will last longer, and the guinea pig will move freely in it. It won't take much time to build it.
What you will need
- Thick cardboard;
- metal mesh;
- cable tie;
- knife;
- scotch;
- scissors;
- pencil;
- ruler.
To protect the surface of the cardboard from moisture, it needs to be covered with several layers of tape. The cells of the metal mesh should be no more than three centimeters.
Manufacturing
Before you start work, you need to decide on the size of the enclosure.
It is important to remember that the larger the area, the more comfortable the guinea pig will feel. Therefore, the minimum dimensions should be:
- for one animal - 100×70 cm;
- for two - 140x70 cm;
- for three - 170x70 cm;
- for four or more - 210x70 cm.
Once we have completely decided on all the measurements, we get to work:
- Draw the shape of the base of the enclosure on cardboard.
- We measure 15 cm on each side and connect the lines. These are future boards.
- Carefully make an incision along the lines of the top layer of cardboard.
- We assemble the frame of the enclosure using the cuts.
- Fold the edges.
- We bend the protruding parts and glue them with tape.
You should end up with a large box without a top. This is the pallet of the future enclosure. Now you need to assemble the sides from the metal mesh. For this:
- Cut the mesh into pieces of the desired size. The height of the walls should be at least twice as high as the pallet.
- The edges are reliably processed from sharp corners.
- The finished parts are connected to each other using cable ties.
- The mesh box is secured to the pallet with cable ties.
The metal case will be inserted inside the cardboard pallet. Therefore, it must fit exactly in size.
Necessary materials
Once the construction of the guinea pig house is finished, you can begin to equip it inside to make it softer, warmer and more comfortable for the animals. Whatever the material is chosen for, for a hammock or for a crib, you should choose only absorbent fabric, since guinea pigs do not use trays, as rabbits can do, for example.
You can use recycled shredded paper, wood shavings, or paper towels to make your cage cozier.
The important thing to remember here is to avoid any wood shavings that may have high levels of essential oils or preservatives, as these may be toxic to pets
Using layered towels or wool can be more effective because the material can be washed and reused. You can get creative and use colors and designs to create a separate little palace for your guinea pigs in the cage. This is the place where they will sleep and hide.
- Multilayer and dense corrugated cardboard,
- Metal mesh or lattice with a mesh no larger than three centimeters,
- Ordinary plastic cable ties,
- Knife,
- Scotch tape,
- Large and small scissors
- Pencils or markers for marking,
- Ruler.
To ensure that the cardboard does not allow moisture to pass through, it must be glued on the inside with tape in two or three layers. Some people prefer to cover the inside with acrylic or even fiberglass. Cardboard is an ideal material - it is light, easy to work with, odorless and harmless, and also easy to find.
After a new and spacious house for a guinea pig is ready, it must be equipped with everything necessary for a comfortable and happy life for the animal. The first thing you need is feeders. It is necessary to have a separate feeder for hay or grass, as well as for dry and succulent food. If there are several pets, then there should be several feeders so that the animals do not compete and fight for food. There should also be several drinking bowls.
You can also make your own drinking bowl and feeder. A bent and fastened metal mesh is a good substitute for a hay manger, and a drinking bowl can easily be made from an inverted plastic bottle. To do this, a hole is punched in the bottle cap into which a regular drinking straw is inserted. The liquid will not spill if the hole diameter is slightly smaller than the diameter of the tube.
You can make a house with your own hands from plywood or durable cardboard, or you can buy a ready-made version in a store.
We suggest you read: How to make a house for a rabbit with your own hands
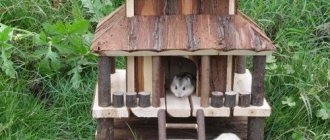
As houses, some breeders use clay flower pots, cardboard boxes, and even wooden bird cages from which the bars are removed. There are quite a lot of options. If the cage is multi-level, several ladders should be installed. They are made from lattice or wood. You can also set up a play area for pigs and place a small labyrinth, several toys, balls or a comfortable hammock there.
Prepare the necessary materials and tools:
- ruler;
- stationery knife;
- small and large scissors;
- markers and pencils for marking;
- plastic clamps;
- scotch;
- metal grid with a cell size of up to 3 cm;
- thick cardboard.
It is recommended to install a plastic tray at the bottom of the structure, which will facilitate the cleaning process and protect the animals from drafts. An alternative option is a pallet made of 8 mm plywood; for this, use the base drawing. The ends of the walls and bottom are glued together with toxic-safe glue. You can also make a pallet from polycarbonate by connecting the structural elements with building corners.
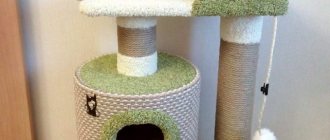
Housing for guinea pigs based on a metal rack
To build a multi-story “cottage” for your pet, a metal rack is suitable. The removable elements of this design can be easily swapped, adjusted in height, etc. If you need a larger house, it is enough to create a single structure from several racks.
One end of the house is covered with plywood or other material. A metal mesh is attached to the other end and back side. It is better to make doors from plexiglass. When building a home for an animal from a metal rack, the shelves are installed upside down to create a kind of pallets.
You can easily give your pet a luxurious home by making it yourself or simply giving an old closet a second life. A properly created shelving structure is not just a comfortable house for your pet. With a creative approach to the construction of this home, it will become a real decoration of the interior.
How to train a guinea pig to a hammock
Accustoming to innovation should be done gradually. You should not place a new device in the cage of a pig that has only recently appeared in the house. To do this, the animal must live in the new place for at least two months.
After installing the hammock, the pet may get used to the update for several days, and then begin to be interested in it. The behavior of the pet after the appearance of the innovation needs to be observed. The pet can immediately start jumping into the new bed. If the hammock is located too high, then you need to identify this in time and move it lower.
If the animal does not show interest in the innovation, then you can lure it with a treat. But you shouldn’t get carried away with the food, as the new place can turn into a dining room.
If your pet gets nervous when new objects appear in the cage, then it is better not to make him nervous. You can try a more modest hammock or skip using one altogether.
A hanging lounger should not be frequently moved from place to place. This can only be done after the pet has completely gotten used to it.
How to arrange it?
Objects inside the home should be well attached to the walls or located on the floor. Inside the cage it is necessary to place a drinking bowl, a feeder, a tray for hay, toys, and wooden sticks. It is also necessary to provide the animal with a place of privacy.
With the help of a drinking bowl, the individual will not splash water onto the litter and will not be able to wet itself. The volume of the drinking bowl may depend on the number of pets inside the cage. If there are a lot of animals, then you can use several small drinking bowls.
There must also be a food area inside the individual’s home. It is necessary to purchase several feeders to sprinkle different types of feed. Green, juicy and tough food should be placed in different feeders.
A rodent that lives at home needs conditions similar to natural ones. The pet needs rough materials so that it can grind down its teeth. You need to put twigs inside the cage, but you shouldn’t put coniferous branches. Branches that have large bones inside the fruits must be dried in advance. You can also put a mineral stone inside the cage.
You can place hanging accessories as they will not cause injury to your pet if they are installed and secured correctly. For example, it is worth taking a closer look at hammocks on which sea pets can relax.
The animal is shy and modest. Next to caring people, the individual will become more sociable and bolder. But your pet still needs an area so that he can have some privacy. Inside the cage you should arrange a secluded corner, for example, a house.
If there are many rodents inside the cage, they will fight for it. Instead of a simple house, you need to put up a canopy or fence the entire cage with good material. Another option is to use a pipe made from compressed hay.
If a guinea pig is constantly hiding inside the house, then it will be impossible to tame it, since inside it the animal may feel isolated and cannot see people. In order for the pet to get used to the person, the house needs to be temporarily replaced with a handful of hay.
You should buy toys for the animal so that your guinea pig can have some fun. With the help of toys, your pet will be able to quickly explore the entire territory of the cage. In order for the animal to move more, you need to constantly change toys.
If you put a ball of hay in a cage, many rodents will be able to pull the straws out of it. But this design will not be convenient for eating. You can put both a special tray and a ball.
These pets feel comfortable in an area that looks like a hole. For this reason, it is necessary to purchase toys that are shaped like a pipe. If several animals live inside the cage, then you need to purchase several pipes. Pipes can serve as a shelter if pets conflict with each other. Also, pipes and labyrinths can make your pet’s life more interesting.
The animal can become interested in various labyrinths for a long time. The main thing is that the rodent is active, as this has a good effect on the pet’s health - it will not become obese.
To learn how to make a cage with your own hands, see below.
HOME AMUSEMENT PARK
If the space in your house allows you, then you can make an entire amusement park for your pets.
Naturally, this requires a territory much larger than a cage, so you will have to organize some kind of enclosure. The fencing materials can be of your choice (maybe even simple cardboard, but pets can chew it off), but the most important thing to remember is that they need to be safe first and foremost, so avoid anything sharp or prickly. Guinea pigs love hay very much, so it can become the main consumable.
They can line the bottom of the enclosure. After which you need to make a house for the pigs. It can be purchased or made with your own hands from a cardboard box or wood
Guinea pigs love hay, so it can become the main consumable. They can line the bottom of the enclosure. After which you need to make a house for the pigs. It can be purchased or made with your own hands from a cardboard box or wood.
Read about how to distinguish a boy from a girl parrot, the distinctive features of different types of parrots.
What is the life expectancy of guinea pigs if you feed and care for them correctly - https://tvoipitomec.com/gryizunyi/skolko-zhivut-morskie-svinki-v-domashnih-usloviyah.html
A pet needs to hide somewhere if it gets scared of something. You can put several cubes in the enclosure that will be connected by bridges; you can also make them yourself. The shape can be chosen by you, it depends only on your imagination. Organizing several levels in an enclosure would also be a very interesting idea.
These levels can again be connected by bridges or tunnels. They can also be made from twigs, hay, cardboard, or, as a last resort, bought at a pet store. You can put several balls and small soft toys in the enclosure, and install a mirror.
Guinea pigs, by nature, love to burrow in the dirt or sand. So give them this opportunity! Find a place where you can pour enough sand or soil, and let them dig to their heart's content! You can also hide a few seeds or nuts there to arouse even more interest in your pet.
You should, of course, take care of water for your pet. During its stay in the enclosure, the pig will not get too hungry, but it will want to drink, because it will constantly run around.
Video: choosing a cage for a pet
https://youtube.com/watch?v=KTXQWy8M9jA
Pets have their own opinions too
You shouldn’t expect your pets to accept any idea you have with great joy. Not all toys will be to their liking, regardless of whether they were made with their own hands or bought for a lot of money.
Each pig, like a person, has its own characteristics and whims. Try to remove for a while what does not cause her much interest at the moment, and after a while put it back. Maybe the animal was simply not in the mood.
If you still don’t show interest, you can try giving the animal a stimulus—a treat. You can put some fresh fruit at the end of a tunnel or staircase, and make a path of seeds in the maze. At least in this way, they need to be attracted to physical activity so that they do not become obese.
Decorative guinea pigs are wonderful animals, they will not cause you much trouble. But if you decide to get such an animal, be sure to remember that they are very active.
It is important for them to engage in physical activity and somehow spend time while you are not around, so try to organize leisure time for your pet as much as possible
Instructions for creating a children's house with your own hands
So, the most common option, perhaps, is to make houses from wood. Let's look at the instructions that will help us recreate it with our own hands, creating a safe and interesting play space for the child.
We decided to make a house of a traditional type and small size, having the following parameters: 160 by 160 by 140 centimeters. The height of the ridge of this structure will be only 90 centimeters. So let's get started.
Drawing No. 1
Drawing No. 2
Drawing No. 3
Drawing No. 4
Step No. 1 – collect the necessary materials
A wooden house for a child is a small analogue of a serious structure, so its construction should be approached in the same way as you would approach the arrangement of a real-size house. To assemble such a real small house, you need to first stock up on some materials. Namely:
- foundation blocks, 4 pieces;
- timber for laying the floor, 11 pieces;
- floor boards, 4 pieces;
- timber for roofing, 5 pieces;
- edged boards.
- lining for finishing;
- figured platbands;
- furniture panel;
- ondulin for the roof;
- paint of the desired shade;
- mounting angles;
- beam holders, 6 pieces;
- screws;
- nails.
You also need to prepare a traditional set of construction tools, and you can get to work.
To create a house, stock up on lumber
Step No. 2 – install the foundation and assemble the floor
Before starting major work on the foundation, it is necessary to fold the frame, connecting the beams together. It will be the standard for the rest of the work associated with creating a house for a child.
First, we connect the boards, turning them into the frame of the future foundation of our house
The base must be aligned diagonally and reinforced with metal corners.
Next, we find a flat place on the site, place a frame on it, and mark points on the corners of this frame. At these points, recesses are dug, inside of which we will later place blocks for the foundation.
Blocks for the foundation will then be placed at the corners of the frame.
So, we place our blocks in the dug holes. Each of the recesses must first be filled with sand approximately the size of the bayonet of one shovel.
The laid blocks and the frame placed on them will need to be isolated from each other, covered with a layer of waterproofing.
Connecting the frame and foundation
The finished frame is sewn up with cut boards, which we previously prepared to create the flooring, and we get a fully assembled lower segment of this house.
Prices for popular models of jigsaws
Jigsaw
We have a stable floor for the future house
Such security, in turn, will maximize the service life of the structure being created.
Step No. 3 - create a frame
Now we need to build the frame of the future house. First, on the surface of the newly created floor, you need to create markings for attaching the timber.
Consistently attach beams to the floor surface of the house, creating a frame for children's housing
By analogy with the image presented in this step, you will need to sequentially fill the timber, measuring its individual parts. Do this carefully, as the rafters will then be placed on top of the frame.
Step No. 4 - install the rafters
We make markings, only this time for the rafters. We attach ready-made, pre-assembled rafters, in the amount of three pieces, onto a securely fastened frame.
We fix the rafters on the previously assembled frame
Step No. 5 - sheathing
Now we have to cover the house. Using lining, it is necessary to fill the empty space in the finished wall frame.
The frame is covered with clapboard, and the roof is covered with carved boards
The roof of the roof is sheathed with carved boards, and the outside is lined with ondulin, laid on both sides of the canopy. It is very convenient to cut ondulin with a grinder.
Ondulin is an ideal coating for the roof of a children's house
Step No. 6 – decor
As you remember, we stocked up on carved frames. Now is the time to decorate with them:
- doorway;
- window openings.
We decorate the corner parts of the outer side of the building with curly overlays.
Overlays and curly trim will help give the house an elegant look.
Step No. 7 – arranging the interior
So that the children have something to play in the house, install homemade tables and benches inside, having previously treated them against parasites and carefully sanded them so that they do not accidentally get a splinter. In principle, you can install a purchased set of children's furniture inside.
The house must be filled with some kind of furniture for the convenience of children
Basic requirements when creating a cell
A guinea pig needs a spacious home in which it can move freely and have fun. In addition, the parameters of the cage must be such that the animal can be safely taken out or put in.
At the same time, the enclosure must be durable, since a domestic rodent can chew through not only cardboard, but also wood. The most advantageous option would be a housing with a plastic bottom and an easily removable upper part.
It is very important that the rodent cage meets the following requirements:
Smooth, smooth ceiling, floor and walls. They must also not contain cracks or burrs. Ease of care. Cleaning the home, removing dirt, disinfecting and feeding should take place in maximum accessibility and comfort. Access to light and air. There should be constant daylight and fresh air flow. To keep several animals you need to have several cages
This condition is important to prevent disease outbreaks. In this case, the blocks will be difficult to disinfect, unlike a separate cell.
Drinking fountain
Such a device can serve not only to quench the thirst of animals, but also become an original accent in the home interior. The design consists of a water bowl, a filter, a diffuser and a drinking bowl located at the top. Additionally, it is equipped with a decorative sprinkler, especially popular with native breeds (Maine Coons, Kuril Bobtails, Siberian cats).
Continuous circulation of liquid is ensured by a mini-pump powered by a USB cable. More advanced models may contain backlighting and an indication of the level of remaining water in the tank.
Cost – 2400 rub.
Making a cardboard house
To make a structure from sheets of thick cardboard, you will first need to make drawings. The steps are similar to the process of making a house from wooden plywood. But in the case of cardboard, you will need a safe, non-toxic glue instead of nails. The advantage of cardboard is the ability to make carved decorations without much effort. A house decorated with beams and carved elements looks more attractive
It is important to remember that the glue must be allowed to dry completely before using the finished product for its intended purpose.
Corrugated cardboard can be used as a material.
Manufacturing procedure
To prepare for work, a diagram is made taking into account all specific dimensions. You can take any drawing of a rack or shelf as a sample. Substitute your dimensions, making sure to check whether the rack will fit in the space allocated for it.
Rack drawing
Don't make the shelves too deep, as this will make cleaning difficult. The distance between floors should be sufficient so that the pigs can stand on their hind legs if necessary. Once the drawing is ready, start manufacturing:
The finished diagram is transferred to the material using a marker with a ruler. To cut parts from wood, use a jigsaw or hacksaw. If necessary, a frame is assembled from wooden blocks. The base and ceiling of the second floor are treated with silicone sealant or other waterproof impregnations. Another option is to purchase plastic trays for the filler, but it is not always possible to find the right size. The side walls are attached to the base using tie screws or self-tapping screws. Large ventilation windows should be installed at the first floor level. The side windows are covered with a mesh, which is secured with screws. The ceiling of the second floor is installed, a hatch hole for the ramp is made in advance. The top floor can be left open for better ventilation; the absence of a ceiling will also make cleaning easier
It is important that the walls are higher than 30 cm, then the pig will not be able to jump out and hurt itself. If you decide to close off the second floor, you can use drop-down plexiglass doors. It is recommended to attach all doors to furniture hinges. Inside the rack you must place several shelters for resting and sleeping, preferably one for each animal
The pig will also like shelves and elevations. Don't forget about toys - otherwise the rodent will take on the parts of its home. In order to make it convenient for the animals to climb to the second floor, it is better to install not a wire staircase, but a ramp - a flat, wide board with glued slats.
Shelf with additional lighting
The rack itself must be placed at a sufficient height, at least 15-30 cm, otherwise the animals will be exposed to drafts.
The solution may be to install the product on a bedside table, which can be conveniently used for storing litter, hay and other accessories for caring for pigs. If there is insufficient lighting at the location of the rack, it is recommended to provide additional lighting. Attach hanging fluorescent lamps on each floor.
Minimum requirements for conditions of detention
Before getting a guinea pig, it is important to create the necessary conditions for it. It is worth taking care that the animal does not become exhausted from lack of space.
Do not forget about the need to regularly ventilate the room in which the cage with the rodent will be located. However, drafts are prohibited for the animal
It is important to take care of good lighting, given that direct sunlight can harm your pet.
When the location of the enclosure has been determined, it is time to figure out what apartments the animal needs. It is not easy to name specific parameters, because they are individual for each guinea pig.
But it is important to consider the minimum requirements for a comfortable stay for a pet:
- 40x80 cm - the smallest dimensions of the cage, with a height of 50 cm;
- presence of a pallet. This condition will make the cleaning process easier. But you should not choose a container that is too deep, as the animal will lose the opportunity to look out;
- It is forbidden to neglect safety. Any chips, defects and cracks can cause harm to the guinea pig;
- convenient feeder. Practice will help you choose the right kitchen equipment for your animal. Some people prefer floor-mounted bowls, while others prefer pull-out or outdoor designs. The main thing is that it is convenient for the pet to eat, and he cannot turn the feeder over, spilling its contents;
- presence of hay. Hay is an essential nutritional supplement in a guinea pig's diet as it is the main source of protein. If there is such a piece of furniture for the pet, we will not scatter food throughout the cage;
- drinking bowl A guinea pig can use either a special device or a simple bowl. However, it is better to give preference to an automatic drinking bowl. This way, debris and pollution will not get into the water, and the litter will remain dry;
- filler. For rodents, compressed wood pellets are best. This filler absorbs moisture, eliminates odor and is used sparingly;
- house. Not a single living creature would refuse to rest in peace and quiet. Having a house in a cage will help the animal hide from the surrounding noise and get some sleep.
Advice from experienced professionals
So, making an economy apartment for your pet on your own doesn’t seem difficult. But owners and breeders with decent experience in keeping rodents are advised to listen to the recommendations for home improvement:
- It is advisable to use a plastic tray at the bottom, which the animal cannot chew through. Alternatively, using a base pattern, the bottom and sides can be made from polycarbonate, connecting the sides with construction angles. Or make it from 8 mm thick plywood, gluing the ends together with non-toxic glue. By spending a little more money, the owner will make the cleaning process easier.
- The grid cells should not be larger than 2.5 mm. This is due to the safety of the animal.
- All internal surfaces of the home should be free of cracks.
- For comfortable adaptation of a new friend, it is advisable to cover 2-3 side walls with opaque material (cardboard, thick fabric) for the first weeks of keeping. The animals are shy and sudden movements can frighten them. As you get used to it, the fences are removed to allow natural sunlight to penetrate.
- For pets who practice walking around the apartment, during the installation process it is necessary to consider a door for free entry and exit.
- For multi-level rodent apartments, wooden ups and downs along the edges should be covered with thin planks, marking the edges. If a pig falls, even from a small height, it can cause injury.
Having arranged the cage, you need to take care of the contents. The filler for the bottom and bedding should be the one your pet is used to.
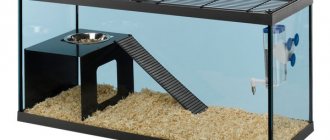
A spacious, comfortable enclosure for a family of rodents with two levels, equipped with a sleeping area and a corner for hay. The feeder and drinking bowl are cleverly located in different places, pushing the animal to overcome obstacles.
Three-room apartment for a rodent. The area for sleep, rest and active games is demarcated. The cage is designed for a large family.
Residential complex for an energetic pet. The ascent with a tunnel, a large hay barn, toys and manholes are conducive to achievements and conquering peaks.
Like any living creature, a guinea pig deserves a comfortable home filled with a variety of accessories. By making a pet cage with your own hands, the owner will express love and care.
Why do rats use shelter?
Tame domestic rats may use the cage house quite rarely, but this does not mean that they do not need it. All pets need shelter at certain times.
Stress
Even very tame rats are frightened by unfamiliar people, changes in their usual routine, and loud noises. Without a place to hide, your pet will develop stress, which can lead to aggression.
Bad mood, malaise
If an animal feels unwell, it feels an instinctive need to hide, to make sure that it is reliably protected.
Paper bag
A very unusual and simple option for housing a pet. You just need a package that should be placed in the cage and the pig will immediately take a liking to it. Rodents will be happy to tinker with it, making rustling sounds. To support the walls of such a house, add hay. It should be remembered that housing will quickly deteriorate. This is due to the fact that the paper gets wet very quickly and the house needs to be thrown away. The bag can also be used as bedding by tearing it into small pieces.