Cats 25002
Thanks to an automatic feeder, your cat will always have enough food. This is especially necessary if you plan to be away from home longer than usual. An automatic feeder will ensure that your cat is well-fed. But where can you get such a miracle device? Option one is to buy. The cost of such feeders depends on the configuration, manufacturer, type and ranges from 900-12,700 rubles.
Option two is to make an automatic cat feeder with your own hands from available materials. This method will help you not only save your family budget, but also show your creativity.
What is an automatic feeder
An automatic feeder is a device that will automatically pour food into your cat's bowl. The most important part of the design is the tank, where a lot of feed must be poured in advance. There is a pipe attached to this tank. The food will flow through the pipe directly into the bowl.
Automatic feeder allows your cat to eat at any time
Some industrial models have a built-in timer: you can set the feeding time on it, and then the food will go into the bowl at the right time. This is useful for those pets who are recommended to feed by the hour.
Types of automatic feeders:
- simple mechanical;
- electronic;
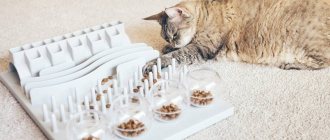
- "puzzle";
- with several compartments for dry and wet food, for water;
- with dispenser;
- with timer;
- with remote control;
A DIY cat feeder is a great gift for your beloved pet.
Thanks to the dispenser, the cat will not overeat
Description and mechanism of action
An automatic feeder is a device for feeding a cat without human presence. It is a large plastic container of various shapes and sizes, which the owner fills with dry or wet food.
A device is connected to the container that allows you to dispense a dosed amount of food to the animal. The feed supply mechanism can be varied:
- in the form of a round container with a lid, divided into segments, which are filled with food for one meal;
- trays with lids that open when signaled by a timer;
- dosed feeding of food from a large container into a bowl.
Advantages of automatic cat feeders
The feeder (automatic feeder) has many advantages. Many owners strive to make such a feeder themselves or purchase it in a store.
Automatic cat feeder with timer
Pros:
- Suitable for cats who are prescribed a diet, such as split meals.
- Dust, dirt, and excess moisture do not get into the food.
- The food won't dry out.
- The design with 2-3 compartments allows you not only to pour food in advance, but also to pour drinking water.
- You can put a lot of food in the feeder so that the cat can eat it for 2-5 days.
- There are feeders that allow you to pour a large amount of food, which will last for 90 days.
Automatic feeders with a large supply of food will help when the owner needs to leave for several days. In such cases, you need to choose a model with a built-in drinking bowl so that your pet always has fresh water.
Important! An automatic feeder is convenient if the owner does not like to get up early to feed the cat.
Such a device will be useful in a house where several cats live: all pets will be able to eat whenever they want, and there will be enough food for everyone.
Feeder "Puzzle"
We are fed well here too: an automatic cat feeder
You have decided to get a cat. Many questions immediately arose: what food to choose, litter for the toilet, how often to bathe and others. Your pet’s health, appearance, coat quality and life expectancy depend on nutrition. It is not uncommon for cats to live more than 20 years with good care. Not only the diet matters, but also the dishes from which your pet will eat. Let's try to choose the appropriate option.
Tools and materials
DIY play complex for cats
To make an automatic cat feeder with your own hands, you will need the following tools and available materials:
- plastic bottles;
- food containers;
- scissors for cutting metal;
- office supplies: knife, paper clips, eraser, clips, scissors;
- scotch;
- electronics (for a feeder with a dispenser).
Bottle device
Individual product to order
What if you don’t have the time, patience and desire to do it yourself?
Then order an exclusive version of the feeder from the professional craftsmen, which will suit you in all respects:
- Stylish
- Color
- Material
- Size
- Quality
- Reliability
- Environmentally friendly.
Such cat furniture can have only two disadvantages - long production time and high price.
A simple automatic feeder made from plastic bottles
Drinking bowl for cats: do-it-yourself automatic fountain
The simplest model can be made from ordinary plastic bottles.
Materials:
- plastic eggplants (bottles) with a volume of 5 liters - 2 pcs.;
- stationery knife;
- awl;
- scissors;
- glue;
- lace or rope.
Step-by-step instruction:
- Cut off the bottom of one of the bottles.
- Cut a spatula or scoop from the bottom.
- Cut 2 holes in the second jar. Their size should be equal to the height of the bowl spatula.
- Insert the spatula into the hole inside the bottle.
- Secure the structure with glue or rope.
- Add dry food.
This design is only suitable for feeding dry food.
Feeder with dispenser saves time
There is an easier way. Tools:
- food container;
- plastic bottle;
- stationery clip and paper clips;
- ball or small toy;
- scissors;
- rubber;
- stationery knife;
Step-by-step instruction:
- Trim the bottle so that its length is equal to the height of the container.
- Make a hole at the bottom of the container to insert the neck of the bottle.
- Make 2 small holes in the lid.
- Connect all the parts.
- Tie a rubber band to the ball or toy, pull it through the bottle and secure it to the holes in the lid.
Pour in food and secure the structure at a low height. Place a bowl below. The cat will touch the ball or toy, then the neck will open and the food will pour into the bowl.
Important! The kitten will love this feeder.
With a do-it-yourself dispenser
Interesting models, useful and affordable
In the online store you can buy a ready-made stand for bowls from well-known manufacturers, including wooden ones.
Their base is made to suit any color, taste and budget:
- made of plastic;
- bent plywood;
- metal;
- cast iron;
- combined materials.
You can buy universal racks with stainless steel plates. The height of such products is adjustable to suit any pet’s height. Tripods are in demand among dog owners.
How to make a cat feeder from plastic pipes with your own hands
An excellent feeder with a large supply of food can be made from fan or plastic pipes.
Materials:
- straight plastic or fan pipe 1 meter long;
- board 1 m long;
- fastening - 2 pcs.;
- corner 90° - 1 pc.;
- corner 45° - 2 pcs.;
- cover - 1 pc.
Progress:
- Assemble the 45° and 90° angles and attach them to the lower end of the pipe.
- Attach a second 45° angle to the top end of the pipe and cover it with a lid.
- Attach the fasteners to the wooden board and insert the pipe into them.
- Sand the edges of the bottom 45° corner with sandpaper until they are smooth, otherwise the cat may get hurt.
- The pipe is attached to the wall. It is necessary that the pipe be covered by a canopy.
- Cat food is poured through the top hole in the pipe.
The pipes make a very convenient device
Useful homemade products
Murka owners demonstrate skill and design abilities, and use the ingenuity and artistic taste of all family members.
For example:
- There is a box made of thick corrugated cardboard. In this case, you can make a stand out of cardboard. Cut three identical rectangles from flat sheets - this will be the top and main part of the stand. Choose the size of the base taking into account the diameter of the cat's bowl.
Glue the blanks together. Then wrap it with self-adhesive film. Glue wooden cubes instead of legs. Or attach the craft to the wall using corner brackets. The cardboard stand or shelf for cat dishes is ready. - There is a piece of furniture board sitting idle in the closet. Make a wooden table for your cat from it yourself.
- Of course, this also requires a tool.
- And to make the craft look no worse than the store-bought one, try and apply creative skills:
- Make a drawing on paper or directly draw it on chipboard;
- Cut out blanks from furniture panels;
- Assemble the product using self-tapping screws and a screwdriver;
And then wood putty, sandpaper, and moisture-resistant paint in the color you have in mind will help. Patience and inspiration will also come in handy.
Automatic watch feeder
An original feeding structure can be made from an old watch.
What you will need:
- quartz wall clock;
- bowl with compartments - 1 compartment in the middle and 4 along the edges;
- wide iron or plastic jar;
- board or block of wood;
- thin sheet of plastic or plywood;
- clay (environmentally friendly);
- rubber suction cups;
- scotch;
- scissors for cutting metal;
- pliers;
- nails - 2–3 pcs.;
- file;
- small battery in working order;
- flexible copper wire;
- lighter;
- felt-tip pen.
All starting materials must be environmentally friendly, without harmful substances.
How to do:
- Remove the mechanism from the watch.
- Cut the bottom from a wide metal or plastic can. The height of the sides should be about 3-4 cm. First you need to mark the line with a felt-tip pen, and then cut the metal with scissors or wire cutters.
- Using a file, polish the sharp edges of the cut bottom so that it is impossible to get hurt on them. If the jar is plastic, the edges can be made smooth by melting them with a lighter.
- Cut a small cube out of wood and insert it into the clock. This cube should be positioned so that the clock hands rise above the jar.
Now you need to prepare the feeder itself. To do this you will need a bowl with compartments. It can be made from clay, then wait until it hardens, and then bake it in an oven for 2-3 hours at 200 °C.
Important! The bowl should fit in the jar.
DIY watch feeder
How to connect all the parts to make a feeder:
- Fold the hour hand in half and secure it to the mechanism located inside the wooden cube using tape.
- Insert the battery into the mechanism. And use wire to attach its mechanism in the central compartment of the bowl.
- Cut a circle out of plywood or plastic. This is the lid of the feeder. Make several holes in the center of the circle for the screw that holds the arrows. On one side of the circle, cut a hole equal in size to one compartment of the bowl.
- Hammer 2 nails into the lid. The distance between them should be equal to the length of the arrow bent in half. Cut off the sharp ends of the nails.
- Cut another cover from plywood. Remove the fastening that holds the second hand from the clock and attach it to the underside of the plywood cover. Insert the second hand into this mount, cut it evenly and seal it with tape.
- Connect the feeder and the lid. Attach rubber suction cups to the bottom so that the structure does not slip on the floor.
You can decorate the feeder. Pour food into it and offer it to the cat.
Rattle feeder
When making such a feeder, the emphasis is not on the automatic delivery of food, but on involving the cat in the process of getting it. The design is made from simple and affordable materials, the whole process will take no more than 10-15 minutes. To work, you will need a minimum of materials - a plastic container with a volume of 5-6 liters or a container with thick walls, a stationery knife, a lighter. The manufacturing process is as follows:
- First, you need to make many wide holes in the container. The size of the latter should be such that the cat can easily insert its paw into them.
- The edges of the resulting holes will be very sharp. To protect the animal from injury, you should singe them with a lighter. Then you need to pour food, various treats and toys inside through the neck.
- The result is a rattle toy containing not only food, but also various items for entertainment. The success of such a product is guaranteed.
Automatic feeder with servo motor
A do-it-yourself cat feeder with a dispenser will allow you to measure out precise portions of food and serve it at the appointed time. You can make such a device yourself using a servo motor.
Tools:
- simple servo motor;
- continuous servo motor;
- Arduino controller;
- encoder KY-040;
- power supply 12 V, 1 A;
- auger 10 cm high;
- PVC tee with a diameter of 15 mm;
- alphanumeric LCD display based on HD44780 controller;
- button;
- hot glue;
- drill;
- jigsaw;
- food box (plastic, with high sides);
- mounting box made of MDF 9 mm thick.
With dispenser
Master Class:
- Take a ready-made auger or use an auger from an old meat grinder. Attach the continuous servo motor to the base of the auger.
- Test the mechanism inside the tee. If it works well and without interruption, secure it in the tee with glue.
- Cut 2 square holes in the MDF box (for the servomotor and for the control panel display), as well as 3 round ones (for the auger).
- Find a suitable panel on which the feed button, LCD display and encoder will be installed. Attach the structure to the box.
- Attach a small spoon to the servomotor bar for stirring food.
- Attach a food box to the body.
- Assemble electronic components using the Arduino system. Solder all components with a soldering iron.
To set a timer, you must first press the encoder, set the time, turn the encoder and press it again, confirming the action.
Making a cat feeder with a dispenser with your own hands will require skill from the owner and some material costs, but it will pay off well.
For your information! In stores, such feeders cost about 12 thousand rubles and even more.*
Plastic product
This version of the cat feeder can be called the most popular today. It would be fair to classify the device as mechanical, because it does not have sensors, timers or other modern options. But as the amount of feed decreases, it is automatically added to the container. These designs have the following advantages:
- ease of manufacture;
- requires minimal investment of time and money;
- The products are highly efficient.
Making a plastic pet feeder doesn't require many tools. It is enough to take two containers, the total volume of which will be in the range of 5-7 liters, an awl, scissors, and tape. The step-by-step procedure for assembling the structure is as follows:
- Take one bottle and cut off the bottom. The height of the latter should be approximately the length of a finger.
- Cut the resulting container on one side so as to completely cut off the wall. The walls on the other two sides also need to be shortened, and the fourth side must be left unchanged.
- Then you can start working with the second container. On one of the sides, near the bottom, a hole should be made, the height of which will correspond to the same height as the sides of the first pallet.
- Insert the tray into the resulting hole.
- Cover the formed structure with tape. It is desirable that the parts fit as closely as possible to each other. This is necessary to improve the stability of the product.
The automatic feeder can be considered ready, now you just need to fill it with food. The resulting design is best suited for dry food. If an animal eats natural products, it makes no sense to put porridge or minced meat in a container, because such food quickly disappears. In addition, the food will stick to the sides of the feeder, making it difficult for the cat to get it out.
Dry food for this product is the most suitable option. Today, the market for pet products is saturated with premium foods, so every caring owner will be able to choose something suitable for their pet.
Automatic feeders of industrial production
You can find a variety of models of automatic animal feeders on sale. Many devices are equipped with a dispenser, timer, dispenser and even a sound signal. The best are considered:
- Catit Senses;
- Smart HD Pet Feeder PF03;
- Stefanplast Break Reserve;
- Feed-Ex PF100;
- Petwant PF-102 White;
- SITITEK Pets Ice Mini;
- 4SITITEK Pets Pro Plus;
- SITITEK Pets Tower-5;
- Ferplast Cometa Bowl;
- Petwant PF-105;
- Beeztees Cat Mate C3000;
- Triol;
- Cat Mate C50;
- Trixie.
Criterias of choice
The automatic feeder is selected based on the needs of the animal. In this case, the following criteria must be taken into account:
- Size and weight of the animal: the larger it is, the more food it needs.
- Find out in advance how many feedings the feeder is designed for.
- For a pet with an excessive appetite, feeders with a timer, dispenser and dispenser are suitable.
- If the cat eats enough food and does not overeat, you can make it a regular feeder.
- The structure must be strong and stable.
- The device must be made of environmentally friendly materials - metal or food-grade plastic.
Two bottles make a simple but convenient feeder.
The cat must quickly find a new “miracle of technology” on its own, so the automatic feeder is placed in the pet’s usual feeding place.
Important! Before leaving, the owner must carefully check the condition of the device. It needs to work perfectly.
How to care for an automatic feeder
Regular cups are easy to wash immediately after feeding. Caring for an automatic feeder is a little more difficult. About once a week they need to be taken apart and washed thoroughly. Once a month, disinfect all its parts with a baking soda solution.
Important! It is always necessary to ensure that pieces of food do not clog the passage in the feeder, otherwise the cat will not be able to eat, and the food will begin to rot inside the device.
There should always be a cup of water next to the feeder. If there are several cats in a family, then each will need a separate automatic feeder. However, some cats can take turns eating. In this case, you need to give them more food.
A DIY cat feeder will be a great gift for a pet and will make life easier for overly busy owners: their pets will always be fed to their fullest.
*Prices are as of February 2022.
Rules of care
An automatic feeder is a very convenient design, and if it is made by hand, it is also budget-friendly, so we can confidently say that the device is beneficial in all respects. But it is necessary to take into account that the feeder is different from ordinary bowls; when caring for it, you need to adhere to certain rules.
Such units must be thoroughly washed. Residues of food can get stuck in the cracks of the structure and remain on its walls. Because of this, a large number of bacteria will accumulate in the feeder, which, if they enter the cat’s body, can provoke the occurrence of various pathological conditions, for example:
- disturbances in the functioning of the pancreas;
- acne on the chin;
- vomiting, stomach upset;
- lesions of the oral cavity.
Each animal should have its own feeder. Of course, if cats live together and are ready to eat from the same device, this is very good. However, cats are often jealous of their dishes, so it is advisable to make a separate copy for each pet.
If your pet eats dry food, there must be a container of clean water next to the feeder. Since the animal will not only eat, but also play, the likelihood of fluid loss increases. It must be replenished.
It won’t be difficult for a caring owner to spend a little free time to make an automatic feeder for his pet. Any cat will be happy with such a gift and will repay the owner with affection and warmth.
Thanks to an automatic feeder, your cat will always have enough food. This is especially necessary if you plan to be away from home longer than usual. An automatic feeder will ensure that your cat is well-fed. But where can you get such a miracle device? Option one is to buy. The cost of such feeders depends on the configuration, manufacturer, type and ranges from 900-12,700 rubles.
Option two is to make an automatic cat feeder with your own hands from available materials. This method will help you not only save your family budget, but also show your creativity.
