Unlike dogs, cats do not need a collar as much, but thanks to this accessory, a lost pet can be returned to its owner. Therefore, many owners of these animals are wondering how to make a collar for a cat with their own hands before going on vacation with their pet, for example, in the country.
Today, a cat collar also acts as one of the fashionable jewelry, complementing the unique image of this graceful animal. In this regard, special photo sessions for cats have gained relevance. But the most impressive thing is the unique DIY cat collar.
Making such an accessory yourself is quite simple. It is important that the pet feels comfortable. The collar should not squeeze the neck or have sharp edges. In addition, the decoration should be stylish, matching the animal’s fur, color and character.
How to make a cat collar with your own hands
Most owners love their pets very much, and some, especially girls and women, also strive to somehow additionally decorate their kitten.
For example, a haircut, a bow on the tail or a decorative collar. Many cat owners are looking for beautiful collars for them in pet stores, and needlewomen prefer to make some kind of cat decoration with their own hands. In general, a cat does not need a collar, the exception being a flea collar for animals that go outside. However, it is so nice to see your pet in a new outfit.
DIY cat collar
Despite all of the above, there are plenty of people who like to dress up a furry family member, as well as ideas for creating a decorative cat collar.
The most important rule when creating a collar is that it should under no circumstances interfere with or choke your pet.
Otherwise, seeing the owner with decoration in her hands, the animal will urgently hide in hard-to-reach places.
You can create a collar from anything - from scraps of leather, sewn from thick fabric, beads or beads, from chains, woven from elastic bands, knitted or crocheted - there are a lot of options.
collar collar
Such a collar can be made extremely simply and quickly, and most importantly, it will be simply irresistible to any cat. The master class below will show you how to make this decoration.
This stylish cat collar requires only a shirt and scissors. The shirt can be absolutely any, plain or checkered, worn or initially not the right size for the owner. In other words, a shirt that no one will wear again. An excellent method for recycling old clothes.
First of all, you should remove the tag so that it does not cause discomfort to your pet.
It is convenient to cut a buttoned collar in a circle, being careful not to touch the threads, otherwise the product may become frayed over time. If desired, you can sew the edges by machine or overcast them by hand.
You can surprise your friends and neighbors with such an unusual design. It is important that the selected shirt matches the pet’s fur well in tone, then its image will be simply flawless.
Beautiful collars for cats: interesting ideas, master class
Great skill is not required to create a collar, so even a beginner can do it. However, it is worth considering that the collar is being made for a cat or a kitten. Depending on the size of the pet, you can make a thick or thin collar. If your pet is walking outside and the collar is supposed to reduce the chances of catching a cold, then a thicker version will do; a thin collar will not be as effective.
So, to create a collar you will need to choose a material (something natural is best, synthetic materials can cause allergies in the animal and wearing the collar will not be safe).
If the collar is made of beads, beads, chains or something like that, you will need to put fabric under it, otherwise it will cling to the pet’s fur. An everyday collar should be easy to put on and use. A ceremonial collar, which the animal will wear occasionally, can be made more sophisticated.
The length of the collar is calculated as follows: it is necessary to measure the circumference of the animal’s neck and take into account that a finger must fit freely between the collar and the neck.
Collar made of leather or fabric
Materials:
- A piece of leather (or thick fabric)
- Rivets (can be used as decoration if desired, can be placed in the studio)
- Fastener (buckle, hook, button and more)
- Decoration (rhinestones, bows, bells and more)
Making a collar from ready-made materials is very simple: a strip of the required length is cut out of leather or fabric, the edges are processed if necessary, decor is glued or sewn onto the strip, and a clasp is attached. The collar is ready and can be used.
Collar made of rubber bands
Weaving from rubber bands is a new technique that is quickly gaining popularity.
The simplest collar can be woven even on your fingers! One elastic band twisted in a figure eight is put on two fingers, and then two elastic bands in the usual way, then the loops of the lower elastic band are removed and thrown forward, then another untwisted elastic band is put on, and the lower one is removed and reset, and so on to the desired length.
How to crochet
Any pattern will be suitable as a basis, for example, cast on 90 air loops, and in the second loop, knit a chain with double crochets in the opposite direction. At the end, a lifting air loop is made and everything is knitted back with a single crochet. At the end - again an air lifting loop and another row of double crochets. All that remains is to decorate the finished collar.
For fleas
It is not recommended to make flea collars yourself, as they work thanks to insecticidal and acaricidal impregnation. And if you spray this impregnation on a regular collar at home, there is a risk of poisoning your pet. It is better to buy a special collar at a pet store so as not to inadvertently harm your pet.
How to use a cat collar and what problems you may encounter
Using the collar is very simple: you need to put the device on the animal’s neck and mechanically fix it with the means available for this. Ideally, the cat should not be able to remove the cone from itself, nor should it be able to reach an area of the body that should remain untouched. But in some cases this may be difficult.
The author of these lines lives with a wonderful red cat of the European common breed. She is very small: weighs 3.5 kg at 5 years old with excellent nutrition and the absence of any parasites. I adopted her as a kitten in very poor condition and treated her for a long time: first for her ears, and then for allergic dermatitis. I had to buy a cone at the stage of treating the ears so that the animal would not scratch them. I bought the cheapest cone, plastic, “transparent”. There was no way for the cat to scratch its ears. The same cone helped after sterilization. But later, dermatitis appeared on the animal’s back and tummy, which my pet regularly bit and licked, leaving open wounds on itself. And the cone did not help, because, stretching out, she easily reached the lower abdomen, individual areas closer to the tailbone and the outer side of the thigh. In this case, the cat simply removed the larger diameter cone, being very miniature. Fabric cones with Velcro did not help either: with them it turned out exactly the same.
I had to sew her homemade clothes from the trouser legs of old long johns, which simply covered all the affected areas. The cat licked and scratched the clothes, but did not touch the wounds themselves. As a result, with good nutrition, within two months all the wounds healed and began to grow over with hair. As it turned out later, there is a separate category of products - postoperative fabric blankets, which are created just for such cases.
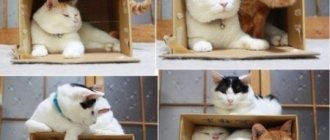
Postoperative fabric blankets - a possible alternative to a veterinary collar
A collar chosen to fit will not interfere with the animal's drinking and eating. At the same time, certain inconveniences during movement cannot be ruled out: some animals quickly adapt to the collar, while others are disturbed by it, but these are temporary difficulties and they are not critical. As a last resort, you can use a blanket or a homemade collar.
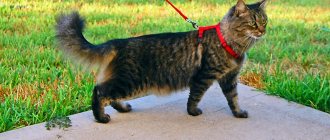
Why does a cat need a collar, leash or harness?
Even the most phlegmatic domestic cats are happy with the new experiences that a walk gives. And if your pet has an active temperament or has lived on the street in the past, he may feel sad, sitting in the apartment all day long. In order to make walking with your cat safe and comfortable, special devices come to the rescue: a collar, a leash and a harness.
Walks give cats many new experiences
Collar
Some owners purchase anti-parasitic collars for their cats, which the pets even wear around the house. But for a walk you need a more reliable collar with a strong clasp.
If your cat walks, as the saying goes, on its own, you need to choose a comfortable collar for it that will not allow the animal to get caught on protruding dangerous objects and will not fly off during active movements. In addition, the collar must have a mount for an address book on which you can write the cat’s name, your phone number or address. If the pet gets lost or gets into trouble, the people who find it will be able to return the poor thing home. When deciding to walk an animal on its own, you need to be aware that it is unsafe.
The pet's collar must have a tag with the owner's number on it.
An option in which you can not worry about your pet, but at the same time give him the joy of a walk, is to use a collar in tandem with a leash.
Leash
As mentioned above, a leash is the key to a safe walk with a cat. It is best to opt for a long but strong leash. A chain, unlike dogs, is not suitable for cats - it is heavy and can scare your furry or cause him pain.
The cat's leash should be soft and light
And, of course, even when walking on a leash, put a tag with contacts on your cat’s collar - just in case.
Harness
What should you do if your mustachioed pet refuses to walk on a leash and doesn’t like the collar? It doesn’t matter, you can replace these devices with a harness. It looks like an interweaving of wide straps that cover the chest, part of the back and paws.
As a rule, this object irritates cats less and causes less pain when moving, because the throat is a sensitive part of the body of any living creature. When wearing a harness, most of the load falls on the chest, not the neck. And in case of danger (an approaching dog, falling into a hole), it is much easier to grab the pet by the back strap of the harness than to pull the leash.
Most cats enjoy being walked on a harness rather than on a leash.
My cats (both those who came into the house as babies and former street residents with experience) love walks in the fresh air. However, they absolutely do not like harnesses. Animals fall on their stomachs or sides, refuse to move and even lose interest in walking. The situation is completely different when pets are wearing a collar and an ordinary leash. Cats behave appropriately, move along the ground, sniff the grass, albeit with some caution. Perhaps it's because my cats live with dogs and see them walking on leashes. I don’t see any other reason for preferring this accessory to a harness. If it were not for the silent but expressive protest of the cats, I would prefer to walk them on a harness.
How to make your pet's ammunition with your own hands
Don't worry that pet walks will put a strain on your budget due to the purchase of equipment. All these things can be done with your own hands from scrap materials. Handmade leashes and collars have a number of undeniable advantages compared to purchased ones.
- Saving money.
- No need to drive or go to the pet store.
- The owner can show creativity when sewing products.
- Your pet's ammunition will be unique.
- Equipment tailored to your pet’s individual parameters will fit better than store-bought ones.
The disadvantages include the following:
- You need to spend time. If you are not used to making things with your own hands, you may need a lot of it.
- You are responsible for the reliability of the ammunition. If you don't make good enough fastenings, you risk losing your pet.
Making a collar for a cat
So, you can’t do without a collar with an address tag on a walk, so it’s better to start making ammunition with it. To do this, you can use leather, fabric (nylon, velvet, velor) or improvised materials. The clasp for the collar can be made of metal or plastic; you can also sew Velcro or ties instead (which is less reliable). To work you will need:
- scissors;
- thread and needle;
- a thimble and an awl (especially if you are sewing leather or thick fabric);
- sewing machine - if available;
- measuring tape or string with handle:
- fabric (leatherette, jeans, other available materials) or nylon sling - your choice;
- accessories for decorating the collar (beads, rhinestones - optional);
- purchased fastex fastener, metal buckle or Velcro;
- half ring for attaching a leash or address card.
First you need to determine the length of the future collar. To do this, measure the circumference of the animal's neck, and then add a distance the size of two fingers (about 5 cm) to this measurement. This is done so that the collar does not put pressure on the cat's neck. Next, add another 5–7 cm to adjust the fastener.
The comfortable width of a cat collar, in turn, is usually about 2–2.5 cm.
Based on these parameters, a strip of fabric is cut out or a suitable nylon sling is selected.
Nylon sling is the simplest material for making a collar.
The end of the tape is passed through one of the two parts of the fastener, folded over and secured with a seam. The ring for attaching the carabiner is also sewn on at this stage, immediately after the clasp.
This is what the collar looks like after part of the fastener and the half ring are sewn to the sling
The other, remaining free end of the sling is threaded through the double-slot buckle and the second half of the fastener, which is not yet sewn. The sling is then pulled through the buckle again, forming a loop. The “tail” of the sling, threaded through the buckle, is bent back 3 cm and secured with a seam.
In order for the fastenings to be reliable, it is better to lay a double seam
If making a collar with a fastex clasp seems difficult, you can simply sew a buckle and ring to one end of the product, and make holes for the clasp at the other end of the collar with an awl. Whatever option you choose, there is always room for imagination - the collar can be decorated with decorative elements to your taste.
Video: options for making a collar yourself
Making a leash
A leash for a cat is made according to the same principle as a collar.
You need to find it at home or buy a sling and carabiner. The length of the future leash depends on your height and on how far you allow your pet to move away (usually 1.5 - 2 meters).
One edge of the sling is threaded into a carabiner, pulled inward by 2–4 cm, folded over and sewn on. For maximum reliability, you should first make a seam along the edge of the curved sling and a seam near the carabiner. Between the two parallel seams formed, two more seams are sewn - crosswise.
Stylish butterfly collar
A butterfly collar will also look great on a cat. You can easily sew it yourself from any fabric or ribbons of various widths, plain, striped or polka dots. And most importantly, such decoration will instantly transform the cat into a real gentleman.
For sewing you will need three blanks of different sizes. The approximate length of the collar is 5 cm, the base for the butterfly is 12x24 cm, and its middle is 5x7 cm. At your discretion, you can make the butterfly larger than the one shown in the example.
First you need to sew a butterfly. To do this, the edges of the rectangle are bent towards the center so that everything is symmetrical, and ironed well.
Using the same principle, fold a small part. Then you should bend both blanks horizontally and stitch, stepping back slightly from the edge.
Next, the parts are turned inside out, leaving the seams inside, and the base of the bow is threaded through the resulting small ring as shown in the photo. The butterfly is ready.
All that remains is to sew the collar. The edges of the material are folded towards the center and carefully ironed in the same way as they did with the butterfly. They can be stitched if desired. Then the Velcro is sewn on, following its outline and making several cross stitches.
Once completed, the collar is threaded into the same ring, behind the butterfly. The accessory is ready and it’s time to call the cat to try it on.