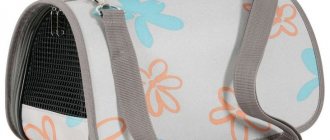
Loving owners try to make the life of their pets as fulfilling and healthy as possible. They express their feelings by purchasing various products for cats and dogs: leashes, collars, houses, and so on. Nowadays, cat supplies are quite expensive. Many owners may not be able to afford this, since they could already spend money on a purebred pet. The article will tell you how to sew a cat house with your own hands, using patterns from the Internet, and what materials are best to use.
Hammocks and beds
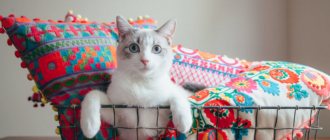
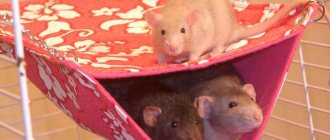
A small hammock for cats looks original and cute, similar to a real one, designed for humans. The fabric can be hung anywhere by securing it firmly at the four corners. For example, a hammock under a chair will allow you to watch your pussy during moments of relaxation.
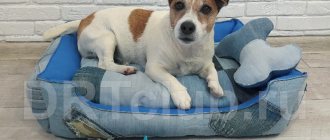
The bed is an original bed for pets, made in the form of baskets or boxes. For the comfort of the animal, a soft mattress is included. A mustachioed friend will appreciate such a piece of furniture and will be happy to relax there.
What is better - a playhouse or a bed?
Why and how to make a cat house yourself? You will find instructions a little later, but first, let’s figure out why the fluffy needs his own house. First of all, let’s determine whether it should be a bed or a playhouse. What exactly does your cat need? Only you can know this. If you want the house to be a large structure of a combined type, with one or two sleeping places, a play area, stands and other goodies where the cat will happily spend time, determine where you will put the “new building”.
If the kitten was adopted only recently, then you should not make a house for him to grow up; it would be much better to make a simple structure that will protect your kitten from fears and psychological trauma. You can sew a good house for a cat with your own hands according to various instructions, and the methods will be described below, and you choose from the article what you like and you can get started.
Booth houses
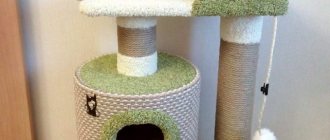
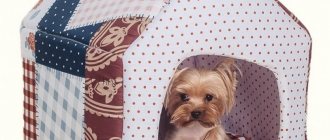
A cozy nest for a cat where she can be alone. Such a building is a full-fledged house with a roof. The stores offer models of different sizes and areas. Some of them include an external or internal scratching post. This practical move on the part of the manufacturers will protect the furniture from the sharp claws of the pet. An important advantage is the beautiful appearance of the booth. If desired, owners of domestic cats will be able to decorate the house with additional safe elements.
What materials can be used
A variety of materials can be used in production. I will describe all the elements of the product and tell you what materials these parts can be made from.
Sleeping area
There should be a rigid frame with a roof (if you are making a house) or without (if it is more of an open or partially open bed) and a soft bed. To make a frame you can use:
- tree;
- cardboard;
- plastic;
- light metal tubes;
- plywood and chipboard;
- textile.
Litter
sewn from fabric and filled with printed material:
- foam;
- padding polyester;
- straw;
- foamed polystyrene or other special granules.
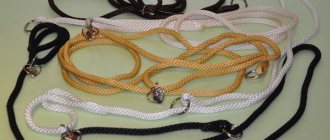
A claw sharpener is made from a piece of wood and winding - you can use synthetic ropes and natural jute or hemp.
Built into furniture
Universal pieces of furniture that include sitting areas for the cat. This could well be a closet with three compartments, two of which contain the owners’ personal belongings, and the third section is equipped as a resting place for a mustachioed friend. A good idea on how to make a house for a cat is bookshelves, where scratchers love to sleep.
Such models can hardly be found in pet stores, but loving owners will always come up with something to make a house for a cat from. They are ready to allocate a free part of the furniture for the rest of their furry friend.
General design recommendations
It is necessary to take into account the character and characteristics of the pet when making a house. If the cat prefers to be always in sight, you need to build open beds. For a pet who loves peace and solitude, an enclosed kennel-type house is suitable. It is also necessary to take into account the size of the animal, as they directly affect the size of the product.
Important! A cat that is expecting offspring should have a larger sleeping area, since kittens will sleep with her in the future.
The main condition when choosing the finish of a product is the use of natural material that will not accumulate an electrical charge and will not disturb the pet. A well-designed house should have the following characteristics:
- easy to care for;
- do not accumulate dust;
- do not have sharp edges or chemical-smelling material.
A bed for a cat and its offspring.
With the right tailoring and choice of materials, the house will not only be a favorite resting place for the animal, but will also fit perfectly into the design of the room.
Compact furniture
This piece of furniture will be appreciated by owners who love to photograph their pets. Their sleeping places are real beds or sofas, only of miniature size. As a decoration, the crib is covered with a bedspread of unprecedented beauty, the pillows are embroidered with multi-colored patterns. A miniature crib that has become an exact copy of the owners’ bed will look impressive.
Sleeping place made of fabric
In order to sew a cat bed yourself, you should follow a few simple steps, namely:
- cut a piece of fabric of the required size, which is calculated taking into account the parameters of the animal;
- prepare two equal pieces of fabric. They will become the parties between which the foam rubber will lie;
- Sew the sides tightly together without creating gaps. This will increase comfort for the animal;
- Sew small elastic bands from each corner, thanks to which the lounger will be tied to the legs of the furniture.
Sleeping place made of fabric
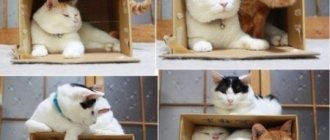
Cardboard house
The main advantage of a cardboard house is the variety of models. Cardboard houses are assembled in the form of a birdhouse, castle, tent, cave. And that is not all…
It is possible to assemble a cardboard house yourself. On the Internet you can find sample templates that will help you get the job done right. But do not forget that a house made of such material is not durable. Having played out, the pet can easily destroy its building. Owners should not be upset. You can always make a new “fortress”.
From a T-shirt or sweater
A fabric bed can be built using a T-shirt or sweater, which will keep your pet warm in cold weather. To do this, you should sew the neck and sleeves, filling them with padding poly for volume, and twist the product into the so-called “steering wheel”.
You might be interested in how a beginner can sew dresses for dolls with his own hands
Sweater lounger
Simple cardboard house
The simplest option that even a third grade student can handle. The main thing is to carefully follow the instructions on how to make a house for a cat.
You will need:
- Textile;
- cardboard;
- scotch;
- colored paper;
- scissors.
As a basis, you need to choose a box of such a size that the cat not only fits there, but can feel freedom. Fabric is needed for interior decoration to give coziness to an animal’s home. The design of the facade depends on the scope of the owner’s imagination.
Assembly instructions:
You need to cut out the bottom and top of the first box, then spray paint from a spray bottle. It is advisable to complete the drawings and take the dimensions of the house for your furry friend. It is important not to forget to cut out the windows and the entrance to the home.
The parts that have been cut out are connected using adhesive tape and the roof is installed. You can decorate parts of the house with colored paper, making something like tiles. At this point the assembly process ends and the cat can celebrate a housewarming party.
Note!
- Do-it-yourself illuminated mirror - step-by-step master class on how to make it yourself, photos of types of lighting
- DIY flower stand - TOP 100 photos of stand options, detailed instructions, diagrams and drawings from the masters
- Do-it-yourself furniture restoration: restoration methods, step-by-step master class, necessary tools and materials
Step-by-step instructions for durable houses
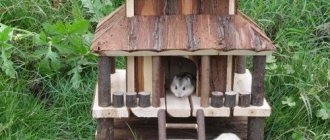
Wooden house
If you decide to make a house “for centuries”, it is recommended to use wood.
This is the best material for cat permanent residence.
For it you will need:
- plywood;
- electric jigsaw, wood saw, plywood saw;
- good wood glue;
- nails;
- carpenter's hammer;
- screwdriver with brush;
- brush;
- black paint;
- sandpaper;
- wear-resistant varnish
- fabric for bedding.
When everything is ready, you can start making:
1. You need to glue the sides to the plywood square. Ordinary carpentry PVA, such as “Moment Joiner,” works well.
2. Make identical pentagonal walls. It is necessary to cut a passage for the cat into one of them.
3. Insert the walls into the mold and glue.
4. Now make the base of the roof. To do this, just glue in 2 crossbars made of plywood.
5. Cut small rectangles from plywood - these will be tiles. If you're lazy, you can just glue 2 squares.
6. For decoration, you can glue fake doors, as in the photo.
7. Use a drill with a brush to go over the tiles. This will create an aging effect.
8. Now it's a matter of processing. The walls need to be coated with a good layer of varnish. It's better to just paint the gate.
9. All you have to do is put the pillow inside and a great permanent home is ready.
The bedding can be soft and made of fabric material.
Shelter for homeless cats
If you decide to make a house for stray cats and kittens, fabrics will not work. You will need impermeable and warm material, and cheap one at that.
For it you will need:
- Foam thermobox. Sold in large supermarkets. You can save money and glue it yourself using polyurethane foam.
- Good tape, preferably plumber's tape.
- Any insulation.
- Plastic film for protection against mildew.
- A good utility knife.
- Marker for marking.
- Polyurethane foam or foam glue
- Fabric material for soft bedding.
First you need to prepare the input:
- Mark one side with a marker.
- Cut a hole using a utility knife.
Then you need to connect the walls and the lid:
- Apply foam glue around the perimeter. Stores sell special compounds from 3M, but you can also use regular polyurethane foam.
- While drying, secure the lid with good tape. Wait until completely dry.
Now you can make a crib:
- Place the cotton wool in a ZIP bag.
- Place inside and cover with a cloth.
Done, you can safely move the house outside. The foam will maintain a moderate temperature inside even in severe frosts and the cats will always be warm.
Tent
Instead of the usual house, you can pitch a tent for your mustachioed friend. It is desirable that it be mobile. This model will also make it easy for a skilled owner to make a similar design.
You will need:
- Old jacket;
- cardboard;
- wire 0.4 mm.
Assembly instructions:
From copper wire we construct two identical frames in the shape of an arc. We install the frames on thick cardboard from 4 corners. A jacket is put on top, the sleeves of which are fixed at the back. The neck of the sweater will become like an entrance to the tent. If you wish, instead of an unnecessary sweater, you can buy thick fabric in a calm color and use it as the main material.
Requirements
The building for cats must meet the following requirements:
- The height of the structure is as close as possible to the level where the animal spends the most time (bedside table, chair, bed, etc.), but should not be less than 40 centimeters.
- There is no unpleasant smell of chemicals in the house, otherwise the pet simply will not accept it.
- The home is suitable for the size of the pet, it should be comfortable in it (the size for an average cat is at least 40*40 centimeters).
- The structure must be strong, safe and stable.
- The circumference of the entrance to the structure is at least 15-20 centimeters.
- The cleanliness of the house must be carefully monitored.
- To make the building, only high-quality, environmentally friendly materials are used so as not to harm the health of its occupant (plywood, cardboard, concrete, cotton).
- It is recommended to build a playground in the home.
- If a scratching post is installed in the structure, access to it should be free. Otherwise, the pet will sharpen its claws on walls, wallpaper, etc.
- In a multi-tiered house it is necessary to make an additional exit. This is how animals arrange their homes in the wild.
Corrugated cardboard house
The idea of creating such a house came to the minds of the inventive Japanese. There are no difficulties in making a home for a pet and it will please cats of any temperament. The house looks like a beehive due to the combination of raised cardboard lines. The craft can be given different shapes. The most popular are spherical shapes. The ribbed structure of this type of cardboard will allow the cat to sharpen its claws at the right time.
You will need:
- Cardboard;
- PVA glue;
- soft bedding.
Manufacturing instructions:
You need to cut circles out of corrugated cardboard. The size of the circles must follow the bending lines of the future house. Then the elements are glued together with ordinary office glue. For the comfort of your pet, it is advisable to lay a pillow inside the ball.
Plywood house
It is possible to build a house from plywood. You need to prepare the necessary material and carefully carry out all stages of the work, following the step-by-step instructions for creating a house yourself.
You will need:
- Fastening tool;
- carpet;
- beam;
- rope;
- sandpaper.
Construction method:
The house model consists of a lift and a miniature booth. Elements of the house are cut out of a piece of plywood - the roof, a small ramp and walls. Be sure to sand the edges of plywood elements. Then, using staples, the parts of the house are covered with fabric and fastened.
The base mounted to the booth must be slightly wider than the main structure for making the ladder. The legs are attached to the base. A shelf is attached from above to a beam wrapped with rope using a tool.
You can look at pets endlessly. We must love them and create comfortable living conditions.,
DIY cat house: choice of design, types of houses
All houses for cats are divided into several types:
- Booth
- Bed or hammock
- Sofa
Adviсe:
- That is, if your pet really loves to communicate, he likes new acquaintances, and without much fear or embarrassment he jumps into the arms of strangers, then in this case you can safely purchase or make your own open sofa or bed or crib.
- There is no need to install a roof. This will allow the cat to observe what is happening in the house and meet new guests in any convenient situation.
- If the cat is secretive, indeed, the best option would be to equip a kind of hole, booth or house that will hide it from the eyes of strangers. Nowadays there are a huge number of houses for cats on sale, but their prices are not at all low.
- The better the material, the stronger the base, the higher the price. However, not every owner will be able to allocate such a decent amount of money to purchase such a house. In this case, you can make it yourself.
Cat's house
Photo of a homemade cat house
DIY cat house: drawings
It is worth noting that in order to properly design such housing, it is necessary to adhere to certain norms and rules. It is quite difficult to make a really good house on your own, without outside help and specific dimensions. Therefore, our drawings can help you. All prepared options are used when using plywood or cardboard for the house. Of course, the most reliable option would be to make a house from plywood.
Blueprints
Blueprints
Cat's house
cat house
A cat house is a secluded place that will allow your pet to hide from prying eyes and rest peacefully.
Scratching post options
In addition to the most common scratching posts for cats, you can make simple but original analogues. So, it is permissible to make a scratching post in the form of a picture. To do this you will need a simple piece of plywood (rectangular) and carpet.
When there is a lot of space, you can afford to build a large house
The carpet is fixed to the board using nails and a hammer. The corners of the fabric should be hidden on the back. They even attach a mini hanger. Then the finished painting is hung on the wall in the corridor or room. It should hang at the height of the pet. This refers to the cat's height at the withers, and not from the floor to the tips of his ears.
VIDEO: How to build a house for a cat with your own hands?
Cat's house
Do it yourself
Mattress for a cat
For the simplest mattress you will need two pieces of fabric and filling (sintepon). Such a lounger will protect armchairs and sofas from the need to constantly clean them of wool.
Cut out two identical pieces of fabric and place them right sides together. Sew on three sides and turn inside out.
Cut out the insulation from padding polyester, sized so that it fits tightly into the resulting “bag”.
Carefully fold the unsewn edges inward and stitch the last side of the bed. To prevent the filling from bunching up when washing, you can stitch the mattress several times along the front side.
From newspaper tubes
Masters of weaving from newspaper tubes create amazing works, not forgetting about their pet. So, with the help of an unnecessary stack of various waste paper, you can create a wonderful structure where your pet will be warm and cozy. The following materials will be required here:
- PVA glue;
- scissors;
- knitting needle;
- a stack of newspapers;
- paints or varnish (optional).
A cat house from newspaper tubes is created as follows:
- Cut the newspaper for blanks into long strips approximately 7-12 cm wide. Wind each strip tightly onto a knitting needle, hooking it on one edge. You will end up with a long newspaper tube, the end of which should be glued with glue so that it does not unravel.
- Weaving begins from the bottom of the future cat house. We make a crosshair in the center, and then gradually turn it into a disk.
- Next, we attach the tubes along the edges, which will hold the main frame of our wicker cat house. First you need to walk along the entire diameter around the bottom to make the sides of the bed.
- In the next step we will raise the cocoon, gradually increasing the mass of tubes on the back wall.
- We don’t touch those vertical newspaper tubes that are already out of use for now - we leave them sticking up. At the final stage, we will braid them into a beautiful braid to beautifully decorate the cat’s house.
- The house can be coated with paint and non-toxic varnish. Be sure to check if the varnish contains any harmful components! Cats often like to have fun with their houses and sometimes chew on straws to sharpen their teeth.
The cat house is ready. You should put a pillow inside to make your pet comfortable.
Watch this video for more details on how to weave a cat house from newspaper tubes.
Soft bed with sides
One of the master classes will demonstrate how to sew a cat bed with your own hands from available materials. This sleeping place has a simple oval shape, small sides with soft filling and a removable pillow as the bottom. If the pillow gets dirty, it can be easily removed and washed, so the product is very practical and will definitely appeal to the cat.
For sewing you will need:
- dense natural fabric;
- synthetic winterizer as a filler;
- pattern paper;
- handy stationery.
It is not recommended to use smooth sliding fabric, as the pet can get caught in it with its claws, which will cause him discomfort, and the material will quickly become frayed over time and the bed will not take on the most presentable appearance.
Absolutely any paper, newspaper sheet or cardboard is suitable for the pattern. However, you can sketch out the outline of the desired product using a bar of soap, but it will be difficult to see on light fabric. The size of the bed depends on the size of the cat. In this case, the pattern turned out to be 40x55 cm.
The resulting template is placed on top of the fabric and secured with pins so that the fabric does not move to the side, and then the base of the future product is carefully cut out along the contour. A total of 4 such blanks will be required.
First you need to sew the bottom for the sleeping area. To do this, take two blanks, put them together with the right side inward and sew them together
It is important to step back about 1 cm from the edge and leave a small hole for filling with padding polyester. For convenience, you can grab the parts with pins and sew them on a machine. A thin layer of padding polyester is placed inside
Then the hole is carefully pinned and sewn on a machine. To make the product hold its shape better, you can additionally stitch it around the entire circumference
A thin layer of padding polyester is placed inside. Then the hole is carefully pinned and sewn on a machine. To make the product hold its shape better, you can additionally stitch it around the entire circumference.
Next, you need to stitch the bottom lengthwise and crosswise, breaking it into small squares. Now you can start making the sides.
First, you should measure the diameter of the bottom of the future bed and add at least 10-15 cm to this value, this way you can calculate the length of the side. In this example, the prepared piece of material is 40 cm wide and 155 cm long.
In the next step, one of the edges of the fabric is bent by 1 cm, for convenience, pinning it with pins. Then this edge is applied to the opposite one, moving 2 cm from its end, and again fixed with pins on the sides.
Next, you need to sew the fabric on a machine and fill the resulting sides with padding polyester. You can use another filler at your discretion. It is not recommended to stuff the product too tightly, as it should be slightly airy.
Then, using a ruler and pencil, measure out 16 cm squares.
Transverse seams are sewn according to the pencil markings. In this way, the sides take shape, but this is not necessarily an action. If desired, you can leave them smooth and oval.
The free edge at the side should be folded and secured with pins to make stitching easier.
Finally, the side is sewn to the bottom, and its free folded edge is located under it
It is important to make sure that the formed side fits snugly to the bottom of the bed and does not deviate to the side. All that remains is to close it, carefully bend the edges, put them inside each other and stitch. It is recommended to knead the product a little to distribute the filler evenly
It is recommended to knead the product a little to distribute the filler evenly.
In general, the bed is ready, but this model also has a removable pillow. To make it, you will need previously prepared two oval pieces of fabric of the same size as the bottom of the bed. Using pins, you need to outline the outlines of future seams. This can also be done using a pencil and ruler.
Next, using contrasting threads, carefully sew a small circle in the center and from there the sectors diverge in different directions.
Each sector is tightly stuffed with padding polyester. Then the pillow is stitched around the entire circumference with a zigzag stitch.
To make the product look more attractive, its edges are slightly folded and stitched with the same seam. The bed pillow is ready. Now you can invite your cat for the first test.
Required materials and tools
When planning to make a house for your pet with your own hands, you need to stock up on the necessary materials and tools.
At the slightest discomfort, the pet will simply refuse to use the prepared house.
To make a comfortable place for a cat you will need:
Cardboard. Both plain and corrugated sheets, as well as ready-made boxes and crates, are suitable here. Sharp cutting objects (knife and scissors). Stationery (ruler and pencil). Glue
Particular attention should be paid to the choice of this particular ingredient. It should not have a pungent odor, since the four-legged pet has a very acute sense of smell.
Upholstery. When choosing a material, you need to concentrate on density and softness. Internal lining. It must have water-repellent properties. Wide tape.
Popular options
The cat building may have a non-standard shape. You can make it from available materials. It may also not have a scratching post at all. Let's consider several of these options:
- Wigwam . The structure is made of metal rods in the shape of a tent. Then it is covered on all sides (except one) with fabric. Foam rubber and bedding are laid on the floor of such a house.
The wigwam itself is quite an interesting object
- Ottoman house . A standard square ottoman usually consists of a wooden or MDF structure. Therefore, we remove the fabric from the bottom of the pouf and cut out a hole with a jigsaw. Then the wooden part can be covered with latex paint, and a soft lining can be placed inside.
- Hammock house . Any cat is interested in new places. Making a hammock for her to relax is very simple. To do this, you can use: a small coffee table, an armchair or a chair. But these pieces of furniture must have 4 legs. So, at the level between the floor and the tabletop/seat, the canvas is stretched. On its sides two fabric strips should be sewn to each. Then the canvas is attached to the legs using ties. And voila!
Hammock house for cats
- Triangle house . This is the simplest type of pet hut. To make it you will need 3 small pieces of OSB. They can be cut from a thin board, 6 ml thick. The pieces should be equal in size and rectangular in shape. Then we place the first piece on the floor, and on top of it we make a dome from the remaining two. We fix the parts together using nails or screws. Additionally, you can use metal triangles. Using a glue gun or a furniture stapler, we frame the outside of the house with fabric. We put a soft lining inside.
- Shelf house . From available materials (osb boards, boards, laminate or chipboard) you can prepare shelves of various levels. But its main task will be to become a place for the cat to relax. So, you will need to cover the resulting piece of furniture with fabric and place it on the floor.
Wall-mounted option in the form of a shelf
How to make a hammock?
A homemade hammock bed is convenient because it does not interfere with air circulation from below, and the presence of a canopy, depending on the model, allows for shade. Hammocks for pets can be very diverse in the way they are attached. For example, they can be ordinary, installed on the floor, in addition, they can be installed on a radiator or attached to window glass. In the latter case, the fasteners are large suction cups that firmly hold the compact bed.
Such modifications can be made from thick wire or pipe. It is used to create a frame with hooks through which it will be attached, for example, to a radiator. The size of the frame must be sufficient to accommodate the animal. After the frame is bent, we begin sewing the textile cover, taking measurements on the finished frame. For ease of washing or cleaning, the cover can be sewn with a Velcro fastener. Next, all that remains is to put the cover on the frame and secure the bed with hooks to the battery.
If there is enough space between the battery and the wall, you can make a wooden frame with supports hiding behind the battery. Otherwise, all that remains is to simply sew a cover from thick material or pull an old sweater over the frame, tucking its sleeves inside the resulting hammock. If you have a chair with high legs at home, it will be perfect as a ready-made frame for a future structure. You will need to sew a fabric to it and secure its ends to the crossbars.
An original solution could be a bed suspended from the ceiling. Moreover, it can be either single-tiered or consisting of two or even three floors. A characteristic feature of such products is the narrowing of the size upwards. To make such beds, textiles, foam rubber, and synthetic winterizer are used. The product can be attached to a ceiling hook using wide ribbons made of thick textile. It’s difficult to call such beds comfortable, but cats are not afraid of difficulties: during the day they manage to lie down wherever they can.
Hanging cat house and shelves - original composition
Such an unusual project will become a real highlight in your home. Now the cat house imitates a hanging shelf, and real small bookshelves serve as steps for it.
We build the house from ordinary wood plywood, cutting out a doorway and a small window in the shape of a cat's face.
But the most creative element of the composition is the cable bridge! It is made from cut strips of birch plywood and grommets connected to a cable. We buy it at a hardware store. Cable ties and fastening clips are also useful. We use a laser cutter for cutting.
The final touch is rugs on the roof of the house and on the steps-shelves. We fasten them with construction glue.