What will you need for your farm?
You need two jars with lids - one larger, one smaller (so that the second can fit inside the first). Ants and soil will be placed in the space between the small and large containers. A smaller jar is needed to leave space in the center.
The ants will be able to lay eggs at the top edge and build tunnels, and you will be able to watch this process. Airtight containers are great for “construction”. You can use them to create the desired size of farm. Please note that the jars should not have any patterns, cracks, scratches, etc. If you want your ant farm (with ants) to be flat, buy a small narrow aquarium from your local pet store.
Incubator
With the stable development of the ant family, problems may arise with the supply of food inside the incubator, since curious ants will try to run out at any opportunity to explore the surrounding world, and the most daring, courageous and aggressive individuals may attack, since they will regard the intrusion as a threat to the colony.
Of course, such conditions exclude the possibility of quiet feeding, and it is necessary to expand the formicarium area by connecting an arena.
The arena is a structure that plays the role of space outside the nest. In this territory, the ants will collect food, remove garbage, and study various decorative elements previously placed by you. This option greatly simplifies the process of feeding insects - it is enough to simply place a feeder with a treat (syrup, other types of food insects, seeds) in the arena.
Soil-sand farm
First you should prepare a mixture of sand and soil. Ants require a moist environment. This will allow little residents to dig tunnels and paths. If you collect ants in your dacha or yard, use the same soil so that when they move to a new house, they find themselves in their familiar habitat. You will need enough earth to fill the space in the jar. Loosen it well.
Mix two parts soil with one part sand. You can buy fertilized soil and sand from the gardening department and mix them well. If you buy special ants from a farm at a pet store, then the necessary mixture is included with them.
Ant food
The main thing when caring for ants is to avoid fuss, as these insects are very shy and can behave inappropriately, feeling stress and discomfort. Before breeding ants, you need to study the rules of their behavior within the family and the laws by which they live. After you bring the queen home in the first days, you should not feed her. Nature has laid down a mechanism in which she will have enough nutrients by the time she has time to breed working individuals who will then feed her. However, if you cannot resist feeding, you can give one drop of sugar syrup the size of an insect's head.
Please note that reapers are not given syrup. They are fed grains. For the queen to hatch eggs successfully, she should not be disturbed or create stressful situations. This may cause the queen to destroy all the brood. When laying eggs, she should create the most comfortable conditions possible. After the first working insects hatch in your formicarium, you can start feeding the ants more often. To do this, special seeds purchased from pet stores are poured into the feeder.
For the mother, drops of syrup are left on foil, which are removed after a few hours so that they do not have time to ferment or thicken. If you want your ants to grow faster, feed them protein foods. Such food can be shrimp, chicken fillet or boiled egg white. It is not recommended to give ants live insects, especially large ones. This can be stressful and frightening. There are also situations when ants cannot cope with a large insect, and it kills them. You should not forget about foods that contain carbohydrates. Adult ants especially need it. Carbohydrates are found in seeds, sweet syrups, vegetables and fruits. Reapers especially need such food. If you are in doubt about the correct diet for your ants, consult with store clerks or online forums.
Poppy seeds are used unfried, without any additives. You can also use pumpkin seeds, canary food, zucchini seeds, sunflowers, sesame seeds, dandelion seeds, you can give boiled potatoes, all vegetables and fruits raw without nitrates. The rate of colony development depends on the quantity and quality of protein food, since protein is necessary for the formation of egg shells and chitin of adult insects. Insects are fed: flies, cockroaches, garden crickets, spiders and others. Protein should be given to goosebumps once a week in different forms. Calculate the amount of food so that the ants can eat it at one time.
Looking for an anthill
Now you need to find “tenants” for your farm. The easiest way to find ants is outside. You will not have any difficulties with this, especially if you involve your child in this process. Small anthills are often found in yards. You can find them if you follow where the little workers are rushing with their finds. When going to collect ants, take with you gloves, a jar with a tight lid and a scoop.
Make several holes in the lid using a needle (for air access). They must be very small so that insects cannot get out. Add some honey or jam to the bottom of the jar. In this case, the ants will gather around the sweet treat and will not try to get out. Very carefully dig up the inhabitants of the anthill and move them to a jar.
Try to find the queen. You will recognize her immediately - she is much larger than the rest of the inhabitants of the anthill. An ant farm, which is populated only by working insects that live on the surface, will last no more than four weeks. This is how long these insects live in natural conditions. A queen ant that is ready to lay eggs can be found near anthills in early autumn, immediately after mating has occurred between males and females. In addition, the queen can be purchased from professional breeders. Your ant farm can accommodate 30-40 insects to start with.
Settlement of residents
After you have purchased and assembled the structure, you need to find residents for the farm.
Where to get ants
There are three options for purchasing insects:
- Catch them in the wild during the season.
- You can buy pets at a pet store throughout the year.
- Buy on specialized web resources.
Important! A fertilized female differs from an unfertilized female by the absence of wings. You can distinguish it from wingless worker ants by its developed chest (due to the remaining flight muscles) and massive abdomen. After mating, the females land, break their wings and look for a place to build a nest
At such a moment you need to catch them, one or several at once.
After mating, the females land, break their wings and look for a place to build a nest. At such a moment, you need to catch them, one or several at once.
Move-in process
A captured queen should not be placed immediately in the nest as she will be difficult to care for. To begin with, it is placed in a regular medical test tube with moist soil, or in a special core filled with soil or plaster. Egg laying begins a few days after summer. The first babies appear after 60-90 days, and the new family can already be fed with carbohydrate and protein food. When the colony has more than 20 individuals, it can be moved to a prepared artificial anthill.
If you still decide to just watch the ants in order to later breed a full-fledged colony, then collect the workers from the anthill and place them in your farm.
There is an easy way to catch ants - lure them into a jar with sweet bait.
Once you bring the insects home, place them in the refrigerator until they become sleepy, about 15 minutes.
After this, carefully move them to the farm, to the arena. Do the same with an ant family bought in a store.
Important! Do not shake ants into the arena, especially pupae, larvae and eggs. This way they can be injured, and the brood will stop developing or be born with defects.. Having placed the incubator in the arena, humidify the farm, darken it and wait until the scouts examine the new housing and report to the queen
After this, she will move from the incubator to the formicarium, and the workers will transfer the brood there. When there is no brood left in the incubator, you can drive out the last adults with light taps.
After placing the incubator in the arena, humidify the farm, darken it and wait until the scouts examine the new housing and report to the queen. After this, she will move from the incubator to the formicarium, and the workers will transfer the brood there. When there is no brood left in the incubator, you can use light tapping to drive out the last adults.
Building a farm
Now you can start building the farm. Cover the smaller jar with a lid and place it in the larger one. To make it stand in the center, you can glue it to the bottom with glue. Fill up with soil. Make sure the lid is closed tightly. Fill the space between the jars with soil and sand mixture. This composition should not be compacted tightly - ants will not be able to move inside.
The soil should not reach about 1.5 cm from the top of the jar. This is necessary so that insects cannot escape when you open the lid. Place the ants in a jar and close it. Do this very carefully. Use a needle to make holes in the lid for air.
Preparatory stage
When you have decided where to get the ant family, start preparing their home. This is a very important stage, because, in addition to providing the insects with everything necessary for their life, it is necessary to ensure the complete tightness of the formicarium. Otherwise, the pets will crawl throughout the house.
The first step is to prepare a container into which the filler will later be placed to ensure vital functions. According to experienced specialists, the best option is two glasses, which are fastened together by a frame, and the filler is poured between them. Making such a container will require a little time and some skills.
Farm care
We figured out how to make an ant farm. Now you need to find out how to care for it.
- It is necessary to regularly moisten the soil and feed the inhabitants of the farm. Every 3-4 days, throw small pieces of fresh fruit and a few drops of jam or honey into a jar - ants have a sweet tooth, they love sugar very much.
- Ants should not be fed meat or any other cooked foods. Otherwise, your ant farm will attract unwanted insects.
- When you are not observing insects, cover the jar with a light, dark cloth. The fact is that ants dig their tunnels at night, in complete darkness. If this is not done, the insects will be in a constant state of stress and may lose activity.
- Ants are fragile creatures, rough handling can kill them due to tunnel collapse. Therefore, the jar should not be shaken.
- The ant farm (you see the photo in this article) should be located in a warm room (at a constant temperature.
- Do not expose the farm to direct sunlight. The walls of the jar may heat up and the ants will die.
Main types
A horizontal ant farm is inconvenient because it takes up more space than a vertical one.
These designs come in several types:
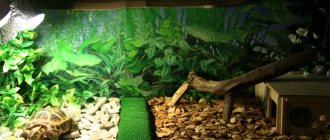
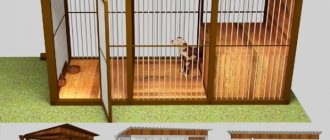
- Horizontal. These are “lying” farms in which the main slab is located horizontally, as in natural anthills.
- Vertical. The main slab “does not lie”, but is in a standing position, imitating tiered ant dwellings.
- Complex. It combines several types at once: both nests and an arena are located inside, they are larger in size, reminiscent of an ant town.
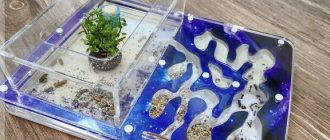
- Island. The arena is surrounded by a water moat, there is a farm in the middle, no nets or glass are required. The main thing is to monitor the water level and clean the moat.
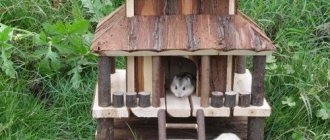
Ant farms can also be divided according to the material from which they are made. Plaster, acrylic, gel and even wood are used.
The most common designs are made of plaster and acrylic: they are easy to make and do not require frequent repairs. Wooden ones have faded into the background due to the fact that they quickly become unusable: the wood begins to rot, becomes less durable, and falls apart.
Truss with gel filler
The gel ant farm is now sold in stores as a complete set. Of course, such a farm does not include its inhabitants. They must be purchased separately or collected in the yard or in the forest. You can make such a house for ants with your own hands. We assure you that it will be interesting not only for children, but also for adult naturalists to watch how insects dig tunnels, pulling pieces of gel to the surface.
For this you will need:
- flat container with a lid and transparent walls;
- gelatin.
Warnings
You should also know what not to do when using formicarium:
- close the lid tightly, insects need air to breathe;
- the holes in the lid for ventilation should be of such a size that pets cannot escape from you;
- do not allow strong cooling, otherwise you will be in sleep mode;
- ants are contraindicated in extreme heat, which will lead to the death of insects;
- do not shake or drop the formicaria;
- do not pour water, the ants cannot swim and will simply die.
In conclusion, let’s say that by creating a formicarium with your own hands, you will make a unique specimen, thanks to which you will be able to observe the life of your unusual pets.
Preparing the gel
Pour three sachets of gelatin (15 g each) into 0.5 liters of hot water, stir well until the gelatin is completely dissolved. After this, add another 0.5 liters of water. Pour the finished mixture into a container and place it in the refrigerator. When it hardens, take it out and wait until the gel mass reaches room temperature.
Aquarium gel can be bought ready-made in the store, but it’s more interesting to make it yourself. You should know that such a filler for an ant house is not only a habitat, but also food. As soon as you make a small depression in the gel and place ants in it, they will immediately begin to “eat away” their passages and build tunnels. Let us remind you once again that ants living on a gel farm do not need to be fed or watered. The gel is a source of moisture and food for them.
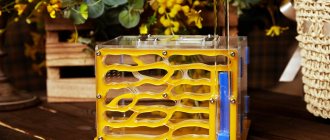
Acrylic
For an acrylic farm, the most difficult thing is to form passages and holes for ants
Required tools and materials
- pencil:
- paper;
- acrylic;
- polycarbonate;
- plastic rivets;
- cocktail tubes.
Step-by-step manufacturing instructions
- Develop a project for a future farm. To do this, on a sheet of paper you need to draw with a pencil the future structure, the approximate location of the tunnels, and the dimensions of the structure.
- Take acrylic and follow the example on paper to make small holes, the so-called passages.
- When the structure is ready, fasten it to the walls and polycarbonate lid using plastic rivets.
- Before settling the farm, it is necessary to insert cocktail tubes into the structure so that air, water and food flow through them.
Gypsum ant farm
Such a formicarium (also called an ant farm) is attractive because it is completely open to observation of insects.
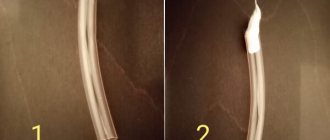
To create it you will need a transparent container. We dilute the plaster to the consistency of sour cream. Pour the resulting composition into a container, having previously placed a regular plastic tube in it (at the side). It should reach the bottom of the container. This is necessary in order to later add water to the formicarium, which will maintain the humidity level.
After pouring the composition, the workpiece sets very quickly, but dries completely in about a week. On the third or fourth day, remove it from the mold. If it does not come out easily, place it in hot (not boiling) water for thirty seconds. After this, the workpiece will easily come out of the mold.
Now it’s time to show your design abilities, that is, “draw” “rooms and corridors” on the blank. At this time, the composition is still damp, so you can easily scratch out any tunnels on it - it depends on your imagination. Although amateurs who already have an ant farm recommend studying the structure of a real anthill so that the passages are as close as possible to natural ones.
The two entrances for the residents of the formicarium can be drilled using a drill. Now take any convenient tool (stationery knife, screwdriver, etc.) and start making tunnels according to your drawing applied to the workpiece, choosing plaster from them. Do this carefully so that the composition, which has not yet completely dried, does not crumble.
Several depressions should be made at the bottom of the workpiece to better distribute water and moisturize the formicarium. They need to be connected by a small channel to a cocktail tube. Such recesses significantly reduce the weight of the formicarium. Don't forget to make ventilation holes in the top cover and sides. For this you can use a 0.5 mm drill.
Your farm is almost ready. All that remains is to dry it well and place it in a container. Here again you may encounter a problem - the dried workpiece will not want to go back into the mold. Don't be discouraged, but again place it in hot water for 30 seconds and it will easily enter the container.
All that remains is to find ants for the formicarium. There are many types of them, so before purchasing, it is advisable to look through special literature to select the most unpretentious one. After settling the farm, you will be able to study the life of these insects.
How to choose the right one and how much it costs
What you need to pay attention to when choosing a formicarium:
- arena features;
- humidification system;
- possibility of modifying the design;
- main module type.
Did you know? In a natural anthill there may be not one, but several candidates for the role of the queen. Then they fight among themselves for the title of queen. The ants watching the fights recognize the winner as their queen, and kill the losers.
The ant arena is both a dining room and a waste area, so it should be comfortable.
Convenience criteria:
- The arena must be reliable and easy to maintain.
- The arena must be well ventilated and at the same time prevent the escape of insects.
- For ease of maintenance, the farm should have a convenient lid.
The formicarium must have:
- porous material;
- auto-humidification element - a test tube with a cotton or gauze swab, which is connected to the humidification compartment.
Did you know? Because ants receive information through odors, they are unable to identify a dead body until it begins to decompose, releasing a corresponding odor. Only then is he taken out of the anthill.
The type of the main module is horizontal, vertical or shaped structures, which have already been mentioned above.
Horizontal structures have a large area and shallow chambers, making it possible to clearly observe the life of the colony. True, such formicaria occupy quite a lot of space.
Vertical structures take up little space and can be placed in almost any corner of the room, but due to the large depth of the chamber and the secretiveness of the passages, it is almost impossible to see the entire colony.
If you are no longer interested in such popular pets as cats, dogs and hamsters, perhaps you should get a lemur, squirrel, degu, moose, opossum, manula, capybara, monkey or raccoon.
Curly designs are fraught with various advantages and disadvantages that a beginner will not understand on his own. Therefore, they are recommended only for experienced keepers; a whole article would not be enough to discuss them.
How much does an ant farm cost? The answer to this question depends on the type and size of the formicaria.
| Type | Price, UAH. |
| Acrylic: | |
| horizontal mini | from 200 |
| horizontal large | from 800 |
| vertical mini | from 300 |
| vertical large | from 1500 |
| modular | from 1000 |
| Gel: | |
| small | from 250 |
| big | from 500 |
| Sandy: | |
| horizontal mini module | from 150 |
| vertical mini module | from 300 |
| Wooden: | |
| small | from 800 |
| big | from 1200 |
| Plaster: | |
| "Tower" | from 2500 |
| "Big" | from 3500 |
Did you know? Many types of insects disguise themselves as ants. Some of them imitate aggressive ants for the purpose of protection, while others - for the purpose of hunting the ants themselves, such as anteater spiders that penetrate deep into the anthill.
There are also designs made to order.
Adviсe
As you can see, making an ant farm with your own hands is not difficult at all from any material. In conclusion, I would like to give some tips that will be useful to you.
- You can feed ants dead insects, but only if you are sure they are not poisonous.
- Plant one type of insect in your farm. The two colonies will not get along together; they may fight to the death. Therefore, even if you catch ants yourself, try to collect them from one anthill.
- All ants bite. Some - less often, others - more often. For example, red ants bite and sting very painfully. Therefore, use gloves.
Cleaning the walls of the formicarium
In order to wash the glass of an ant farm, use ordinary ear cotton swabs and cotton pads soaked in water. It should be taken into account that all marks made by ants should not be washed off. Remove only those that interfere with observation and spoil the overall appearance of the ant farm. If you remove all the secretion from the insects, they will apply it again, however, with greater intensity. It is not recommended to clean the acrylic walls of the formicarium using alcohol or chemicals. This causes acrylic glass to become cloudy and may become deformed. When washing glass, do not make fussy movements. Let the ants calm down, carry out the procedure in several stages. After you have cleared the ant marks with a cotton swab, wipe the glass with a cotton pad soaked in plain boiled water. Try not to shake the truss too much while working. If the ants become very agitated, close the lid and give them time to calm down, then continue working later.
When to start relocation
It’s easy to choose the moment for the ants to move. If there are already more than 20-50 workers in the incubator, then it’s time to relocate. Check the instructions for the exact number. The colony's strength should be enough to keep the formicarium clean.
If there are less than 20 worker ants, then wait until the colony increases in number. A small number of ants means poor control of the territory; garbage will be scattered anywhere. Where there is trash there is a chance of mite infestation and mold growth. This is an unpleasant matter.
I heard that ants are given solid resin and calendula flowers so that they disinfect the area. I haven't tried it myself.
I gave my ants a day to rest after moving them. For them, vibration is a strong stressor. The poor fellows are also nervous. I think: let them rest, at the same time the formicarium has warmed up. And then he carried the poor reapers in the forty-degree frost.
Relocation may take a week. Normal terms are 3-5 days.
The movement of ants is a movement into the formicarium passage system, and not into the arena.