Today, many families have exotic animals at home. Quite common inhabitants of home terrariums are lizards. They are unpretentious and do not require special conditions of maintenance, but still the owner will have to work a little on the proper arrangement of the terrarium, taking into account a number of important criteria.
In the article we will tell you what to pay attention to when choosing and arranging terrariums for lizards, how and from what you can make a terrarium with your own hands, where it is best to place it, and how to properly clean it.
How to make and decorate a terrarium for a red-eared turtle: drawings, description, photo
Exotic animals are quite suitable for keeping at home. However, for their full existence it is necessary to create suitable conditions. For this purpose, terrariums are equipped.
Important: To keep pets in a terrarium, it is necessary to recreate an ecosystem similar to the living conditions of animals in natural conditions.
We will tell you what requirements a terrarium must meet to keep various animals. Let's start with the turtle. At home, you can keep land turtles, as well as freshwater turtles (including red-eared turtles).
The most important mistake is keeping these animals on the floor of an apartment or house. You can organize a ground terrarium; it must have suitable characteristics. However, it is unacceptable to allow a turtle to roam around the apartment; this is harmful for the pet.
There are many species of land turtles For home keeping, in most cases, medium-sized turtles about 20 cm are chosen. You can make a terrarium for a turtle yourself, what you need for this:
- Purchase and glue glass;
- Organize ventilation;
- Carry out UV lamps;
- Select soil.
For a small turtle of about 12 cm, a terrarium with a minimum size of 60x40x40 cm is required. But it is important to make sure that there is enough space if the turtle grows. If there are several turtles, the sizes should accordingly be twice as large.
The terrarium of land turtles should not be cluttered with various kinds of obstacles that will interfere with movement. The following soil should be placed on the bottom:
- A mixture of sand and clay;
- Hay;
- Wood chips;
- Large pebbles.
Terrarium for a land turtle
For red-eared turtles , whose size is in the range of 18-30 cm, a terrarium of 150-200 liters is required. Water should occupy 3⁄4, and land - 1⁄4.
Important: For red-eared turtles, it is necessary to organize a sloping bank with no scratchy texture. The water must be at least 20°C.
Terrariums for turtles should be well ventilated. For this, two holes are made:
- The first is large, located on top of the terrarium;
- The second is small, on the front wall of the terrarium at the base of the soil.
Air temperature is a very important factor that should be properly organized in the terrarium. The turtle terrarium is equipped with a 60 W incandescent lamp, which is installed on top. Bottom heating is not recommended, as it is harmful to the animal’s kidneys. The lamp should heat one corner more strongly, here the turtle will bask and eat food (temperature about 28°C). The house is installed in a cooler corner (about 24°C).
Aquaterrarium for the red-eared turtle
Scheme of organizing a terrarium for a turtle
Making an Aquarium
An aquarium is an excellent interior solution. Therefore, if you decide to become an aquarist, then gluing an aquarium will be the first step to a new hobby, especially if a structure of a suitable size and configuration is not available for sale. The aquarium is quite easy to glue using the open seam principle.
First you need to decide on the size of the aquarium and prepare the glass.
Material
The best material for an aquarium is glass with a thickness of at least 5 mm. The thicker the glass, the easier it will be to position and glue. The types of glass that are suitable for an aquarium are indicated in the range from M1-M8. The higher the grade, the better the quality of the glass, so it is better not to use below M3.
It can also be made from plexiglass, but its performance characteristics are much worse. The required size of glass can be purchased at a glass workshop or cut yourself from window glass. True, such glass can distort the surface, which will affect the appearance of the aquarium. To cut glass you will need an oil glass cutter, a “carpenter’s” ruler, a square, a caliper, a calculator, and a marker. The cutting should be with a discrepancy of no more than 1.5 mm. To maintain geometric parallelism, you will need a square and careful marking for cutting. After cutting, the corner edges of the glass must be sanded in order to remove sharp edges. For grinding, it is best to use medium-grade corundum sandpaper. We place the glass in the bathtub on a wooden stand or towel and carefully rub the edges under a stream of water.
Now we determine the size of the glass
Let's take the conventional dimensions and consider in detail the calculation scheme. So, for a 45L aquarium you will need a length of 50cm, width and height of 30cm. The thickness of the glass is 4mm. Then use a ruler or caliper to measure the actual thickness of the glass. For example, it will be 3.8 mm.
We calculate the size of the side and front walls as 2 X 50X30 and 2 X 30X30.
The size of the bottom will be equal to the length of the aquarium X the width of the aquarium + double the thickness of the glass, we get the “clean” size of the bottom which is 50X30, and taking into account the thickness of the glass, the size of the bottom will be 50.76cm X 30.76cm.
To glue the aquarium you will need syringes with silicone
Their quantity depends on the volume of the aquarium, so for 10-20 liters of volume a couple of 20 ml syringes will be enough. You also need to have narrow tape, scissors, a clean A4 landscape sheet, alcohol, toilet paper for degreasing, a pair of suction cups.
As a working surface for gluing the structure, it is better to choose a flat surface about 1.5 m in length, for example, a table or floor. We lay out the glass, alternating the side glass, the front glass, then the side glass and the front glass again, making sure that the sides below are perfectly straight. This will avoid leaks. The edges must be carefully aligned joint to joint. The discrepancy in the segments that occurs on opposite edges should not be more than 1.5 mm.
To simplify the work, first apply tape to the glass joints. In this case, you should make sure that the glass is tightly attached and the edge is smooth without distortions. We do not add more tape from the bottom side, leaving a distance of 0.5 - 1 cm, and from the top side - 1-2 cm. This way, the tape will not interfere with the application of glue and will be convenient to remove in the future.
On one of the sides, the tape must be glued to only one half of the tape, the second will hang in the air. On the side where the adhesive tape is located, we place one half of the glass, aligning it evenly, and place the other side on top of it, where there is no adhesive tape. Press down lightly so that the tape sticks better. When carrying out this stage of work, you should constantly monitor the accuracy and evenness of the joining.
Then we slightly lift the structure and iron the last strip of tape so that it sticks tightly to both sides.
Before you start gluing the parts with glue, you need to set the parallelism. It is best to do this along the bottom of the future aquarium, placed on top of the structure. With this method, all errors in geometry and irregularities made during cutting will be clearly visible. Glue should only be used specifically for aquariums. Otherwise, toxic substances can further lead to the death of fish.
Before gluing, you also need to make sure that all open corner and bottom seams are smooth, without holes, bends, or tears. The bottom glass should not touch the walls, so when gluing large aquariums, you must first glue small silicone balls to the bottom edges, and only after they have dried, apply the main layer of glue.
We trim the seams so that there are no distortions. Before filling the seams and bottom edge with glue, they must be thoroughly degreased with alcohol. Corner seams are filled with silicone from bottom to top. The squeezed-out tape of glue should go continuously and fill the entire space of the seam; the tightness of the aquarium will depend on this. Therefore, the glue should not be spared; the excess can be removed after drying. Now you need to align the corner edges again. To do this, we will use a small piece with a flat surface, torn from an A4 sheet and, pressing lightly, draw it along the center of the seam, leveling the silicone. Then, using a clean piece of sheet, we clean the edges of the glass from any remaining silicone that was squeezed out during leveling. You can also apply narrow masking tape to the edges of the glass before applying the silicone so that excess silicone does not fall directly on the glass.
After you have finished gluing the corner edges, you can begin filling the bottom edges with silicone. We attach suction cups to the bottom glass, with the help of which the bottom glass will rise and fall onto the edges. Before applying the suction cups, you need to wet them so that they do not fall behind at the most crucial moment. Glue is applied to the edge of the bottom, and carefully lower the bottom glass onto the glued edges. Then we remove the remaining excess silicone.
Not earlier than an hour or an hour and a half later, the silicone will set and the structure can be carefully turned over. It is worth noting that with low humidity the glue dries better and faster. Now you can remove the tape and carry out preventive maintenance, which consists of applying a layer of silicone to the inner corners of the bottom and walls. Level the applied layer of glue with a piece of paper or a finger dipped in water. At the junctions of walls and bottom, in the lower corners, prevention must be done especially carefully. Maintenance seams should be smooth, without burrs or cavities.
The tape must be removed after 3-5 hours so that it does not stick and leave marks on the glass. If something happens, the remaining masking tape can be slightly moistened with water or wiped off with alcohol; it leaves marks on the glass. Water can be added no earlier than a day later, when the glue has thoroughly evaporated and dried.
Before introducing inhabitants into the aquarium, it must stand in water for some time to check the quality of the bond. If there is a leak in the corner, then you need to take a little glue on your finger and press it into the corner from the inside of the aquarium, without draining the water. If the leak is along the seam itself, you will have to drain the water and remove a piece of the seam. Then press silicone in its place. There are also cases where small bubbles may appear in the seams. In this case, if there is no leak, then it is better not to do anything. Typically, such aquariums operate well for quite a long time.
How to make and decorate a terrarium for Achatina snails?
Achatina snails are large sized mollusks. It’s easy to keep them, because these snails are undemanding to conditions. Even in the temporary absence of the owner, they can feel good if taken care of in advance.
A terrarium for Achatina snails can be made of regular or plexiglass, or you can use a plastic container. The “house” for snails should have small holes for ventilation. It must be of such a size that the snail does not escape.
Important: Achatina snails need space for a comfortable existence. A 3 liter container is suitable for one snail; for two snails - 5 l.
Container equipment requirements:
- Cover the bottom with flower substrate without fertilizers; snails love to burrow into the soil. Suitable substrates include sand, walnut shells, and coconut shells. The bad layer is clay and tree bark.
- The soil should always be moist, but not waterlogged. The soil is sprayed with a spray bottle daily.
- There is no need to install lighting lamps for snails. Soft, diffused daylight suits them. During the day, snails hide in the substrate and are awake at night.
- The air temperature in the container should be about 24°C.
To cover Achatina snails, fragments of flower pots, coconut shells, and stones are placed inside the container. Also, living plants are planted in the substrate: moss, ivy, fern, lettuce, cereals, etc.
Terrarium for Achatina snails: top view
Feeding
As noted above, in comparison with other aquarium fish, kalamoichts have an excellent sense of smell. They love live foods rich in protein, such as bloodworms, small or earthworms, pieces of shrimp, fish fillets, squid, brine shrimp, pieces of raw fish, pieces of frozen food. But Kalamohites are quite slow. While you feed the fish, due to his eyesight and habit of hiding, he will be the last to find food. It is advisable to feed him either at night, during the period of their activity, you can throw food in front of him or feed him a little later separately (after 10-15 minutes), when he feels that there is food. A young individual needs to be fed 5–6 times a day, and an adult 2–3 times.
How to make and decorate a terrarium for a tarantula spider, ants, Madagascar cockroaches, and a praying mantis?
Insect terrariums must also have a number of certain characteristics. If everything is done correctly, the life of insects will be comfortable and safe.
Let's look at how to set up terrariums for various insects.
Terrarium for a tarantula spider:
- Keeping a tarantula spider at home requires a spacious terrarium. There should be no objects with great height inside to prevent the tarantula from falling.
- Provide shelter. Pieces of bark, flower pots and other similar devices are suitable for this.
- It is not recommended to place stones in the tarantula spider's terrarium, as the insect may be injured.
- The size of the terrarium is calculated as follows: the length of the spider’s legs is multiplied by two. For example, the length of the legs of an adult spider is 14 cm.
- In this case, the size of the “house” should be 30x30x20 cm. Moreover, 20 cm is a safe height for a tarantula spider.
- Be sure to make holes on the sides and top for ventilation.
- The bottom is covered with soil, and branches are placed for tree spiders.
Terrarium for a tarantula
Terrarium for a praying mantis:
- A vertical terrarium is suitable for the praying mantis.
- Pour soil into the bottom and place a layer of foliage on top. If the foliage is large, additional cover is not required.
- Humidity should not be too high; spraying is not recommended frequently.
- The temperature in the terrarium is 25°C.
- The terrarium should not be placed in direct sunlight.
- Ventilation is required.
Contents of the praying mantis
terrarium for ants :
- To keep unusual pets, a narrow flat container is required.
- Sometimes 2 jars are used to maintain an ant farm, so that one fits into the other. Both jars are closed with lids. An ant family is located in the space between the banks.
- A terrarium for ants is called a formicarium. Sand or a special gel containing additives for ants is poured inside.
- Some people collect ants in the forest and collect soil there.
Formicarium
Terrarium for Madagascar cockroaches :
- If the terrarium for Madagascar cockroaches is not equipped with a lid, then lubricate its walls with Vaseline so that the insects do not escape. It is better to cover the home of Madagascar cockroaches with a lid with holes.
- There must be a lot of hiding places inside. To do this, they use egg trays; cockroaches love them for the presence of cells, toilet paper rolls, pot fragments, and wood.
- The flooring should be made of fragrant wood with sand. The wood is preferably coniferous, it is changed periodically.
Keeping Madagascar cockroaches
Shelters
The reptile looks for a place where it feels safe. Usually there are at least two nooks: in the warm and cold zones. This is a pile of flat stones, branches, a clay pot, ceramics. They use boxes, boxes with a hole, hanging hollows, and long pieces of bark.
You can buy ready-made grottoes for the terrarium. Artificial structures weigh less than natural ones. Shelters with one transparent or removable wall have appeared on sale for observing secretive individuals. To organize a wet shelter, sphagnum moss is placed on the floor in the box. It is moistened periodically - it stores water for a long time.
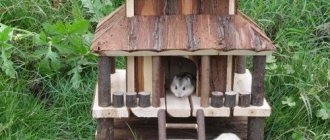
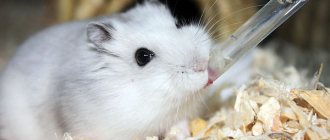
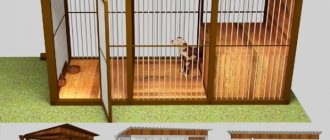
How to make and decorate a terrarium for rodents and hamsters?
In most cases, rodents, including hamsters, are kept in cages. Rodents can also be kept in terrariums, providing air access.
Terrariums for hamsters can be made of plastic. They have a number of advantages over the cage:
- Firstly, sawdust does not fall out of the terrariums;
- Secondly, at night you can’t hear the hamster gnawing on the bars of the cage.
A hamster can be kept in terrariums of varying sizes; the size of the pet should be taken into account. If there is a well-equipped “home”, the pet will feel quite comfortable.
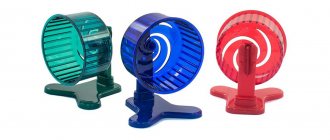
How to design a terrarium for a hamster:
- Cover the bottom with sawdust or hay;
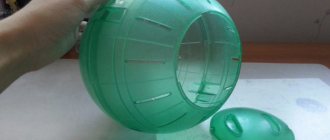
- Place a drum or wheel, a feeder, a drinking bowl;
- It is also necessary to have dry twigs and sticks; the hamster will sharpen its teeth.
Comfortable house for a hamster
What helps maintain humidity in a terrarium?
Keeping many exotic pets requires a certain level of humidity in the terrarium. For some animals, high humidity is indicated, for others, humidity is contraindicated. For example, hamsters will feel great in dry sawdust, Achatina snails vitally need a wet extract, mantises will not be able to survive if there are drops of condensation in the terrarium.
Important: The easiest way to maintain humidity in a terrarium is to spray the soil with water from a spray bottle.
The required soil moisture for pets is different:
- Humidity for Achatina snails is checked in this way - squeeze a handful of soil in your hand, if water drips, then the soil is waterlogged. Achatina snails react negatively to high humidity: they hibernate, become lethargic, and lose their appetite.
- Moisture is also important for ants. You can determine the level of sufficient moisture in the formicarium as follows: if perspiration appears on the walls, stop spraying.
- The soil in the praying mantis terrarium should be sprayed rarely. It should be slightly damp. How often this needs to be done is difficult to say for sure, it depends on the air circulation in the terrarium.
- The optimal humidity level for the tarantula spider is 35-60%.
You can determine the exact air humidity using a hygrometer .
A hygrometer determines the humidity level in the terrarium
How to make the temperature 33 degrees in the terrarium?
Important: Temperature is one of the most important requirements for maintaining the microclimate in the terrarium.
Terrarium animals are very sensitive to temperature changes. All animals have their own biological needs for thermoregulation.
Various devices are used to maintain temperature:
- Heating lamps;
- Heated mats;
- Ceramic heaters;
- Infrared lamps.
- Heating thermal cords.
Warm areas are made for scaly ones. In these “sunny areas” the pets periodically bask. Then they crawl to places with lower temperatures. Heating lamps are suitable for this. They should be placed in such a way that the pet does not get burned from touching.
For snakes, heating mats are used under the ground; turtles are heated from above. To heat the snails, use a heating pad or rugs.
A budget-friendly heating method is to place the terrarium near heating radiators or heaters. But this method has a number of disadvantages that can affect the normal life cycle of animals. Still, it is better to use special devices for heating terrariums.
Important: You can and should monitor the temperature in the terrarium using a thermometer.
How to make and decorate a large terrarium from an aquarium for plants and flowers?
A terrarium is not only a “house” for your beloved pets. You can grow plants in a terrarium. Terrariums with plants have many advantages:
- They are easy to care for.
- This is a luxurious element of the interior.
- Suitable for people with a minimum of free time and a desire to have indoor plants at home.
- A good alternative to flower pots.
Aquariums are suitable bases for terrariums. But before you fill it with soil and plants, you need to understand which plants are suitable for terrariums:
- Plants that prefer or tolerate shade easily.
- Dwarf plants. It is important that the plant does not outgrow the walls of the terrarium, otherwise its appearance will suffer over time.
- Plants that love humidity.
Plants that are most often grown in a terrarium are moss, cacti, and succulents.
If you decide to turn an aquarium into a terrarium with plants, keep in mind that the aquarium with soil will become very heavy. Therefore, do not place it on fragile tables. Also, such terrariums should not be placed under air conditioning or in close proximity to heating appliances.
Think in advance about how the lighting will be maintained. Direct sunlight is contraindicated for the terrarium, but darkness is also unacceptable. Optimal lighting is indirect diffused light. You can use special garden lamps.
Large terrarium for plants
Important: If you decide to use an old aquarium, wash it thoroughly with antibacterial agents or soap. Residues of dirt and bacteria can subsequently harm the plants.
To arrange a terrarium, in addition to plants, buy a soil mixture with drainage. It is desirable that the soil contains the addition of bog moss or sphagnum. You will also need pebbles (gravel), moss, all kinds of decorations, and gloves.
The following layers are placed in the aquarium:
- Pebbles or gravel . You can add a handful of activated carbon, this will serve as additional drainage.
- Moss . A layer of moss will prevent soil subsidence and retain moisture.
- Soil . The soil layer should be thick enough to accommodate the plant roots. Also, the thickness of the soil depends on the height of the aquarium.
- Plants . Plant the plants in the holes. Water the plants.
At the end, you can add decorative elements that will not be damaged by excess moisture. These can be any objects: shells, figurines, coins. At this point, the organization of a terrarium for plants is ready.
Basilisk - an amazing lizard
This reptile has a crown-shaped crest on its head. The Basilisk lizard has an amazing feature: it runs on water at a distance of 300-400 m. But only young individuals whose weight does not exceed 50 g are endowed with this gift. Scientists conducted a lot of research before understanding how it manages to do this. It turns out that this phenomenon is accompanied by the structure of the paws and tail, low weight and speed. For this ability, the reptile was called the Jesus Christ lizard.
The reptile is an excellent swimmer. The Basilisk lizard can stay in the water for 2 hours and is able to move on its hind legs and climb trees. This nimble and fast reptile can run 10 km in an hour.
A characteristic feature of the lizard is its omnivorous nature. It feeds on insects, plants, berries, small rodents and lizards, as well as its own young. They produce offspring four times a year and live up to 10 years in a family of one male and several females. He is awake during the day and sleeps at night. When resting, they become easy prey for mammals, birds of prey and large snakes.
How to make and decorate a terrarium with your own hands from a can, bottle, plastic
The plant terrarium is called florarium. You can grow plants in a bottle or jar. This flower arrangement takes up very little space, but looks impressive.
Growing plants in a jar or bottle is similar to growing plants in a greenhouse. The presence of container walls allows you to maintain the necessary microclimate of the florarium. Jars with plants are covered with lids or a small hole is left.
The disadvantage of growing plants in a jar is the difficulty of care. Cleaning a florarium and getting rid of dead plants can be quite troublesome. But, nevertheless, this does not stop connoisseurs of florariums.
For the florarium, you can use both glass and plastic bottles. Plastic containers are inferior to glass ones in their characteristics and appearance. The container does not have to be in the form of a jar. These can be vases, serving caps, large glasses, etc.
Important: You cannot grow plants that are incompatible with each other. For example, succulents and ferns. These plants have opposite watering requirements, so there is a risk that the florarium will deteriorate.
In addition to evergreen exotic plants, you can grow a single flowering plant in a jar. Recently, it has become fashionable to give such flower arrangements. The advantage of such a gift is its durability. You can, of course, give a flower in a pot, but a florarium looks more impressive and stylish.
Florariums are used to decorate home and office interiors. A row or series of florariums looks original. The process of planting plants in a jar or bottle is essentially no different from planting plants in an aquarium. However, planting plants in a container with a narrow neck is painstaking work.
How to plant plants in a bottle or jar:
- First, layers are poured in the same order as in the aquarium: pebbles, moss, soil.
- Use a long narrow stick to make indentations.
- Carefully remove the plants, along with their roots, from the pots in which they were sold.
- Using two long sticks, place the plants into the holes.
Caring for the terrarium is not difficult: just water the plants as the soil dries out, and also wipe off the dust from the jar inside and out. If there are no problems with wiping dust from the outside, then many may be puzzled - how to wipe the dust inside the terrarium? This is not difficult: you can wrap a piece of soft sponge on a flexible wire, which will simply cope with dirt. A soft-bristled toothbrush will also work if it is the right size for your terrarium.
Florarium
We collect everything you need
What materials will be needed to create a terrarium?
- gravel
- fertile soil, soil
- charcoal
- pebbles
- moss
- plants
- decorations (stones, figurines, other interesting elements)
It is worth dwelling on plants in more detail. Since we are considering "mini" terrariums, the plants should not be tall. Another important point is unpretentiousness.
For a closed terrarium, moisture-loving plants are suitable; the best choice would be various types of moss and ferns. Plants of the bromeliad family from tropical forests will also like the conditions. Saltirolia, called baby's tears, is another option.
For an open terrarium the variability increases. Succulents and cacti are the leaders in size and variety of appearance, especially since they are unpretentious. Some types of plants absorb moisture from the air and do not require watering - only spraying. For a terrarium this will be the most convenient option.
How to make and decorate an eternal mini-terrarium from a light bulb?
Terrariums made from light bulbs look original and stylish. The most common light bulbs of different sizes are suitable for making such a terrarium. To begin with, we recommend trying to work with the largest light bulb.
You will need:
- Large light bulb;
- Screwdriver;
- Round nose pliers;
- Scissors;
- Long tweezers.
Be sure to protect your eyes with goggles, as pieces of glass may fly off during operation.
Step-by-step production:
- Remove the metal seal on the light bulb base.
- Then use a screwdriver to very carefully break the internal parts of the light bulb.
- Using long tweezers, remove the “entrails”.
- Finish the hole well with a screwdriver so that there are no sharp edges.
- To stabilize the light bulb, make legs by adding 2-4 drops of silicone glue.
- Now pour sand and dry moss through the funnel and place the plants using long tweezers.
- You can use small pebbles and plastic figures as decoration.
- A mini-terrarium made from a light bulb can be placed on a stand. This will make it even more impressive.
Mini terrarium in a light bulb
Materials
Plexiglas is the most suitable material for a terrarium
The most suitable and affordable materials for creating terrariums are silicate and organic glass.
Advantages of plexiglass:
- It is more difficult to break than ordinary silicate;
- Containers made of plexiglass accumulate heat well and reluctantly release it into the surrounding space;
- Its fragments rarely form sharp edges on which you can cut yourself;
- Plexiglas is easier to process and fasten.
Plexiglas has fewer disadvantages than advantages, but each of them can become critical for a terrarium.
- Plexiglass is easy to scratch. Therefore, you can only wash it with a soft sponge or gauze;
- The surface of the plexiglass becomes cloudy over time and begins to turn yellow;
- Ultraviolet rays are harmful to plexiglass.
Thus, plexiglass is a good material for terrariums whose inhabitants cannot scratch the walls. These could be spiders, snakes, Achatina. To make terrariums in which animals with sharp claws (lizards or turtles) will live, you should choose a different material.
In addition to the plexiglass itself, you will need plastic corners and a metal mesh for ventilation. To make doors, you need two types of plastic E profiles. The upper profile should be 2 times deeper than the lower one. The size of both profiles corresponds to the thickness of the door material.
Choice of plexiglass
In order to choose the right plexiglass for a terrarium, you need to know that it comes in two types - cast and extruded. Casting is more expensive, but does not have most of the above disadvantages. It is stronger than extrusion and less cloudy. Some brands transmit UV rays well and are not destroyed under their influence. Therefore, it is worth choosing those brands of molded plexiglass that are characterized by strength, preservation of transparency and do not block UV rays. The sheet thickness should not be less than 5 mm.
Glue selection
The glue must meet two characteristics:
- Be harmless to living organisms, do not release chemicals upon contact with litter, water or excrement;
- Be durable and waterproof.
In practice, any silicone sealant for gluing terrariums or aquariums meets these conditions.
When working with such sealants, you must be careful, since drops frozen on the material are difficult to clean off.
Ideas for hanging and tabletop terrariums: photos
Below you will find ideas for plant terrariums of various configurations and with different plants. Get inspired to create beautiful and unusual home decorations with your own hands.
A small terrarium in a glass cup is perfect for decorating your desktop.
Tabletop terrarium
Hanging terrariums of different sizes are convenient.
Hanging terrariums
Even teapots can be used, the main thing is to use your imagination.
Original florarium
Some flowering plants will thrive in beautiful terrariums.
Blooming florarium
Decorative terrarium in a round container.
Bright florarium
A tabletop terrarium will decorate any interior.
Small tabletop terrarium
Terrarium idea
Making a terrarium for plants or animals is not difficult if you approach this issue with inspiration and the desire to create a useful and beautiful thing.
Substrate
They hide in the ground, look for food, and wear down their claws on it. Peat, mulch, sphagnum, clay, coconut crumbs - choose what your pet is used to in the natural environment. For desert animals, sand of different colors is used. Sawdust - for large lizards: monitor lizards, tegus, snakes.
The gravel should not be larger than mouth size to prevent small animals from eating it. No sharp edges allowed. For children and during quarantine, use paper napkins or clean sheets of white paper. Arboreal amphibians quickly contaminate the soil with mucus: they are recommended to use an artificial substrate - it is easier to wash.