Types of cages for rabbits
Rabbit cages are classified according to the following criteria:
- Type of rabbits. Large and small breeds, adults, pregnant females and those who have recently given birth, young animals kept for separate living.
- Method of operation. Stationary, portable. Outdoors, indoors.
- Material. Wood, metal, plastic.
In one household it is permissible to have several different types of cages for rabbits, each of which serves its purpose. According to their design, cells are divided into single-tier, two-tier, and three-tier. The choice depends on the available space. Despite the differences in designs and parameters, there are general manufacturing rules that have been proven in practice. It is recommended to adhere to them.
Choosing a suitable location for a rabbitry
Before the construction project begins, the location for the building is determined. The nursery is located on the street or in a utility room.
In the first case, a suitable area is selected, protected from:
- dampness;
- draft;
- exposure to direct sunlight.
The health of animals, as well as the quality characteristics of meat and fur, depend on proper housing conditions. Therefore, they also think about the number of cages for rabbits and the sizes of sections. Select a cozy area for the queen cell.
Air humidity in the rabbitry should not exceed 75%. Therefore, the building is installed away from ponds or other sources of water.
DIY rabbit cage construction
The creation of structures begins with the selection of materials. The basis is wooden blocks treated with antiseptics to avoid damage to the wood. In addition to the frame, you should take care of the walls, floor, ceiling, and doors. For individual parts of the structure, appropriate material is selected.
To build a rabbit cage you will need:
- bars;
- boards;
- plywood;
- net;
- wooden slats;
- metal wire;
- slate;
- plastic pallets;
- door bolts;
- loops;
- fasteners;
- drinking bottles.
Internal partitions are made from sheets of plywood, using its qualities such as strength and moisture resistance. Chipboard is an unsuitable material because it absorbs moisture and breaks down due to swelling.
Before installation, the wooden parts are sanded and sanded. Do not leave sharp edges so that animals do not get hurt on them. It is advisable to cover the protruding parts with iron. The height of the legs depends on the location: when installed outdoors, their size is from 80 cm, and indoors they are half as low. The diameter of the cells should be no more than 2x2 cm. When installing rabbit cages in an open space, the use of roofing materials is necessary. It is undesirable to make the roof metal, since its strong heating in hot weather can lead to thermal shock.
Features of a large bird cage
In addition to size, it is worth considering other factors in keeping large birds. Large parrots are capable of bending the bars of an ordinary house with their beak, so you should choose thick wire. Most likely, wooden cages will not be suitable, as they are not always able to withstand constant impacts and may break.
Stages of building a rabbit cage
The production of cages for rabbits occurs in stages. First, the prepared bars are treated with an antiseptic. This prevents the appearance of rot on the tree and the penetration of harmful microorganisms. The requirements for the antiseptic are environmental friendliness, the absence of a large amount of chlorine, so as not to expose pets to harmful chemicals. This treatment increases the service life of wooden products.
The processed timber is cut into parts: four one and a half meters long, four 55 cm each, two 70 cm each. Then the planks are connected in such a way that two identical rectangular figures with sides of 1.5 and 0.55 m are obtained. After connecting with the beams, a box is obtained , which is the basis of the cage for keeping rabbits. Dimensions may vary depending on design.
Then you should start building the floor. It can be made from different materials, which have their own advantages and disadvantages: metal profiles, mesh, slats. A high-quality floor will be obtained by combining. For example, there is a metal profile below, and a mesh on top. The profile will prevent the mesh from deforming, which increases service life. Such a floor is not subject to rotting, like wood, but it faces another danger - metal corrosion. In addition, a metal floor is cold for rabbits to live in, while a wooden floor creates a more natural environment for them.
Expert opinion
Dobryshev Sergey Anatolievich
Professional rabbit breeder and hare breeder with 30 years of experience
If you intend to place a queen cell for grown-up rabbits in a cage with female rabbits, a part 50-70 cm wide should be left on the floor with a mesh for the construction of a wooden covering. The floor is secured with nails and screws.
Material for walls - boards, plywood, mesh. The back part is made of boards. For the front, a mesh is used. This allows you to observe the behavior of your pets. Plywood is suitable for the side parts. The roof is also made of waterproof plywood, but if the design provides for its tilting, then it is necessary to attach hinges. They are screwed to the timber, and then the plywood is installed. The entire structure is placed on legs about a meter high. The last stage is the installation of feeders and drinkers.
Making cages from mesh
These are very simple and cheap designs - all elements are made of metal mesh. The cages are easy to move indoors in winter and outdoors in summer. You can place it directly on the ground, which makes caring for animals much easier.
Frameless cage is an excellent option for rabbits for the summer season
To work, you will need wire cutters or a grinder to cut the mesh. This is one of the few cases when we recommend cutting galvanized mesh with a grinder. Why? The fact is that with this tool you can completely grind off small pieces of wire, and in some areas of the cage the cut should be perfectly smooth. Otherwise, rabbits may be injured, which is very undesirable. You need ordinary pliers and a clipper for crimping metal staples. If it is not there, then you can only get by with pliers, but the manufacturing process will become much more complicated, and the appearance will deteriorate.
What is a clipper
Step 1 . Make the bottom. For this element, you can use a mesh with cell sizes of 16x48 mm; such cell parameters ensure good manure drainage, the floor is always clean and dry. Rabbit breeders know that wet floors make rabbits sick and lose weight. In our case, the cells are two meters long, 90 cm wide, and there are four cells of 50 cm each in one row. Cut the mesh to the appropriate size, the number of parts depends on the number of sections.
Cut out a blank for the bottom from the mesh
Practical advice. If this technology is unfamiliar to you, then make blanks for only one section. After gaining experience and taking into account the mistakes made, you can move on to manufacturing a large number of cells.
Step 2 . Make blanks for the sides and top. For these purposes, it is recommended to use a mesh with cell dimensions of 25×25 mm, wire thickness 2.0 mm. Why so fat? Because the vertical elements must have sufficient strength, these are load-bearing parts. As we have already said, this design does not have an additional frame made of wood or rolled metal.
Make smaller blanks for the sidewalls
The length of the front panel is equal to the length of the bottom, the height is approximately 42 cm. The exact dimensions vary depending on the size of the cell - you need to choose such that the cut is made next to the dividing wire. To increase the rigidity of the structure, it is recommended to bend the front part in the upper part. Using the same algorithm, mark the side and rear parts. Cut them according to the marks, bend the stiffeners.
Step 3 . Place the bottom on a flat surface and fasten it to the back and side parts. Place and fix partitions at the required distance. You need to work with a clipper; if necessary, the staples are pressed with pliers. Connections can be made through two cells, the step does not have much effect on the strength of the structure, and the pushing forces are minimal. For reinforcement, galvanized wire with a diameter of 3–4 mm can be installed along all ribs.
Connect the cell parts with a clipper
Step 4 . Start making the doors. There are two options: one for each cell and three at once. The second option is easier to do, but it makes the process of caring for rabbits a little more complicated. While you are busy with one cage, animals can escape from the rest. The doors are made in this sequence.
- The mesh is cut to size, the front part is slightly bent so that it fits onto the vertical wall.
- At the back, the mesh is fixed with wire to the wall, but a strong clamp is not made. The mesh should turn without jamming.
For the door, the edge of the mesh is folded
When closed, the doors must be secured with carabiners or springs. If you wish, you can make homemade elementary hooks.
Instructions for building a rabbit cage yourself
The construction of a rabbit cage begins with a drawing. The optimal options are selected depending on the breed, age, and number of animals raised. The choice of materials depends on the following criteria: strength, resistance to mechanical stress, resistance to moisture.
We should not forget that rabbits belong to the order of rodents and can significantly damage wood. The materials used must not evaporate harmful substances. Drafts are unacceptable, but there must be air circulation, which is provided by micropores in the walls. All fittings used must be of high quality and protected against corrosion.
Construction begins with the construction of a frame to which a metal mesh and sheets of plywood for the walls are attached. Arrangement of the floor is a crucial moment. The best option is replaceable structures. They are easy to remove, clean and reinstall. In case of severe damage, they can be replaced with new ones. Metal mesh is more convenient to clean, but it provokes dermatitis, so wooden slats are preferable.
The roof of the rabbit cage is also a canopy that protects from precipitation and ultraviolet rays. You can make additional opening doors in it. The roof has a slight slope. In addition to plywood, roofing materials can include tiles and slate. The metal option is not suitable, since in hot weather this will lead to strong heating inside.
The finished cage is installed outdoors or indoors, depending on weather conditions. In cold weather, insulation is carried out by upholstering the cell walls with sealants: mineral wool, polystyrene foam, stitched mats. Rabbit hutches require regular maintenance.
Adviсe
Designing a parrot cage is not limited to assembling the main frame. For a full life, a bird needs to have devices that provide food and water.
To arrange these devices, you can take advantage of the properties of the metal mesh from which the cage walls are made. Containers for water or food are hung on mesh cells using homemade hooks made of strong wire.
For a parrot to live comfortably in a cage, you need to arrange a perch. To do this, you can use a homemade crossbar, which rests with its edges in the mesh cells located on opposite walls. In most cases, there is no need to permanently secure the perch. It is periodically removed to clean out droppings.
The simplest additional device in a parrot cage is a swing. They are made from two pieces of steel wire. Loops are bent on both sides of each segment. A wooden crossbar is threaded into one pair of loops, on which the bird will sit, and the other pair of loops is fixed to the ceiling of the cage, maintaining the possibility of a pendulum motion.
DIY rabbit cages: drawings, dimensions
When doing serious business, one cell is not enough. A whole complex of structures will be required, for each of which a separate drawing must be drawn up. The appearance of cages for rabbits largely depends on imagination and financial capabilities, but there are size limits that are not recommended to be violated. The height of the room should not be less than 45 cm. For adults, the optimal area is 150x70 cm. It is necessary to provide a place where the animals can walk.
The front wall is made a few centimeters higher than the back. Individual sections can be connected by small manholes. The hinged lid will provide additional convenience during maintenance. Regardless of the breed being raised, we must not forget that the animals must have sufficient space for movement. Their deficiency will lead to obesity and decreased fertility. In outdoor cages you can make holes into a fenced pen.
You can get ideas for rabbit cages by browsing the relevant websites. If you want to draw up your own drawing, you can do this on graph paper or by using special programs and printing the result.
Optimal size and shape
The dimensions of the structure depend on the type and number of parrots that will live there. It should be such that the pet can freely flutter from place to place without touching the bars. For different breeds of birds, there are minimum acceptable housing sizes.
Optimal sizes for a cage
A large cage of at least 100x100x170cm will be required to keep a macaw, cockatoo or amazon. Also, not very small housing is needed for a pair of medium-sized parrots or a flock of tiny birds. The minimum acceptable proportions are 30x40x50 cm, suitable for a wavy bird or lovebird.
The best cage shape is rectangular with a flat roof surface, as there are breeds that like to run along the walls and ceiling of their house. In addition, a platform is formed on the surface of the cage where you can place a game stand.
If the owner likes the round configuration, it must be taken into account that the pet in such a home loses its bearings. He will not feel safe, as his instinct is to hide in a corner if threatened.
Drawings of cages for rabbits with dimensions: examples
The most common are double structures with separate sections. One section houses the adults, and the other contains the queen cell. Other types include cells with one section, three sections, and group ones. There are original designs.
Drawing up a drawing, algorithm of actions
First you need to draw up a drawing in one plane. It will become clear how much space the structure will take up, and if necessary, make adjustments.
An axonometric drawing will make the future home more visual.
Features of keeping broilers
To begin with, this is not one, but several collective breeds. They can provide a sufficient amount of meat, cheap and tasty, in the shortest possible time.
- Their content is associated with certain differences, since the requirements are both rapid growth and weight gain.
- By two months, for example, a chicken may well weigh a couple of kilograms.
- The size of the cage area for broiler chickens is determined with your own hands before its manufacture.
- Taking into account that the density of birds will be eighteen per square meter.
Adults will need more space. About nine heads can be located on one square.
Do-it-yourself rabbit cage: photo examples, types of designs
There are significant differences between rabbit hutches. If you want to make it yourself, you can choose from existing designs.
Simple one-story
Two-story
With a place to walk
Made of wood with metal mesh
Cage for adult rabbits
For adults, two-tier and three-tier cages are suitable. This significantly saves the area allocated for rabbit breeding. Plywood partitions divide the interior into areas for eating and relaxing.
The family home consists of three sections. A breeding male with good characteristics is placed in the middle, and healthy females suitable for mating are placed in the side compartments. Manholes are made between the compartments.
The construction of three-section cells has its own peculiarities. The frame is assembled from timber, and boards are used on the outside. On the inside, plywood is preferred. The back wall is made of boards, and a mesh is mounted in front. The compartments for females have an attic where she can climb using a special board. This is necessary for the rabbits to rest from maternal duties. Otherwise, they may develop aggression, leading to the death of newborns. This option is suitable for breeding purebred rodents, allowing you to sort individuals and monitor the onset and progress of pregnancy.
A separate room for young animals is built with minimal dimensions. You can immediately move strong rabbits into a room for adults.
Do-it-yourself rabbit cage: step-by-step instructions for the production of work with photo examples
DIY rabbit hutches have the great advantage of allowing you to take your specific circumstances into account. For example, we can consider the construction of a two-section cage.
Step 1. Treat the bars with an antiseptic.
Step 2. Cut the timber into parts of the required size in accordance with the requirements of the drawing.
Step 3. Connect the parts so that you get rectangular shapes.
Step 4. Assemble a frame from them.
Step 5. Start installing the floor.
Step 6. Start upholstering the walls. The back one is made of boards treated with an antiseptic, and the front one is made of mesh.
Step 7. Cover the inside of the walls with plywood.
Step 8. Build the roof.
Step 9. Install planks on which movement is possible.
Step 10. Place an excrement tray at the bottom.
Step 11. Place the cage on supports.
Step 12. Place feeders and drinkers inside.
Cage requirements
In order to end up with a cage suitable for keeping laying hens, you must initially decide on the key requirements that it must meet. Attention should be paid to the parameters described below.
Dimensions
In order for the calculations to be correct, you need to take into account the dimensions of the bird that you plan to keep. They depend on the breed of chickens:
- Egg. In this case, the cage does not need to be made too high, since the dimensions of such a chicken are small. It is believed that one individual needs to be allocated an area of 20 to 50 square meters. cm.
- Meat-egg. Representatives of meat and egg breeds are large in size, so for 1 individual you will need to allocate more space - about 80-90 sq. cm.
When calculating the size of the cage, you must also take into account the number of livestock, since it is extremely important to maintain a balance in area and prevent unnecessary overcrowding in the future. So, according to the number of heads, a cage can be:
- single – 500x500x650 cm;
- for 2-3 laying hens – 600x1000x450 cm;
- for 4-5 laying hens – 600x1200x500 cm;
- for 5-7 laying hens – 700x1500x650 cm.
In case of limited space, several cages can be installed in tiers.
Strength
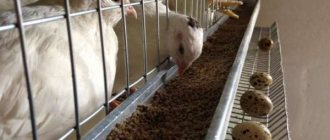
The structure must be strong to support the weight of not only the birds, but also the necessary equipment. So, you need to take into account that each individual section is often equipped with drinkers, feeders and a device for collecting eggs. To prevent the cage from bending over time from the weight of the birds, blank walls should not be allowed. The lattice structure must be strong and have small cells so that small predators like weasels and ferrets cannot get through. The largest cells should be made in the front wall so that the chickens can stick their heads through to eat if necessary. Their optimal size is 5x10 cm.
If you make the floor of the cage mesh and install a tray underneath to collect litter, this will greatly simplify the cleaning process.
Lighting
The amount of daylight directly affects the intensity of egg laying. Thus, with a reduction in daylight hours in autumn and winter, the egg production of birds decreases, and with an increase in spring and summer, it increases. In order for laying hens in cages to receive the right amount of light, it is necessary to properly organize additional lighting. It should be taken into account that the optimal duration of daylight in warm weather is 14-16 hours with an average room illumination of 20-50 lux.
When installing lighting, you need to use a dimmer, as it will allow you to smoothly turn the light on and off, which will create the illusion of day and night. Thus, the chickens’ psyche will not be traumatized, and this is extremely important for their good egg production. In addition, such a device allows you to increase the service life of the lamps.
Centralized lighting (one lamp per chicken coop) is unacceptable, since the light flux must evenly illuminate the cellular systems.
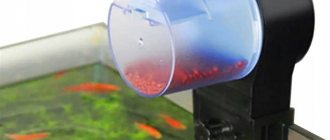
Availability of an egg collector
This device will make it easy to get eggs without disturbing the chickens. Moreover, without it, almost half of the eggs will be consumed by the birds themselves.
Do-it-yourself two- or three-tier cage for rabbits: step-by-step instructions with photo examples
To make a rabbit cage you will need some materials. The frame is made of timber, the ribs of which are located inside, sheathed with a metal corner to protect the wood from the sharp teeth of rodents.
Assemble the sides. The parts are fastened with corners using self-tapping screws.
From the edge, measure the distance corresponding to the door, and attach the partition to give strength. The same actions are repeated on the opposite side.
Between the door openings, 2 bars are mounted in the shape of the Latin letter “V”. This is where the feeder will be located.
Having assembled two such partitions, they are connected with pieces of bars using reinforced corners. The result is a finished frame.
Now it's time to start installing the bottom. A good option is to use wooden slats.
The gaps between them should be of such a size that the rabbit's paw cannot get stuck there.
The protruding parts must be cut off.
Cover the first tier with a sheet of metal and fix the stop for installing the second floor.
The third tier is also installed.
Now it's time to install the doors. Loops are used for this.
Before moving in it is necessary to carry out disinfection.
Zolotukhin's cage is more than just comfort
The famous rabbit breeder Nikolai Ivanovich Zolotukhin developed an original building plan for animals. Thanks to the successful design of the structure, the animals feel as protected as possible, and the farmer cleans their home much less often.
The main features of the Zolotukhin rabbit cage are:
- formation of a 2-3-tier nursery;
- ensuring the desired slope of the rabbit cage;
- replacing the mesh floor with slate or plywood;
- mobile/mobile feeder;
- lack of a permanent nesting site.
Traditionally, Zolotukhin’s cage is designed for 6 adults. However, you can increase or decrease the number of sections.
The floor of all compartments is made at a slope of 20-30˚ (6-8 cm), so that animal feces spontaneously roll into the far part of the structure. A grate (15-20 cm wide) is attached along the entire length of the back wall, through which the animals’ waste will come out. Each subsequent floor is mounted with a shift, exactly the width of the built-in grid. Such a rabbitry arrangement is very practical, since, as has been noted, pets urinate precisely at the back wall of their home.
The feeder in such buildings is presented in the form of a bucket, which is attached with screws to the door frame of the cage. The food device rotates freely around its axis, like a swing. This allows you to clean it without any problems.
In this design there is no queen cell. However, the nest is made in a shaded corner of the building, separated by a board ½ the height of the rabbit cage. A sufficient amount of hay is placed there, from which the female independently forms a nest. Once babies reach one month of age, the separating sheet and space are removed.
Scheme and nuances of cell construction
Nikolai Ivanovich considered it necessary to install a sennik between the cells. The rabbit breeder divided each tier with a device made of wooden slats. The academician connected the lower ends of the planks, and left a distance of 20-30 cm in the upper part. The resulting triangular block will take up to 40 cm in length. When constructing a unique cage, Nikolai Zolotukhin suggests using ordinary drawings.
A three-tier rabbitry with 6 compartments can have the following exact dimensions:
- height - 132 cm;
- length - 248 cm;
- depth and width of compartments - 60 cm;
- height of the stand legs - 40 cm;
- edging or connecting strips - 4 cm.
The height of each tier is different. The blocks on the first floor are 35 cm high, on the second - 49 cm, and on the third - 40 cm.
It is not always necessary to install a net at the back wall of a rabbit cage. It is enough to simply make a gap of 2 cm on the back side, and also raise the floor of the structure by 8 cm. A wooden block is laid on the frame, and then a floor of plywood or slate is laid. The result will be a hole through which feces will come out. Since the 2 parts of the structure are installed with the back wall facing each other, a sewer gutter is installed between them at the bottom. At the same time, it is made at a slight slope.
The frame is made of 4 beams. For strength, they are fastened with transverse wooden
Cages for rabbits in two tiers
The construction of a two-tier cage is not much different from a single-tier one. The height is 2-2.5 m, width – 1.4 m. The dimensions can be changed, but within small limits.
How to make a two-tier rabbit cage with your own hands: nuances
When designing, it is necessary to provide for nuances that will make the premises reliable and make caring for animals easier:
- It is recommended to use hinged doors in the rear wall or roof.
- Don't skimp on fasteners.
- To prevent rabbits from injuring themselves, the edges of the mesh and fasteners should be carefully sealed.
- Installing a retractable tray will make cleaning easier, where feces will fall through the mesh on the floor and urine will flow.
- The lock, which is a piece of wood rotating on a nail, is unreliable. A better option is hooks or latches.
- To prevent rabbits from gnawing the partition, the edges of the openings should be lined with tin.
- The roofs of each of the tiers can be lined with linoleum.
Required materials and tools
Wire
Strong steel wire will do. It should not be galvanized or painted, otherwise the pet may be poisoned. The thickness depends on the type of bird and the strength of its beak. For small breeds, a diameter of 1.5-2 mm is suitable, and for macaws and cockatoos - 5-5.5 mm.
Cage for budgies. Size 0.8 x 0.7 x 0.4 m.
Metal corner and profile
Metal corners for fastenings must match the width of the wooden slats. It is unacceptable for them to protrude beyond the frame.
Tree
It is a more preferable material than plastic. It should not contain any toxic glue or paint solutions. The stand or pallet should be made of ash, oak and other hard types of wood; branches of fruit trees are suitable for perches. You cannot use conifers, lilacs or acacias for work, as they contain dangerous glycosides.
Chipboard or plywood
It is advisable to make the bottom part of the product from fiberboard. Unlike plywood, one side of the fiberboard is coated with a water-repellent layer, which allows you to keep the cage clean and makes cleaning easier.
Finches, DIY bird cage part 1
Nails, self-tapping screws, screws with stops
Consumable small parts must correspond to the dimensions of the wooden blanks. The screws that are screwed in should not stick out on the other side. The thread pitch is selected in such a way that the wood does not split during screwing. The required drill diameter options are carefully selected so as not to damage the material being processed.
Wire cutters
Like tin snips, they are needed for cutting wire or mesh.
Net
Its thickness is subject to the same requirements as the wire. The size of the holes should not be larger than the bird's head to prevent the pet from getting stuck or injured.
Metal scissors
Necessary for cutting metal mesh or wire to fit the dimensions of the structure.
HOW TO MAKE A CAGE FOR A PARROT WITH YOUR OWN HANDS
Wood hacksaw
A hacksaw and a jigsaw are sawing tools that you cannot do without during carpentry work.
Screwdriver or screwdriver
A Phillips screwdriver is usually used. You can also use a screwdriver, which is easier and faster to work with.
Making your own rabbit cage using the Mikhailov method
Rabbit cages built using the Mikhailov method are multi-tiered mini-farms. The structure consists of several tiers, each of which serves as the basis for the next. The bottom is made of slatted lattice, which ensures that manure falls into a special container. The walking compartment is equipped with feeders and drinking bowls. Food and water are replenished as needed.
The main advantage of mini-farms is minimal human participation in the production process, which ensures the absence of stress for shy animals.
Cages for rabbits Zolotukhina
This structure increases the efficiency of raising rabbits. The structure consists of three tiers. The higher ones are shifted relative to the lower ones by the width of the grid. There are two cells on each floor. The feeder is a tilting tray, which makes it possible to add food without opening the door.
This design is very popular.
Types and dimensions of rabbit hutches
For the full-fledged rearing of individuals, an entire “residential complex” is created. It can consist of several blocks, which are formed into 2-3 tiers to save space.
When keeping such a population of rabbits, up to 6 structures for different purposes are often erected:
- pregnant rabbits;
- young animals;
- males;
- giant rabbits;
- adults;
- females with offspring.
Calculation of area for each individual rabbit. Adults are allocated up to 0.7 m² of space, and cubs - only 0.25 m².
The size of the cage for rabbits is determined taking into account the needs and developmental characteristics of the animals. The table below provides recommendations for the design of buildings for keeping different types of animals.
It is worth considering that females with cubs are sent to a nest-nursery, which differs:
- high-quality thermal insulation (layer of foam or hay);
- special purity;
- high sound insulation (double walls);
- sufficient space.
| Animal species | Height (cm) | Length(cm) | Depth (cm) or width | Standard size (cm) VDG |
| Adults (per animal) | 45-60 | 100 | 55-75 | 45×120×75 |
| Young animals (10-20 heads) | 50-60 | 300 | 100-150 | 55×300×130 |
| Giant rabbits (weight - 10 kg, size - 70 cm) | 65-70 | 150-200 | 75 | 70×180×75 |
| Females with cubs | 50-55 | 70-80 | 60-65 | 50×70×60 |
It is recommended to keep adult rabbits in block structures, divided into 2-3 compartments. A mesh is usually used as a partition. As the offspring grow older, it is removed, impoverishing the sections among themselves.
Each rabbit cage should be equipped with space for:
- sleep;
- eating;
- walks.
The optimal dimensions of each compartment are 30x60x50 cm. The space is zoned using plywood partitions. In each of them holes are formed for the free movement of animals. The maximum height from the floor of the openings made should not exceed 15-20 cm. For young animals, a cage is built, the bottom of which is presented in the form of solid plywood. Mesh or slatted surfaces in most cases contribute to the development of pododermatitis.
When breeding giant rabbits, their non-standard weight is taken into account. For this reason, the floor of the structure is additionally reinforced with a thick galvanized mesh or lathing made of bars.
Cages for dwarf rabbits: step-by-step instructions
Cages for dwarf rabbits do not require large material costs. The weight of a dwarf rabbit is small, so the house for it should be appropriate.
Step 1. Assemble a frame 1 m long, 70 cm wide, 55-70 cm high.
Step 2. Nail wooden slats to the bottom or install a metal mesh.
Step 3. Make the walls. Cut a hole in one of them for the door.
Step 4. Place the door on the hinges.
Cages for giant rabbits
Rabbit cages for the “giant” breed are larger than usual. Adults reach a length of 60 cm and a weight of 7.5 kg. The minimum area per animal should be 0.3-0.5 m2. The height of the house is from 55 cm.
Animal conditions
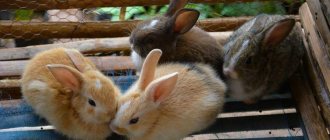
These rodents are unpretentious in nature, quite mobile, and live in ordinary earthen burrows. However, for both dwarf domestic and industrial (meat, skin) breeds, excessive mobility is not needed, so the cages are made with serious space restrictions.
Modern French rabbit farm
Traditional rabbitry in Spain
Before choosing a specific product, or rather, the size of the future homemade product, you need to consider:
- pet size. Dwarf breeds weigh about a kilogram (or less), the largest (White Giant, German Giant, Giant Ram) weigh 12 kilograms or more. The dimensions of their body, respectively, are from 10...12 to 70 cm. The rabbit must fit freely in the cage, be able to turn around in it, and move in small leaps. That is, the minimum width should be equal to the length of the body, and the length should be no less than three to four times the length of the body. It is believed that for an average-sized rabbit the area should be at least 0.2...0.3 square meters for young animals and approximately 0.5...1 sq.m. for an adult animal;
- the number of pets in the cage and their age. For queens with babies, less space is required than for fattened young animals, but in any case, the minimum cage sizes are determined by the largest of the animals;
- type of content – cellular, semi-free, free. Considering that the article is about cells, we are considering cellular maintenance - it reduces the risk of uncontrolled reproduction, degeneration due to inbreeding, disease and death of animals;
- method of keeping - outdoors, under a canopy, indoors, combined;
Two-tier cages for keeping in a ventilated barn. Please note that for meat breeds the cage sizes are smaller! - arrangement of cages - separately for each animal, with grouping - a row, several tiers, the so-called shed, that is, a group of cages under a common canopy;
- availability and cost of building materials.
To keep decorative breeds, cages are often purchased or made from scrap materials. To keep meat-hide and downy breeds, products are assembled in batches for the entire population of rabbits, taking into account the increase in quantity. It is advisable to breed downy and valuable fur breeds under a canopy to preserve the quality of the skin.
How to build a cage for a decorative rabbit with your own hands
When designing cages for decorative rabbits, you should provide for free movement in them. It is recommended to build two tiers with the possibility of transition. You need to start by drawing up a drawing, since such cages are often installed directly in the apartment. In a two-story cage, you should make two doors: one at the bottom end, and the second at the top.
DIY rabbit cages - photo
You can choose a suitable design or borrow an interesting idea by considering the available options.