Before buying a chinchilla, you need to take care of where it will live. Usually, for this purpose, a cage is chosen, inside which a house and other accessories are installed.
How are homemade cages and houses different from those you can buy in a store? Almost everyone. After all, they will definitely be filled with warmth and care for the pet. Here you are the designer and performer. Any idea, any size plus a little effort – done! Nothing compares to something like this.
In this article we will look at how to make a cage for a chinchilla with your own hands, we will look at the best materials to choose and what ideas and manufacturing technologies exist.
Requirements
When choosing any item, there are special things that you need to pay attention to, the same with the cage. What kind of cage should a pet be comfortable in?
Primary requirements:
- spacious. Chinchillas are very active animals; they love to jump and run. Therefore, cell size is an important criterion when choosing. The pet should be comfortable;
- Made from non-toxic materials. An important criterion is the choice of material. It should not be plastic or similar materials (with the exception of a pallet);
- safe. There should be no sharp edges, wires or other dangerous elements inside the cage. Even a small wire from the wall bars, bent inward, can injure the animal;
- it should be possible to easily and safely install shelves, drinking bowls, toys and other items that your pet needs so much;
- have good ventilation;
- sufficient lighting;
- It is desirable to have a tray, this will make it easier to clean inside.
Main varieties
When looking for a home for your pet, you can find different variations of cages. They differ in appearance, price and quality.
Let's look at the most common options.
From metal rods
This is the most common and very budget option. At the bottom of such a cage there is usually a tray with sawdust, which is easy to clean. It is easy to attach the necessary accessories for your pet to the mesh. But this design does not dampen noise at all; any movement in it will make sound.
Display cage
The material usually used is wood, although other models are also available. Such a cage is a real work of art and the pet becomes part of this composition. It will easily fit into the interior and complement it.
From old furniture
Masters can give a second life to any item. Unnecessary furniture in their hands turns into a beautiful display cage.
For breeding chinchillas
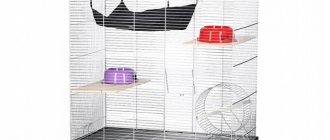
This design is a metal cage divided into several sections, each of which houses a pet.
Dimensions
As mentioned above, size is important. How comfortable the animal will be depends on it; its health directly depends on it.
For one animal
It is advisable to choose a cage with dimensions of 80x80x50 cm. With such dimensions the pet will not feel cramped. But still, acquiring a more spacious living space will only be a plus.
For two chinchillas
The size of the cage must be at least 140x140x80cm.
For breeding
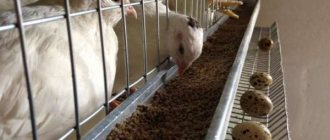
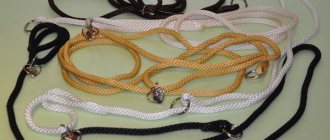
The size of the cage should be much larger than normal. Such farmer cells are an amalgamation of smaller cells. It is desirable that each such cell be 50x50x40 cm in size. It is necessary to build a corridor between them so that the male can calmly pass to the females. At the same time, isolate the females from each other. This can be done by putting special plastic collars on the females.
Content:
Livestock breeders strongly recommend keeping chinchillas in cages. They should be spacious and located in secluded areas. It is also not recommended to expose the cage to the sun or close to heating devices. Industrial farm breeding involves crossing rodents so that the offspring have the same shades of fur. The price of a set of produced fur depends very much on this. Such crossing is possible only with polygamous breeding. Without industrial cages for such farms, this cannot be achieved.
By observing hygiene standards, you will ensure your pet a long and healthy life.
Most often, it is necessary to change the bedding (once a week), carry out wet cleaning (once every 3 months), and disinfect the cage with a special substance (once a year). These are the basic requirements for maintaining hygiene in a chinchilla cage.
Pros and cons of a homemade cage
There is a wide range of cages in stores, but sometimes even there you can’t find anything suitable. Making a cage for a chinchilla yourself is an excellent option for craftsmen and simply loving owners. A chinchilla's cage must have a certain size. Knowing the manufacturing technology, you can make it in just a couple of hours.
Any homemade item has pros and cons. Let's pay attention to them.
Pros:
- low cost;
- confidence in the quality of materials;
- the ability to design the design, dimensions and material of the cage yourself;
- can be made from available materials.
Minuses:
- to quickly build a cage, you need to have some skills;
- you will have to buy consumables.
What structures cannot be used
Sometimes chinchilla owners, trying to save on the purchase of a specialized cage, keep their pets in structures that are completely unsuitable for this. Under no circumstances should you use the following as a home for chinchillas:
- Small cages - furry cats need space to move freely.
- Plastic containers and glass jars. Firstly, such structures are too cramped. Secondly, jars and containers do not allow air to pass through well, which is dangerous for the health and even the life of chinchillas.
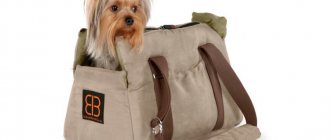
- Carrying. Such structures are intended only for short-term transportation of animals.
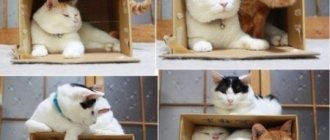
Some chinchilla owners manage to place fluffies even in large cardboard boxes. But a pet will literally chew such a flimsy house within a day.
Metal mesh cage
A cage made of metal mesh is the simplest option that you can make yourself at home.
Required materials and tools
To create such a house you will need the following:
- metal mesh (roll). Must be galvanized;
- metal tubes for the frame;
- fastening rings;
- bolts for locking;
- self-tapping screws;
- aluminum strip (corner);
- aluminum wire;
- scissors for cutting metal;
- centimeter tape measure;
- pliers;
- screwdriver;
- latch;
- loops.
Dimensions and layout
The minimum length and width of the house must be at least 50 cm. Its height must be 70 cm. The distance between the rods must be no more than 2 cm.
If two pets will live in the house, then it should have a place for sleeping, playing and active movement. There should be enough space to accommodate all the necessary elements for a comfortable life for pets.
Step-by-step instruction
Drawing up a drawing
The drawing must be drawn up taking into account the dimensions of all parts. It is important to calculate how many aluminum profiles will be needed in length and how much mesh will have to be spent on the side walls. Be sure to calculate the dimensions of the upper part of the structure. You also need to decide on the number of shelves.
Frame assembly
Assemble a frame from metal tubes according to the drawing. Spread the net on the table and use a tape measure to measure the distance corresponding to the height. Cut out the sides from the mesh and align them.
Connecting elements
Using fastening rings, attach the mesh to the frame. Cut out the roof and bottom from the wall. Attach them to the frame. At the bottom you can lay a piece of tin with sawdust, which will serve as a pallet.
Door installation
Involves performing the following actions:
- To make a door, just cut a window in one of the walls. The edges of which need to be sanded and then trimmed with aluminum strips.
- The mesh cut to the size of the window must also be trimmed and attached to the hinges. This design closes with a latch.
Another, more simplified way:
- Cut a window in one of the walls. Trim the edges.
- Attach the mesh cut to the size of the window onto hooks made of aluminum wire.
Attaching accessories:
One cage is not enough for a comfortable life. The pet needs a house, a bowl, toys, a tray, a bath, and a teeth sharpener. All this can be installed on shelves that can be easily attached to the mesh wall using small metal corners or screws. A hammock in a cage with metal rods can be hung from hooks from the ceiling. The drinking bowl and hay box are simply attached to the walls.
A display cage can be incredibly unusual, because there is no end to the design possibilities. It looks much more beautiful than a regular cage. In addition, this model creates virtually no noise. To find out how to make a chinchilla display, you can look at the drawings on the Internet.
Additional accessories for chinchillas
Placing an animal in a new cage is only the first stage of creating a cozy atmosphere for it. In order for a chinchilla to enjoy life, be healthy and active, its place of residence will need to be provided with additional details. What's on this list?
House
One of the mandatory additions to the cage. You can immediately buy a metal cage or a wooden one, or a profile display case with a house. And if you have purchased a display case, or the simplest metal cage, or you want to independently organize a place of residence for a South American rodent, you will need to provide a home for the pet as the main addition. This way the animal can climb into it at any time and rest. The size of the sleeping place is slightly larger than that of an adult chinchilla, because they like to lie down at their full height.
Cozy homemade house for a rodent
Feeder
An essential element of the cage, which is best attached to the bottom or wall of the cage, and should also be washed systematically. There are no restrictions on materials. The most convenient option is a plastic food bowl. The main thing is that it has a comfortable shape for the animal and is moderately deep.
Feeder attached to the cage wall
Drinking bowl
Another important accessory that will need to be attached to the bars of the wall or door. It should always contain clean and fresh water, and the structure itself should not allow leaks. Unlike the feeder, it cannot be placed on the floor, otherwise the water may become contaminated. The breeder can choose one of two common drinker options - ball or nipple.
It is better to attach a glass drinking bowl to a cage
It is necessary to select the one that will be convenient for a particular pet. Another important nuance is that you should not buy a plastic drinking bowl, otherwise the chinchilla can quickly chew through it. The best option is glass.
Sennitsa
She's a feeder with hay. The latter must be present in the chinchilla’s diet to maintain the health of the animal. If you leave hay just like that on the floor, it will soon be naturally distributed throughout the cage. But you should also be careful with the design of the hay feeder. It is best when it is a separate small house. An alternative is to use a small mouse or hamster running wheel that remains closed after the hay is added. The structure will need to be secured first so that the chinchilla does not get hurt.
The best option for feeding hay to a rodent
Stone for chinchilla
It will be needed so that the rodent can periodically sharpen its teeth with its help. Typically, a salt or mineral stone is used for these purposes, which is placed in the same way as a drinking bowl, on the walls of the cells. Otherwise, it may get lost, but it will always be in sight and freely accessible to the pet.
Mineral stone for grinding teeth
Litter tray
Of course, you will need to organize a toilet in the cage, since the chinchilla is a fairly clean animal. Although it was previously mentioned about the need for a pull-out tray under the cage, it is also better to install the tray inside the cage or display case. This will make cleaning much easier and more convenient. Plus, the cage won’t get too dirty or clogged.
For more convenient cleaning and keeping the cage clean, install a chinchilla tray
Sand bath
We have already focused on the cleanliness of chinchillas. In order for them to keep their fur clean, they will need clean sand, as it is preferable to water for animals
A small container is enough, but it should be comfortable for the animal to roll over in it.
Rodent prefers sand baths
Display cage made of laminated chipboard
Such a chinchilla house can be made using laminated chipboard as a basis. It is important to remember that the area must be dry, have sufficient lighting and good ventilation.
What the result should be, look at the photo below:
Required materials and tools
To build a display case for a chinchilla, you will need the following:
- laminated chipboard;
- pencil;
- centimeter tape measure;
- wooden slats (or aluminum profile);
- wooden boards;
- glass;
- galvanized mesh (mesh size 1.5×1.5 cm);
- PVC tape;
- hinges for doors;
- screws;
- latches;
- drill;
- self-tapping screws;
- screwdriver;
- drill;
- jigsaw;
- saw.
Stages of creation
When everything is prepared, you can begin the creation process.
To do this you need to do the following:
- First take your measurements. Build a drawing.
- Draw the walls and bottom of the required dimensions on the chipboard, cut them out.
- Cut out windows in the walls, which will then need to be covered with mesh (they will later serve as ventilation).
- Use a drill to drill holes in the tray, then use screws to secure the back and side walls.
- Secure the walls together.
- Stretch a mesh on top as a ceiling. It will act as ventilation. It will also be convenient to attach accessories for your pet to the mesh cells.
- Mount the glass (with specially treated edges) to the cage using special hinges that allow you to do without drilling.
- Install the latches.
- Using self-tapping screws, attach shelves and stairs to the display cage. Close the screw caps with caps.
- Cover the edges with PVC tape.
Showcase made from old furniture
An old unnecessary cabinet can be converted into a wonderful display case for your pet. In this case, you will save money and get a display cage that only you will have.
Materials and tools
To build such a house for a furry pet, you need to prepare:
- the closet you will be remodeling;
- pencil;
- centimeter tape measure;
- glass;
- glass lock;
- saw;
- screwdriver;
- galvanized mesh;
- plywood;
- self-tapping screws
Procedure
Next you need to proceed according to this scheme:
- If the cabinet does not have glass doors, then first of all remove the old doors and install glass in their place.
- Attach a special lock to the glass.
- Cut out large windows in the side walls of the cabinet. Cover them with mesh. (This will serve as ventilation.)
- Cut out plates from plywood and make holes in them. Such a simple structure will help the chinchilla move. Set the plates at the desired height.
- Attach the shelves to the back wall using self-tapping screws.
- We place other accessories for the pet.
Making a house
Chinchillas are burrowing animals; staying in secluded places is inherent in them at the level of instinct. Therefore, the house is one of the most important accessories in this animal’s cage. This is her refuge, a cozy corner, a place of rest. She may ignore the house at first. But this is only at the adaptation stage, then the animal will get used to it and will be happy to be there. Let's look at how to make a house for a chinchilla with your own hands below.
Materials and tools
To make a house, you will need to prepare the following:
- wooden boards 1.5 cm thick;
- pencil;
- ruler;
- metal corners;
- emery (or sanding machine);
- hacksaw;
- drill;
- dowels.
House parameters
The size of the home should be such that the animal has room in it. The average size of a simple house for one pet is 27x18x15.6 cm.
Simple
The chinchilla house has only one floor. It is relatively small in size, with a hole for a pet and all the necessary accessories.
The instructions for making such a dwelling are as follows:
- Draw a drawing. Here you can experiment with the design, for example, making round windows or embossing the name of an animal above the door.
- Cut out the walls and roof. On the front wall draw an entrance and a window. Draw windows on the side walls.
- Cut out all the drawn holes.
- Sand the edges of the finished parts, including the windows and entrance. The edges should become smooth.
- Drill holes in the walls and roof for the dowels and use them to fasten the parts together.
- To disinfect, wipe the house with a cloth soaked in water with a few drops of alcohol or vinegar.
- Cover the edges with metal to make the house last longer.
- Dry the resulting home and ventilate it. Install in a cage.
Double decker
You can even make a two-story house with your own hands.
It will be a structure of two floors, where one (lower) floor is almost twice as large as the second. That is, if the part located on the second floor measures 27x18x15.6 cm (for one chinchilla), then the lower one should have a size of about 60x51x48.6 cm. You can reduce the dimensions slightly, but so that the animal fits freely inside.
For a two-story house you need:
- wooden boards 1.5 cm thick;
- pencil;
- ruler;
- emery (or sanding machine);
- hacksaw;
- drill;
- dowels.
Stages:
- Draw a drawing.
- Make two houses of different sizes based on the first method.
- Connect them together (preferably using dowels).
- Disinfect with a solution of water + a few drops of alcohol or vinegar.
- Dry and ventilate. Install in a cage.
A more original design is a house in the form of an arch. It looks incredibly beautiful and is easy to make.
Arch shaped
To build a dwelling in the form of an arch you will need:
- wooden boards 1.5 cm thick;
- small planks (3 cm wide and 2 cm thick);
- compass;
- ruler;
- emery (or sanding machine);
- drill;
- dowels.
Manufacturing stages:
- On the board, draw a circle with a radius of 15-17 cm using a compass.
- Cut out a circle and divide it into two equal parts.
- On one semicircle, draw a window and an entrance, cut it out. This will be the front wall.
- Sand the edges of the parts, including the window and entrance
- Cut the boards into pieces 17-21 cm long. Sand
- Drill holes for dowels on the slats and along the circumference on the walls at distances of 3 cm.
- Build a house.
- Disinfect. Dry. Install.
Buy or make it yourself?
Many people are faced with a dilemma: whether to buy a house for a chinchilla or make one with their own hands. After all, those that are already sold in stores may not meet your preferences and are not entirely suitable for chinchillas.
Also, finished products may not be made to the highest quality. And the materials that were used to create it may not be safe for your pet, so most people decide to make it themselves.
In most cases, home-made housing is no different from store-bought ones, and sometimes it even turns out much better. And you don’t have to worry about your pet’s safety, since you will know exactly what it’s made of.
Making sennitsa
A drinking bowl, a feeder and a hay box - these three things will provide the chinchilla with a complete menu. It’s quite easy to make a chinchilla hay stand with your own hands. The main thing: do not ignore certain requirements. Sennitsa is a place where an animal can get the necessary hay, which will give it important nutrients.
Requirements
The pet's health directly depends on the hay. After all, it contains food with which many beneficial vitamins enter the body.
Requirements for the sennik:
- made from non-toxic materials;
- holds the hay tightly inside;
- closed enough to prevent animal urine from getting onto the hay;
- have a window from which the chinchilla can easily pull out the required amount of grass for food.
Necessary materials
To build a canopy you will need the following:
- galvanized metal mesh;
- pliers (or scissors for cutting metal);
- iron lids for glass jars.
Step-by-step instruction
When the materials and tools are prepared, you can begin the process of creating such a product:
- Cut the mesh and bend it around the diameter of the lid, making sure that the bars parallel to the lid are on the outside.
- The mesh should make a tube, along the edges of which the caps act as plugs.
- We attach a small strip of mesh to one edge of the tube, which will be used to attach the hay to the cage.
- We install the sennik.
So, we can summarize. If you wish and even have the most basic skills, you can build a cage, a house and a kennel for your pet - that is, the things he needs most. And by following the step-by-step instructions presented in the article, the manufacturing process will become even easier.
Original ideas
Creative owners of furry pets offer interesting options for making multifunctional houses. So, one of them is a house combined with a hay barn: shelter - one, material for gnawing - two, a place for hay placed between the sticks - three. To make such a product you need a minimum of materials:
- board as a roof,
- dry birch or hazel sticks (due to the density of this type of wood, the chinchilla will chew them longer),
- a block for fastening them,
- small screws, screws or nails - for the same purpose.
When finished, the house looks like a nice and quite cozy hut for a rodent.
You can make a special “gnawing” house for your pet from branches and wooden scraps, fastening them with the same connecting parts.
Below are the drawings of the houses - several options.
Homemade houses are also an economical option. If you build an entire cage or display case for a chinchilla with your own hands, its total price will be several times lower than the store price. So, dear craftsmen, get a jigsaw in your hands!