The number of loops should be divided by 4. The main measurement is the circumference of the head, where the two-color elastic band runs. We knit from nose to neck. Conditional colors: white and dark.
With white thread we knit a 4-5 cm “roller” face on 4 knitting needles + 2 rows with an elastic band + 4 rows with a two-color elastic band + 1 row with a white elastic band. Divide into 4 parts. Distance between ears = throat part and less side parts. We knit a petal near the ear with a white thread. Same on the other side. Between the ears - an English elastic band to the end of the occipital protuberance with a dark thread. We have two knitting needles left with loops - the throat and the knitted strip between the ears. We cast on the remaining loops, but their number is slightly less than what was at the top of the product. We knit with a simple elastic band. Carefully sew on the dangling petals. We insert the lace around the throat. Well, a lace for the roller.
How to knit petals using 15 loops as an example: We knit with a simple elastic band. 1st row (from top to throat) - just an elastic band 2nd row - close 1 stitch at the throat. underknit 3 stitches at the top row 3 - just an elastic band, 3 stitches remain unknitted row 4 - close 1 stitch at the throat. under-knit 6 stitches at the top row 5 - just an elastic band, 6 stitches remain unknitted row 6 - close 1 stitch at the throat, tie everything off row 7 - just an elastic band 8 row - close off at the throat 2 stitches row 9 - close off
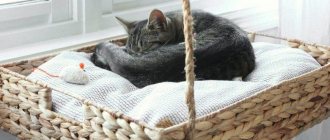
here's a similar one with ears
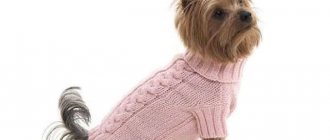
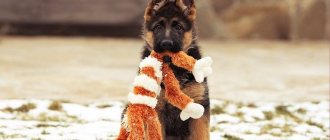
You can knit this one!
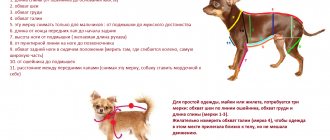
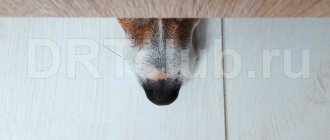
First of all, we need to find out how many knitting loops are in 1 cm. To do this, take the knitting needles and threads with which you are going to knit, and knit a small sample (cast on 10 loops and knit them with a 1x1 elastic band). Measure the head, as shown in the photo. (I show it on the sneeze, because it’s easier to see)
those. measure the circumference (purple line) and semicircle (from ear to ear), approximately to the point where the blue line ends. In general, to avoid confusion, it is better to write down the calculations. Now we subtract the smaller from the larger and write down the results.
According to my calculations, I need to cast on only 44 loops 26 loops - the frontal part 18 loops - the occipital part
We cast on our 26 loops in a way convenient for you. (You can see the methods here) We begin to knit a 1x1 elastic band. Knitted 1-2 centimeters with an elastic band. And we put the remaining 18 loops on the knitting needle (plus or minus 1 loop, see the picture) To avoid “jumps” in the elastic band and shift the pattern, it is better to immediately estimate the number of loops that need to be added to our knitting.
I’ll explain why we didn’t immediately cast the required number of loops. So that the hat on the back of the head does not puff up and slide over the dog’s eyes, but has the correct anatomical shape
We unfold our knitting and knit the cast-on loops, remembering the pattern. Next we will start knitting in the round. We distribute the loops of the frontal part onto 2 knitting needles and continue to knit with an elastic band in a circle.
Having knitted 2-3 cm, we again return to knitting on 2 knitting needles. We divide the total number of loops by 2 and get the answer to how many loops there should be on each knitting needle. In my case - 22 loops. He remembers that the frontal part = 26 loops. Occipital 18. This means that we throw 4 loops onto the “occipital part” knitting needle. But we do it symmetrically from both ends!!! Otherwise the hat will be skewed! They divided it. We have 2 loops at the beginning of the row already knitted, we simply remove them onto the 3rd knitting needle (we knit on 2 knitting needles!!!) and continue knitting until the end of the row. After you and I picked up the loops for the back of the head, we turned our knitting around and went to knit in the other direction. (I hope you remember this) In that place we made a “V”-shaped little “cut”. This is what we have - the end of the series. (then this defect will need to be removed, but I think that I won’t tell you in detail how to do this, everyone can sew) But, you and I must switch to knitting on 2 knitting needles, but for now we have 3 of them. What are we what do we do next? We take a knitting needle and begin to remove loops on this knitting needle one by one. Knit 1, purl 1, alternate 1 stitch on each needle. Those. We do not violate the elastic pattern!!! Now all our knitting is on 1 needle.
You can continue knitting on 3 knitting needles until the end, and before closing, transfer the stitches to 1 knitting needle. Just make sure there is no distortion.
Actually, all we have to do is close the loops and our hat is ready. If you close 2 loops together, it is better to alternate with “3 loops together”, otherwise the edge will stretch.
Let's start decorating.
First of all, we make the ties. Try on the hat and determine the best place for them, because... here the shape of the head plays an important role. We take the thread, fold it in half, pull its end into the loop of the 2nd row of our knitting, and “braid” it with a crochet hook.
Pompoms
We cut out such a part from cardboard (I cut it from a plastic card) in a quantity of 2 pieces.
The diameter of the part will be approximately equal to the diameter of the pompom. Unwinds the thread and folds it 3-4 times. We put our 3 pieces together. We insert the end of the thread into the hole and begin to wind the thread around the part in a circle.
Now take scissors or a blade and cut the threads along the red line.
Next, take a thread about 10-15 cm long (single), insert it between the plates of the part, tighten it and tie a knot. Remove the plastic parts and the pompom is ready to decorate our hat.
The use of any materials from the site is permitted only with a direct active link to the site
Dogs become our best friends. They love us and protect us. We, in turn, must also treat them. It is our duty to make sure that our little and sometimes big friends feel comfortable in the winter.
There are now many specialized clothing stores open for dogs. Outfits are presented for every taste and color. Some people buy clothes just to dress up, while for others it is a vital necessity. But unfortunately for owners, things for their pets often cost them a pretty penny.
How to knit a dog sweater for beginners, diagram with detailed description and photo
For beginners, you can knit this simple dog sweater from warm melange yarn. We will take thick threads, two hundred meters in one hundred grams of yarn. You will need number four knitting needles.
Yarn for work:
First, take measurements from the dog, use the table and description given above. After this, you can start knitting the collar. Try not to make it too tight; the sweater should be easy to put on and not cause discomfort to the dog. The optimal collar width for small dogs is five centimeters. We knit it with a 1x1 or 2x2 elastic band.
We knit the main part of the sweater with a simple stockinette stitch. You can put a pattern in the form of a braid along the back. We will knit the pattern on 17 loops. At the end of the collar, you need to count this number of loops in the middle and knit the pattern according to the diagram below. If you still find patterns difficult, you can knit the entire sweater using satin stitch.
After two rows of the main fabric, we begin to add. Add two loops on each row. We add loops until the width of the fabric reaches the size of the dog in the chest circumference, plus another two centimeters for allowances. Be sure to try the sweater on your dog. To make this easier, place the stitches on circular needles. Then put it back on the stockings. Don’t be lazy to try it on again, so you don’t have to start all over again.
Now you need to make slots for the paws. As shown in the photo, you need to skip the number of loops you need in size, knitting only the side parts from the holes. To do this, knit the first three centimeters, close the next six centimeters, and then knit to the second armhole. And when you get the right one, add air loops and knit further with a single piece of fabric.
Now we need a measurement from the abdomen, length. The fabric tapers towards the bottom of the tummy, so you need to decrease two loops every six rows. Don't forget to try the product on your dog.
Having reached the required length, finish the edge with an elastic band. Six rows are enough. The armholes for the paws would also be good to tie, you can crochet them. The last stage is assembling the sweater, sewing it and trying it on the owner.
Unusual option
Knitting this hat will be somewhat unusual. If in the first versions we first knitted an elastic band, then here we will do the opposite. We knit three centimeters in stockinette stitch and then move on to knitting 1x1 elastic. If you want, of course, you can replace this pattern with any other. But, speaking about beginner needlewomen, we note that this pattern is the simplest and easiest. If this is your first dog hat, then it is better to choose this one.
You need to knit up to the ears. Next, you need to make holes for each ear. To do this, simply close the required number of loops on both sides and continue knitting. Remember that as you continue knitting, you should have the same number of loops as you originally had. When you knit the first row after decreasing for the ears, you will need to pick up the stitches above the closed ones.
Next we knit up to the neck. When there are a few centimeters left before finishing, you should make a few increments. Here we recommend using regular yarn overs. They will allow you to make the product a little wider at the end of knitting and at the same time prevent holes that beginners get when adding loops in other ways.
Crochet pattern for dogs overalls, details
We will crochet number five. You can take the same white or milky yarn (Cinse Artico), or you can choose something brighter. You will also need a pink ribbon, about forty centimeters, and one pearl bead.
We knit according to the pattern: air loop, connecting column, single column. and a column with nak.
Before.
We start knitting the fabric from the waist line. We cast on 81 loops and close it into a ring. Next, using pattern number one, we knit seven centimeters in a circle. Next, the canvas needs to be divided into two parts. The bottom consists of 14 motifs, and the top of 12. Leave 2 motifs between them on both sides. for the armhole. We knit everything according to pattern number one.
Bottom part.
After 10 cm has been passed from the armhole, set aside 7 motifs in the center for the neckline. We knit the right and left parts separately. After 14 cm from the armhole, finish knitting. We knit the second side in the same way.
Top part.
After 10 cm has been passed from the armhole, set aside 6 motifs in the center for the neckline. After 14 cm from the armhole, finish knitting. We sew the details of the bottom and top along the shoulders. The neckline or neckline needs to be tied. To do this, in a circle, first knit 2 rows with single stitches, then 2 rows with stitches. with nak. Use scheme number two.
All that remains is to knit the sleeves and the bottom of the overalls. First we knit the sleeves for the front legs. To do this, we raise the post in the armholes. and knit in circular rows of 10 centimeters using pattern number one. Then make a 4 centimeter column with a nak. according to scheme number two.
Let's move on to the bottom. From the first row along the waist line we knit 20 centimeters according to the first pattern. Then set aside 11 mot. in the middle under the hole for putting on. We knit the left and right sides separately 7 centimeters. At the same time, we perform a decrease, 2 columns. from each side. We sew together the parts of the fabric, not forgetting to leave an opening for putting on and armholes for the paws.
Using the first pattern, we knit in the armholes for the hind legs in a circle of 7 cm. Then make a column cuff without tape. 2 cm.
According to the third pattern, we tie the bottom of the overalls. We make a bow from the ribbon and decorate it with a bead.
Video with master class lessons
Watch this video about an amigurumi dog crocheted from thick yarn. To do this, you will need an appropriately sized hook and a little time. A toy made from large yarn looks very interesting when finished.
Watch this video to crochet a small dog wearing a colorful shirt using the amigurumi technique using a crochet hook. Who said that the nose must be knitted or made from beads? The author suggests stitching the muzzle with thick black threads to create a dog’s nose. You will probably have some colored yarn left over, try making a colored amigurumi hare.
From this video you will learn how to make a true loyal friend. The lesson consists of two parts, in each of which the author describes his actions in detail and tells beginners how to correctly use the amigurumi technique.
https://youtube.com/watch?v=BsNH4OMo_bc
From this video you will learn how to crochet a pug dog using the amigurumi technique using a very simple pattern. The author clearly demonstrates the correct knitting technique, comments on his actions, and also explains the main details of knitting a pug. Try to create your own unique toy.
Knitting raglan for dogs, diagram with description
The simplest raglan diagram for clarity.
We will knit the sweater from the neckline. We cast on loops, the number of which corresponds to your measurements of neck volume. There are 64 stitches cast on in this tutorial. Divide them into four spokes. Knit the neckline with an elastic band two by two 15, and in order to get a lapel about 20 rows.
Let's go directly to the raglan. To get raglan in the future, divide your number of loops by three. They need to be distributed into loops for the back, front and legs. If you divide 64 by three, you get about 22 loops.
For sleeves, you need to calculate the number of loops based on the girth of the paws. For now we put these loops on another knitting needle. Then we continue to work in circles. On the knitting needle you are working with, cast on five to ten stitches so that the sleeve is not too tight. Close the circle and knit further.
We need to knit two hearts on the back. Where the pattern will be located and its size, choose at your discretion. The pattern is knitted according to the pattern.
After you complete the pattern, knit further in the round. The length of your sweater will depend on your dog's measurements, but remember that the back is always longer than the front. Once you have decided on the length, start knitting the elastic two by two. So we knit about seven rows and close the loops on the stomach, leaving the back.
Transfer all the loops to one knitting needle and continue working alternating faces. and purl rows. At the same time we make a decrease. We knit three loops together both at the beginning and at the end of the rows. You will get a smooth narrowing.
Only the sleeves remained. We remember those five or ten loops that are needed so that the sleeve is not tight and is free. Thread them onto knitting needles. Knit in a circle with a two-by-two elastic band to the length you need.
A drop in temperature is a big stress for many dogs, because their ears get very cold, but they still need to walk outside.
To solve this problem, a variety of dog hats have long been invented that not only protect four-legged handsome dogs from hypothermia, but also improve their appearance.
Trying with knitting needles
If you have ever held knitting needles in your hands, then knitting something for a Yorkshire Terrier will not be difficult for you. Clothes knitted with knitting needles will not hold their shape as well as crocheted ones, but they will undoubtedly be warm and will protect the dog from frost. The technique should be chosen depending on your knitting skills.
The best option for beginners would be to knit a cape in the shape of a triangle, which is perfect for a Yorkie. To do this, you only need measurements of the back, and you should start knitting from the tail, adding loops evenly.
Regardless of how the dog product is knitted, the choice of yarn remains the same. It is very important that the yarn is made from natural materials. Otherwise, it may cause discomfort to your pet.
It has also become popular to decorate dog clothes with various decorative elements, which include:
- natural or artificial fur;
- all kinds of sequins or beads;
- beads;
- elements of leather or suede, etc.
Before starting work, you need to take measurements from the dog; knitting by eye will be a very improvident decision. It is better to take measurements from the dog while standing, but it is better to measure the width of the chest when the pet is sitting. But it is worth noting that patterns for Yorkies will differ from patterns for other mini dogs. This is due to the fact that the Yorkshire Terrier's coat tends to mat under tight clothing. Therefore, allowance should be made in places where friction may occur.
We bring to your attention a master class, using an example of which you can knit a hat for your Yorkie:
- First, you need to take a head circumference measurement and decide how many loops are needed for the product. To do this, knit an example of a part and calculate how many loops there are in 1 centimeter. Based on these calculations, we begin to knit;
- Next, knit 8 rows, alternating knit and purl stitches;
- Then you need to divide the number of loops into 3 equal parts in order to close the rows on the first and third parts and continue to knit only the middle. We knit the middle only with facial loops ;
- As soon as this middle part reaches the mound, start knitting, picking up the loops on each side;
- Thus we continue to knit until the end.
A couple of hours of work, and the hat for your pet is ready!
Why do you need a headdress?
To protect the dog from the cold in winter, dog owners most often simply shorten the walking time, but this is not the best solution for the pet - he will not be able to waste all his energy and will remain dissatisfied. It is better to dress your dog warmly, and most importantly, protect your head from hypothermia with a hat.
Not all dogs need such an update and not under all circumstances, but many owners like to dress up their pets, making them more “fashionable.” However, with the onset of cold weather, certain breeds simply need a hat. By helping the ears and head not to freeze, it not only provides the animal with comfort, but also prevents the occurrence of such serious problems as meningitis or chronic otitis media.
What breeds
First of all, miniature dogs, especially short-haired ones, such as, and, need a headdress.
They do not have natural protection from the cold, and high activity leads to rapid consumption of energy reserves.
The list of animals that require full equipment includes hairless breeds, as well as those from tropical regions (for example, native to Africa), which by nature cannot stand the cold. Usually they are not walked in winter, but if there is still a need to go for a walk, a jacket and hat are necessary to maintain the pet’s health.
For breeds with cropped ears, a hat is necessary because it helps prevent otitis media.
In humid, snowy, frosty weather, it will protect your ears from cold and moisture getting into them.
Dogs with large ears require a hat in extreme cold, because due to the size of the ear, the wind can blow through the head too much, which can lead to otitis media.
Divers and swimmers are considered a separate category of breeds that need ear protection. These dogs require commercial rubber caps to prevent water from getting into their ears. When washing in the bathroom, you can use regular shower caps.
Other breeds can do without hats, but there are certain reasons that make a hat necessary:
- chronic otitis;
weak immunity (postoperative rehabilitation or a previous serious illness can temporarily reduce the body’s protective functions).
Taking measurements
How to knit a hat for a dog? What actions are performed first? Of course, as with any other type of knitting, you need to make certain measurements before starting work. If things are much more complicated with suits and overalls, then even beginners never have any problems with taking measurements for a hat.
What parameters are needed? First, you will need to measure the animal's head circumference. Secondly, measure the distance between his ears. We will not make any additional measurements.
Types of hats
Ideally, winter head insulation should meet three types of protection:
- from cold (from late autumn to early spring);
- from the wind (at times of year when cold winds blow);
- from moisture (rainy season, snowy winters).
If a hat is able to protect the ears and head from the three “elements”, such a hat can safely be considered successful.
The hooded hat is the most popular model for both small and large dogs. This headdress resembles a helmet and is held on the head by ties, buttons or rivets. It will fit all types of ears; if they are large, care must be taken that the hat does not press them too close to the head. A hooded hat is worn both in autumn and winter.
Closed hats are necessary for dogs with small or cropped ears.
If the ears are large, and chronic otitis requires a closed head, such hats are sewn to individual order. Their peculiarity is a tight fit to the head and neck, so it will not be very comfortable for your pet to walk in such a hat, but you will have to put up with it.
A low-slung hat can be called a headdress with an attached muff (“scarf without ends”). This model is suitable for all dogs and is quite easy to wear and take off. The main advantage is that not only the animal’s ears are covered, but also its neck, so that the four-legged friend is not threatened by either frost or wind.
Important!
It is best to sew it with elastic thread so that the hat fits tightly around the head and neck, but does not put pressure.
In fact, it is more of a scarf than a headdress. The peculiarity is that it can be worn either completely on the head and neck, or only on the ears (to protect against otitis media). It is ideal for dogs with cropped or small ears. This option is not suitable for breeds with large ears because the fabric fits too tightly to the head.
A cap is most often used for protection from the sun or as a simple decoration.
It is suitable for all dogs, you just need to take into account the size of the ears and the head itself. A cap is especially necessary for dark breeds of dogs in the summer, because they are prone to overheating. It will also help elderly dogs cope with photophobia.
In most cases, such a headdress is decorative, because it does not cover the animal’s ears. However, many owners put such accessories on their pets, and the animals wear them with pleasure. This hat is suitable for dogs with erect ears of any size, the main thing is to fix it well on the head.
Decorative hat
Decorative hats are headwear of any of the listed models, which are used exclusively to decorate the animal and highlight its individuality against the background of other four-legged animals. Decorative clothing is chosen depending on the breed and preferences of the dog itself, as long as it does not cause him discomfort.
Did you know?
The record for ear length belongs to the Basset Hound breed. In 2004, a dog of this breed named Mr. Jeffrey entered the Guinness Book of Records for his ears, each 29.22 cm long. The dog's owner insured them for $47,800.
Pompoms
The most popular decoration for hats are pom-poms. If you look at hats for dogs, photos of which are presented on various relevant resources, then in most options you will see pompoms. They make any hat, even the simplest one to knit, more attractive, mischievous and unusual. How to make them?
Take a sheet of thick cardboard. Cut out a circle of the required diameter from it. If there is a larger pom-pom, then the circle, accordingly, should be wider. We will need two of these circles. We make a hole in the middle of each of them using scissors. Connecting the circles together. We take a skein of thread and begin to weave circles until you think that the pompom will be fluffy enough.
Let's take the scissors and let's do the magic. First, cut the upper edges of the threads. Carefully push the cardboard parts apart and tighten the middle with thread. We remove the details completely, strengthen the central thread completely and fluff the pompom. If there are threads that stand out from the total mass, the length can be adjusted using scissors.
So, the dog’s hat is ready. It can be decorated with any available means: rhinestones and bows, pompoms and stickers, ribbons and hairpins. You can crochet additional bright elements and simply sew them onto the finished hat.
DIY sewing
Any owner can buy a hat at a pet store, but such an accessory is quite expensive, and problems with fitting it on the head may also arise. Moreover, it will not be individual. But if you make a headdress for your beloved dog with your own hands, it will be:
- Nice;
- economically;
- comfortable - such a product will ideally fit the dog’s head, making the hat as comfortable as possible for the animal.
It can be made either from threads (knitting) or by altering children's clothing to look like a dog (altering children's berets, etc.).
Before sewing any clothes, including hats, you must take measurements of the animal, because the comfort of the outfit will depend on this. To make a headdress, the following measurements are required:
- The distance between the ears (the distance from the inner base of the left ear to the right is measured in centimeters).
- Horizontal head circumference (measured in a centimeter in a circle from the outer bases of the ears).
- Vertical head circumference (measured in centimeters from the chin around the head in a circle).
For greater accuracy, you need to make a repeated, control measurement.
Material selection
Depending on the purpose of the headdress, you should choose the right material for manufacturing. Of course, it is desirable that the fabric be natural, or at least hypoallergenic.
- For rainy, snowy days, hats made of materials that do not absorb moisture (synthetics or specially woven cotton, satin) are best suited.
- In warm hats (winter version) it is best to use wool; You can also decorate your headdress with artificial or natural fur or bubo.
- Lightweight dresses for autumn and spring are best made from knitwear.
Important!
Waterproof material should be on the outside of the hat - never on the inside! - since the “greenhouse effect” will harm the animal no less than cold or moisture.
Knitting with knitting needles
Knitting a hat from scratch is more difficult than remaking a ready-made one for children, but in this case you will get exactly what you want. A wide scope for creativity opens up before you.
- We arm ourselves with a centimeter, calm our pet and take the main measurement. We are interested in head circumference. We divide the resulting indicator in half. This is the original size.
- Now we calculate the number of loops. To do this, you need to cast on a small number of stitches (for example, 20) and knit at least ten rows with a working pattern.
- We remove all the loops from the knitting needle and measure the width of the product. Now we make up the proportion (if, for example, the width of the test product is 5 cm, and our original size is 10 cm, we will need to cast on 38 loops, since the two edge loops are not involved in determining the size).
- Now we cast on the required number of loops (we use the same knitting needles, the same thread and the same “hand”, since each craftsman has his own knitting density) and begin to knit the fabric.
- After about 3-4 cm (based on a small dog), we begin to make holes for the ears. To do this, divide the number of loops on the knitting needle into three parts (if the whole number does not work out, the central part may be several loops more). On each side of the product we close the number of loops corresponding to 1/3.
- We continue to knit only the central part of the product until it matches the size of the base of your pet’s ear.
- Now we add on each side the same number of loops that were previously closed, and finish the product symmetrically to the beginning.
- We close all the loops.
- Fold the product in half and sew a side seam to make a hat.
- Add decor (bubo, fur trim, strings, applique, etc.).
Important!
The more often you try on a hat, the better it will fit when finished.
Every owner should take care of his pet and strive to ensure that his beloved dog is not only fashionable, but also healthy. Therefore, for certain breeds it is necessary to purchase hats for the winter. Well, if you have sewing skills, you can make them yourself, which will bring pleasure not only to the dog, but also to you.
Yarn selection
A very important point is the choice of threads for knitting. Knitted hats for dogs should be warm and at the same time comfortable to wear. Do not buy 100% wool threads that are too scratchy for hats. It is better to give preference to children's acrylic or natural cotton.
As you know, many small breeds often suffer from various allergic ailments. They can also be used for knitting yarn. How to check the yarn? Take a small piece of thread, apply it to the inside of your elbow and rub for a while. If your skin does not react to the friction of the thread, you can buy it to knit a pet’s hat. If spots appear on the skin, redness appears, and unpleasant itching begins, then it is better not to use such a thread.