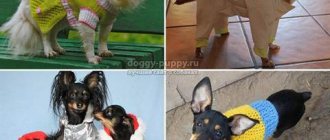
I think it’s no secret for every dog owner that clothing for animals is oh so expensive. But, if you have at least minimal skill in working with a sewing machine, then by spending a small amount of money on fabric, you can easily and simply sew a dog jumpsuit with your own hands.
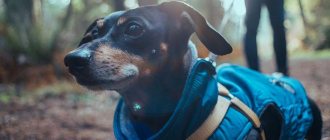
Earlier I already talked about how our Jackusik does not really welcome costume walks. As soon as, before going out, I start rearranging his things, choosing what to dress him in, he immediately hides under the bed... Only his cowardly nose snores with hope: what if he gets away!
But, despite the fact that Jack, to put it mildly, has a dislike for clothes, we have a fairly large wardrobe: knitted and insulated overalls, blankets, vests, raincoats. There's nothing to be done about it. Whether he likes it or not, in any case, you need to protect your pet from weather troubles.
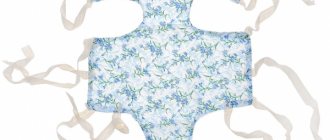
We take basic measurements from the pet
To begin with, let's take basic measurements from the dog (as shown in the photo below): back length, neck girth and chest girth. If you are sewing a blanket or vest, these measurements are quite sufficient.
But if you want to make overalls for a dog, then it would be a good idea to also measure the length of his paws so that after cutting the legs do not end up being too short. Although, this too can be easily corrected by “increasing” the decorative cuffs.
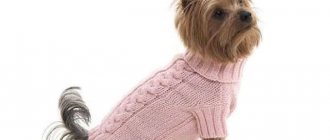
Knitted clothes for Yorkie
For needlewomen who know how and love to knit, you can offer the option of a knitted jumpsuit. It is very popular among owners of small and medium breeds. It doesn't take much time.
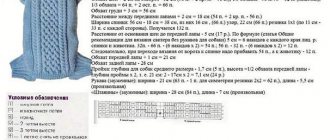
Let's consider the process of creating a knitted product for a Yorkshire terrier with the following dimensions: back length - 30 cm, chest circumference - 38 cm. For this knitting you need to purchase 65 grams of wool yarn and two pairs of knitting needles size 4 and 5.
The knitting pattern for a Yorkie suit is as follows:
- We begin to knit the back part of the product, casting on 80 chain stitches on the knitting needles and threading elastic bands for the neck into 10 of these loops.
- We knit the remaining loops first with regular satin stitch, and leave 20 loops for the elastic at the bottom of the overalls. As a result, you need to knit 50 rows.
- We start knitting the belly part, knitting 60 rows of 20 stitches in satin stitch.
- We begin to decrease the row 10 cm from the edge, which is equal to half the columns in the row.
- The loops should decrease symmetrically on both sides.
- We tie the remaining 10 columns with an elastic band for the pet’s neck.
- We sew together both parts of the overalls, leaving openings for the Yorkie's legs.
Stylish and warm knitted clothes for your pet are ready to try on!
Pattern of overalls for dogs
The pattern of overalls for dogs is one of the most important components. The more accurately the measurements are taken and the pattern is drawn, the better the new thing will “fit” on your pet. And in comfortable clothes, even the most fastidious “fashionist”, such as our Jack, will feel free and comfortable while walking.
The main size that must be used to guide the construction of the mesh and further application of the pattern is the length of the pet’s back from the withers to the tail.
Having measured this parameter, we divide it by 10. The resulting value is the size of the side of the square.
Let me give you an example using Jack. The length of Jack's back from the collar to the base of the tail is 30 cm. This means that I need 30:10 = 3 cm. Thus, the jack pattern grid will consist of squares, the side of each of which is 3 cm.
You may have more or less, depending on the size of your tailed companion.
Note! The blue color on the pattern shows the outlines of overalls for a boy. If you have a girl, then you just need to lengthen the part of the shelf (belly), as marked in pink.
By the way, on our blog there is another, completely different, but also very cool model of warm winter overalls. If you want to sew such a onesie for your furry friend, you will find a pattern and a detailed video master class in the article: winter overalls for dogs.
Here is this jumpsuit in all its glory.
Video master class
A detailed master class on how to easily and simply sew a cool hoodie for a dog.
Today Dzhekushka and I showed and told how to sew a hoodie for a dog with our own hands. We hope you enjoyed our master class, because Jackusik tried very hard.
Share the master class with your dog breeding friends. Write your reviews in the comments and attach photos of hoodies you have already sewn for furry babies. Jack and I really want to see what you came up with.
Good luck and take care of your pets!
Necessary materials
To make the jumpsuit I used the following materials:
- Membrane fabric with water protection.
- Lining fabric on padding polyester (lining stitch). Depending on how warm or not you want the overalls to be, you can use a thinner fabric (for example, flannel, fleece) as the lining layer. If you plan to use the overalls in severe frosts, then as an additional insulating layer you can use Alpolux insulation, which is quite frost-resistant.
- Tractor lightning. If you sew a zipper only along the back (without a collar), as I did, then the length of the zipper must be exactly the same as the length of your pet’s back (in my case it is 30 cm). If you plan to “extend” the zipper to the end of the collar, then its length should accordingly be greater.
Jack always wears collars with us. If I had sewn a zipper along the entire length of the overalls, including the collar, then I would have to put Jack's collar on top of the collar. After all, if I wore the collar down, the leash would constantly rub against the collar, but I don’t think that’s very comfortable. In my opinion, the long lock option is suitable if your pet wears a harness.
Tips for choosing fabric
The choice of material for sewing overalls depends on the time of year and weather conditions of the region. The following requirements apply for a demi-season suit:
- “breathable” fabric so that the dog’s body is sufficiently ventilated;
- high-quality tailoring from durable material so that when touched by branches, the suit does not tear;
- water-repellent (so that the dog does not get wet in case of rain).
The best option for such overalls is membrane fabric. A thin layer of oilcloth is glued to this material, which does not allow the animal to get wet to the last thread . For winter, the overalls should preferably have a lining. When choosing a lining, opt for viscose or twill. It is preferable to sew summer versions of overalls from microfiber or raincoat fabric.
This is interesting: Konchalovsky and Vysotskaya are getting divorced
Step-by-step instruction
The proposed pattern is made to fit my Jackusik, the length of his legs, the width of his chest and the girth of his neck.
There is a good saying: Measure twice, cut once! All dogs are different. Some people have longer or shorter paws. Some are more slender, while others like to eat well.
In order not to be upset later because the work went wrong, before transferring the pattern to the main fabric, make a trial version on a piece of regular chintz or any old sheet. This way you will already have an idea of what and where to “adjust”, expand, lengthen or shorten specifically for your pet.
I didn’t make a “trial” version, since this pattern has already been tested. I used it to sew a vest for Jack. The only thing I had to additionally measure was the length of Jackusik's paws.
Our first fitting looked exactly like this! I caught that rare moment when Jack was motionless and dozing.
Yes, if you use a thicker lining layer as insulation, I advise you to initially transfer the pattern to the fabric, adding an additional 1-2 cm to the constructed pattern. It is better later, during the fitting process, to sew in a little excess, rather than the overalls turning out to be tight.
So, we transfer all the details of the pattern to both the main (membrane) and lining fabric.
Next, carefully cut everything out, not forgetting to add 1-1.5 cm for seam allowances.
The most important controller strictly monitors the entire production process!
From the wrong side, on the sides, we sew together the parts of the front (belly) and back. We perform this operation with both membrane and lining fabric.
Important advice! Before thoroughly sewing all the seams on a sewing machine, I advise you to first manually baste the parts together and first try the product on your pet. The more often you try on, the better the overalls will “fit” your tailed friend.
During fitting, especially for boys, we check the cutout on the tummy to see if it covers the waistband. After all, the next stage of making the overalls will be this part of the product.
We fold the parts of the membrane and lining fabric, already stitched on the sides, together “face to face” and sew along the bottom, in the tummy area, as shown by the red dotted line.
We turn it inside out and, in the same way, in the tummy area, only on the front side, we lay an additional finishing line.
So that during the final stitching on the sewing machine the fabric does not “walk” and the seam is neater, I first swept this place manually with temporary large stitches.
This is what it should look like in the end.
To ensure that the top and lining of the overalls are securely fixed to each other in the future, it is better to additionally stitch the side seams on the front side using a machine.
We sweep away the shoulder sections and try the product on the pet. If the overalls fit well in the shoulders, feel free to stitch the shoulder sections using a sewing machine.
But then I recommend trying it on again to make sure that the armholes do not put pressure on the armpits. If the armhole is too tight, it is better to cut off the excess so that there are no chafing later. Let it be a little more free.
Let's start sewing in the parts of the front legs (let's call them sleeves).
This is one of the most critical stages, and there is absolutely no need for haste here. Before finally sewing in the sleeves, I advise you to sew them into the armhole and try them on again.
Yes, we have already adjusted the armhole to fit the pet’s paws. But, when sewn in, due to the seam, it may also decrease slightly. You may have to cut off the excess again. And during intermediate fitting, you can immediately adjust the length of the front legs of the overalls.
So, as a result of the fitting, we “adjusted” everything. Now, we fold the lining and membrane fabrics of both parts of the paws “face to face” and stitch along the bottom using a sewing machine.
And then according to the well-known scheme: we turn it inside out and also add an additional finishing line along the bottom (as shown by the arrows).
Next, you can sew the sleeves to the overalls. But before doing this, I usually blur the details together. I do this so that they don’t move in different directions again.
All that remains is to finally sew everything on the sewing machine.
Well, the front legs (sleeves) are completely ready, let's proceed to the details of the hind legs of the overalls.
The scheme is the same: we fold the lining and membrane fabrics of both parts of the paws “face to face”, stitch along the bottom from the wrong side, and turn them inside out.
We lay the finishing line.
Now we need to finish the edges of the overalls in the area of the tail and butt.
We turn this part of the overalls inside out and sew a seam on the wrong side using a sewing machine.
And again we turn the overalls right side out, and exactly there (in the area of the tail and butt) we make the finishing stitch.
And then we fold the membrane fabric “face to face” in the area of the hind legs and sew it where shown by the dotted line.
Before we start sewing in the lock, we do a fitting to make sure that our overalls fit freely on the pet and do not squeeze anything anywhere. In addition, we take into account that when sewing in a lock, the jumpsuit “unexpectedly” should not turn out to be too tight.
If you suddenly find that there is not enough fabric on the back, and after sewing in the lock, the jumpsuit turns out to be too tight, then you can “increase” the missing volume by sewing on an additional strap. I already encountered this once when I sewed a vest for a dog with my own hands. You can read by following the link about how I got out of this situation.
Next, we sew in the lock.
And again we carry out, one might say, the final fitting. We make sure that there is no pressure anywhere in the neck area, since the final stage of making overalls for a dog will be sewing on the collar.
I will not describe the entire process in detail, since there is nothing complicated here. The following photos reflect everything in sufficient detail.
Well, as it turns out, it’s not so difficult to sew your own overalls for a dog.
If, after completing the work, you find some shortcomings: the fabric on the tummy is puffy, or the parts of the legs are too wide, and the pet is not very comfortable on a walk, you can make small corrections.
For example, in the tummy area, on the inside, additionally sew a wide elastic band (as shown in the master class on making a vest). And the parts of the front and back legs of the overalls can be slightly bent and elastic bands can also be sewn in.
Well, we have already tested the new thing in the field! Jackusik feels great in his new overalls. Apparently, it was not for nothing that we did not skimp on frequent fittings. Everything turned out just great!
Even at the sight of overalls, my little toothy one does not try to hide under the bed, which is very surprising... He probably liked the overalls!
If you found this material useful, I would be glad to see your feedback in the comments. If you decide to sew such a onesie for your pet, but questions arise during the manufacturing process, then do not hesitate to ask questions in the comments to this material. I will be happy to help you!
For miniature dogs
Using the pattern we present below, you can sew either a waterproof suit or a summer suit for mini dogs.
Any tailoring begins with creating a pattern. So, let's begin:
- First of all, it is necessary to take measurements from the animal. The first of these will be the length of the back - the distance from the neck to the tail. To make it more convenient to take measurements, it is recommended to put a collar on the dog, then it will be clear and understandable where to start.
- We build a grid for construction. So, the resulting measurement must be divided by 8. The resulting number will be the side of the grid square.
- From the picture below, we transfer the pattern strictly according to the squares.
- Cut it out of paper. We apply it to a piece of fabric and trace as many details as necessary for sewing. We cut the edges strictly along an oblique line. Also, do not forget to leave one centimeter for processing the seams.
- You should get nine parts and a belt, which is necessary for the model with a drawstring. We cut them out.
- Using temporary seams, we sew the parts with the following sides: CO with C1O1, XY with X1Y1, DP with D1P1, E1D1 with E2D2 (start with E1).
- In the same way, we sew the paired parts together with temporary seams.
- We do the first fitting and, if necessary, adjust the product to the animal’s figure.
- If you are making a jumpsuit with a belt, then you need to sew a drawstring to it.
- All temporary seams must be machine stitched. Sleeves and trouser legs too. Next, we insert elastic bands into the legs, just make sure that they do not squeeze the paws too much.
- We process the neck, but the tail part needs to be processed with edging, and only then insert the elastic band.
- Then you need to sew on the flaps to fasten the overalls. For this it is better to buy Velcro fasteners. Unlike other types of fasteners, it ensures a better fit of the product itself on the dog.
The overalls are ready. You can decorate it with pockets or, for example, insert laces so that you can adjust the size of the product. Here it’s up to you to decide what your imagination is enough for. Good luck.