Dogs become our best friends. They love us and protect us. We, in turn, must also treat them. It is our duty to make sure that our little and sometimes big friends feel comfortable in the winter.
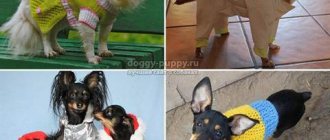
There are now many specialized clothing stores open for dogs. Outfits are presented for every taste and color. Some people buy clothes just to dress up, while for others it is a vital necessity. But unfortunately for owners, things for their pets often cost them a pretty penny.
Variety of warm clothes
Clothes for dogs can be casual or formal. There are many types of clothing:
- overalls;
- blanket;
- sweater or jumper;
- dress;
- panties.
A knitted suit will give your pet a unique appearance.
For your information! The easiest product to make is a cape. To knit it you do not need to have perfect technique. These clothes are suitable for cool spring or autumn. In winter, more thorough insulation is still required in the form of overalls or a set of pants and a jacket for a dog.
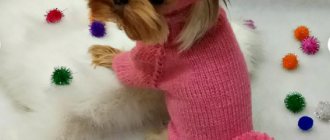
In addition to basic clothing, hats of various styles and dog shoes are popular among animals.
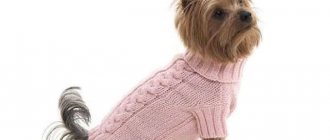
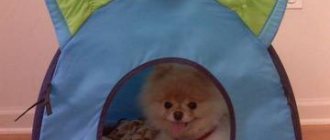
Yorkie feels cozy and warm in a knitted hat
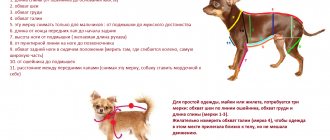
When choosing a model, you should pay attention not only to beauty, but also to practicality:
- the ties must be of sufficient length so that they do not come undone during walks;
- clothing should not hinder the pet’s movements;
- the collar should fit freely under or on top of the product;
- The length of the sleeves and panties should be shortened, otherwise the lower edges will quickly wear out.
LiveInternetLiveInternet
jumpsuit with hood Clothes for dogs! 2part JUMPSUIT with hood
Are you convinced that DIY dog clothes are not so difficult? Well, we are moving along the path of complicating the models, and from a simple sweater we have slowly reached a jumpsuit with a hood. Now I will write for you as for people who know and can do a lot. So where do we start? Of course, with the purchase of threads. For those who are already in the mood for mohair after the “chameleon”, I suggest buying wool or half-woolen thread. For additional decoration of the models, you can use “grass” thread. For wool and wool blends we will need thicker knitting needles, about 3.5-5. taking measurements.
The first measurement
is the length of the overalls.
You know how to take this measurement: you need to put a collar on the dog so that it is loose on it, and measure the length of the back from the collar to the root of the tail. The second measurement
is neck volume.
You can measure by unfolding and measuring the collar that you usually put on your dog. The third measurement
is chest volume.
Measured behind the elbows. The fourth measurement
is the length of the hood. The distance from the occipital protuberance to the withers is measured. You can add 1-2 cm to make it freer and more beautiful. As always, first we knit a sample of 22 loops and see how many centimeters the fabric turns out to be. Using the second measurement, we calculate how many loops you need to cast on. I took orange “grass” for one of the options; I got 46 loops plus two edge ones, i.e. 48 loops.
We knit these 48 loops according to the fourth measurement to make a rectangle. Happened? This means the hood is almost ready. Now we make holes for the ribbon. Of course, you already know how to do this, but I’ll repeat it anyway. We need to get an even number of holes, so we divide our 46 loops (I don’t take the edge ones into account) by the number of holes (8 pieces) and get six loops. Now we knit two loops from the edge and make a yarn over, then we knit two loops together. So, it turns out: yarn over, two loops together, four according to the pattern, yarn over, two together, four according to the pattern. And so on until the end of the row. In order for the holes to become holes, you need to knit the next row according to the pattern, and to make the result more obvious, knit two more rows before you start dividing the fabric and adding loops to form the body. There are holes, but we need to make wedges on both sides so that the suit fits the dog most comfortably. We knit the wedges from the edge, as convenient for you. I knitted 14 loops, returned to the edge, then 8 loops - returned to the edge, then 17 loops, returned to the edge, and knitted a full row. On the other hand, she repeated everything. The wedges are ready! Now we have reached the third measure. Using simple calculations, you will determine how many centimeters your dog’s chest is larger than its neck. A couple more taps on the calculator and you will find out how many loops you need to add to get the desired width of the fabric. Since our overalls have a hood, we will fasten it not on the back, but on the dog’s chest. therefore, we will need to divide the canvas into three parts, but not the same as in the “chameleon”. First of all, we will form the chest strips on which there will be a clasp. Before you start knitting, decide what type of fastener you will use: buttons, Velcro or plastic buttons on a knitted tape.
Buttons have a lot of advantages: they are comfortable, familiar, easy to fasten, you can match the color of any thread, and if the buttons are beautiful and contrast with the color of the thread, they can decorate the product. Velcro is also quite convenient, especially if the thread is not shaggy. But there is one drawback: it is thick, and the fabric will bulge on a small overall. However, if you are not a fan of fastening a bunch of buttons, it is better to use Velcro
knitted tape with plastic buttons. It appeared on the market not so long ago, an almost ideal fastener option for our doll onesies! What difference does it make whether the suit is fastened with snaps or buttons? Yes it's big! If there are buttons, then the fabrics will be fastened end-to-end, and if there are buttons, then they will overlap, which means that for the stripes you will need to knit a different number of loops: for the buttons 5+2 are enough, and for the buttons we allocate the same five loops for each strip, but in the first Add three or four stitches to the same row to create a wider stripe. As usual, we knit strips up to the elbow, and tear off the thread, throwing the loops onto a knitting pin. While we were knitting the chest strips, the stitches for the main fabric were pinned. It's time to tackle them. We remove the loops onto the knitting needle and begin to knit the first row, adding the number of loops that we calculated earlier. Naturally, we knit the row after the addition in order to “legalize” the addition of loops and form a pattern. By the way, because... the fabric on the back will be monolithic, you can show your imagination and knit some simple pattern, for example, a couple of braids. It will look very cute! Now let’s get back to our favorite (or least favorite?) wedges. It is imperative to do them so that the canvas does not puff up on the back. After we have knitted a row that added loops, we knit a wedge first from one edge, then from the other. So: 14 loops - return to the edge - 8 loops - return to the edge - 16 loops - return to the edge - knit the row to the end. That's it, the first wedge is ready! We knit the second wedge in the same way.
Next, knit the fabric to the size to which you knitted the chest strips, and combine all three fabrics into one. New secrets!!!
If you are knitting a jumpsuit for a girl, you can knit the fabric longer, almost to the hips, and only then close 6-7 loops on each side to form a clasp. In the next 5-6 rows, you need to cut one edge loop at a time to form the final fabric that covers the back.
but if it’s for a boy, I advise you to knit 4-5 rows, cut 4 loops on each side, i.e. knit 1-2, 3-4, 5-6 and 7-8 in pairs, cut 2 more loops in the next row, i.e. 1-2 and 3-4, and then bind off 6-7 loops on each side. Then you knit and decrease the loops in the same way as in the “female” version. Why do you need to start closing loops for male dogs so early? But you are knitting for a boy! You don’t want the overalls to be wet from the stomach after the first walk... You knit the back according to the first measurement. It is best to control the length of the jumpsuit by measuring from time to time the distance from the holes you made for the lace to the knitting needle. how to finish the back
We want nothing to bulge, so in the last two rows before casting off the stitches you need to cut off quite a decent number of stitches! I recommend knitting every sixth stitch together on the first row of cuts, and every eighth stitch on the second row of cuts. Now crochet the loops tightly. You have received a tight edge that will not puff up, but will gently fit to the back.
Now you need to make a hood from a piece of fabric from which knitting began. To do this, fold it in half and sew it.
To make the edge of the hood and clasp more durable and not stretch, crochet it. secret number one
if you are making a jumpsuit with buttons, when tying one of the edges, make 4-5 air loops every three loops. They will become buttonholes for secret number two
It is better to knit the edge of the hood with a double crochet. After tying, sew an elastic thread through the rows that you created when crocheting. secret number three
To ensure that the hood does not fly off the dog’s head, before picking up the hook, put the jumpsuit on the dog, put the hood on its head and mark the place under the chin.
While tying in this place, you will make 4-5 air loops, which will become a buttonhole. the legs
in the same way as in the “chameleon”.
And you sew it on in the same way. secret:
if you want the sleeves to sit well on the legs, and so that the legs do not disappear into the depths of the overalls when you pick up the dog, make the sleeves narrow and long enough.
Don't forget to reinforce the cuffs with 4-5 rows of elastic thread! The elastic will hold the sleeves in place. And if you want to quickly and easily dress your dog, and are not going to take him in your arms on the street, knit the sleeves wide, without reducing the rows, so that the fabric turns out to be rectangular. This sleeve will be somewhat in the style of a kimono. a lace
using a purchased lace and put stops on it, but it will be more elegant to weave a braided rope from the remnants of the thread, and make pom-poms at the ends. If you made a jumpsuit from a single-color thread, pompoms can be made from 2-3 colors of thread. It will be very beautiful! Do you remember how to make pom-poms? Very simple! You need to cut out four circles with a hole, two circles for each pompom. The diameter of the circle should be the size you want the pompom to be. I recommend making the diameter 3-4cm, no more.
Fold two circles and wrap them with thread so that there are no gaps. To speed up the work and create uniform mixing of threads of different colors, it is better to fold 2-3 threads together. Since the thread is triple, you don’t need to do many rounds, two will be enough, otherwise the pompom will not open well and the groove where the connecting thread passes will be visible.
After you have wrapped the circles with thread, spread the thread on one side, and, inserting sharp scissors between the cardboards, cut the thread. At the same time, hold the center with your index finger and thumb so that the threads do not fall out prematurely.
Stretch a thread between the cardboards and tie well.
Now remove the cardboard (you can cut it) and roll the pompom between your palms to fluff it up. Trim the protruding threads with scissors so that the pompom becomes round and neat. secret
The pompoms need to be attached to the cord after you thread it through the holes. If you don't like the hood, you can knit a jumpsuit using the same principle, but with a collar. Have fun walking and a warm winter!
https://toychik.sitecity.ru
maybe this will be useful
| Collar-amulet |
| Whatever the owners can come up with for their favorite toys! For example, this collar. If you make a collar with your own hands, I give you 100% that you will never see anyone else have the same one! And if during your work you invest a little soul, love and confidence that this collar will become protection for the dog from the “evil eye” - you will get a real amulet. |
Talisman of Love Magic Coffee amulet was given as a gift before a long journey to Finland. Eye beads are woven into the collar, and silver droplet beads are made along the lower edge.
The collar that you see on the Talisman of Love Lady Boss is also woven from red thread. It is decorated with eye beads and pearl beads.
Vanilla Kiss is wearing a thin collar made of beige thread with golden beads woven along the edge.
So, what will we need to weave a collar? This photo shows a general plan of all the materials that will be useful to us, but it’s better to look at everything in more detail and detail.
Threads. They can be different: cotton, nylon, in general, any that you want to use and that you like in color. secret
: nylon threads look beautiful in the product and are easy to fasten after finishing the work, however, it is difficult to work with such a thread because She doesn't hold the knot well. The cotton thread holds the knot perfectly, but it may begin to fray during wear (in the finished product).
secret
: in order to make the cotton thread more shiny and not prone to fraying, it can be treated with wax, which is used in embroidery. You can buy this wax at a specialized embroidery store.
Pay attention to the thickness of the thread. The collars you saw at the beginning of the page use a 1mm thick thread (pictured on the left). Nylon thread is called “for shoes”. The pink spool of nylon thread is twice as thin; this will need to be taken into account when calculating the length of the thread and the number of threads used in the work that we need to weave a collar of sufficient length. In addition, a thinner thread looks completely different in work, the pattern turns out to be smaller, more elegant, but you will have to spend several times more time on the work and the collar will turn out to be more rigid. secret
: it’s better to take “Iris” cotton thread. It comes in a wide range of colors, is very easy to use and has some shine.
In order for our weave to become a collar, it needs to have a clasp and a loop for attaching a leash. I recommend taking the lock like you see in the photo, i.e. with mandatory fixation of the strap after fastening. We need the strap to fit nicely, and the tail not to stick out to the side and not to come unfastened at every convenient and inconvenient occasion. secret
: do not buy locks that are too big or too narrow. Large ones will look rough, and small ones will not fasten well. In my photo, the most successful one is the round lock. The rectangular ones turned out to be too small...
Macrame in itself is very beautiful; combinations of knots can create absolutely incredible effects and patterns, but the pattern is visible only upon closer inspection. But we want the collar to attract attention with its unusualness and elegance, to decorate the dog and make it stand out from the crowd. And for this you can use various beads and souvenir coins. secret
: estimate in advance what kind of hole your beads have, so that while working you will know how many threads you can pass through the bead. The placement of the bead in the work will depend on this.
To work, you will definitely need pins (to attach the clasp to the pillow) and thin strong wire that will help you thread the bead onto the thread.
Of course, you will not be able to do without scissors and a lighter (if the thread is synthetic). secret
: you need to take the lighter with a metal top. For what? You'll understand later.
In order to calculate the length of the thread, you need to decide how long the collar you need. Take your dog's favorite collar and measure the length from the lock to the hole where you usually fasten the collar. Using the “poke method” I determined for myself the average length of a collar as 18-19 cm. Don’t forget that this is only the length to the hole! You will need to add another 5-6 cm to the tail. As a result, we get 24-25 cm. We multiply the resulting number by 7 and get the length of the thread that we will need for work, i.e. approximately 180 cm. This thread is folded in half and hung on a lock.
You need to hang the threads so that the tongue is clearly in the middle and is tightly clamped with the threads. Therefore, it is better to hang the threads one by one - one to the right of the tongue, one to the left, etc. secret
: when hanging threads, please note that the lock should be turned inside out towards you. Then, after finishing work, the collar will be fastened on the front side.
This is the main knot you will need to create the collar.
the pattern for the collar can be simple
and maybe more complicated. . Select a pattern for your work based on the number of threads you have hung. If the pattern you have chosen requires more threads than the one that fits on your lock crossbar, you can make the first two rows at the beginning of weaving with horizontal bridles and two additional threads. This way you will add 4 threads to the work.
In order to make a loop for attaching a leash, after 2-2.5 cm of work (one step of the drawing) you need to make a series of horizontal bridges, attach a loop, again a row of bridges, and continue the drawing.
The beads used in the work can be very diverse; they can be alternated in color and location in the pattern. To create the “status” of a talisman for the collar, I wove in several blue beads with the image of a peephole. secret
: eye beads are not sold in bulk in stores, I just bought a bracelet with such beads and took it apart.
After you have woven 18-19cm, i.e. the size of the collar to the first hole, you need to form a tongue with holes. To form the tongue, you need to leave in the work such a number of threads that it will form a strip that easily passes into the lock. This is especially true if the collar is much wider than the lock. In my case it is 8 threads.
We cut off the threads that are no longer needed for work, leaving approximately 3-4mm. The cut threads need to be slightly smoothed to the underside, set on fire, and when the fire comes almost to the wicker, you need to quickly press the molten thread with the metal part of the lighter. By doing this you simultaneously extinguish the fire and melt the edges of the weave. We finish the formed tongue with 4-5 rows of bridles and close the weaving by fusing the edges. secret
: if you did the work not with synthetic threads, but with cotton threads, you will not be able to melt the edge. Therefore, I recommend fixing the ends of the threads from the inside out using Super Moment glue.
Fun jumpsuit for a dog
This knitted jumper will keep your dog warm in cold, windy weather. Designed by Whitney Christmas.
Animal Size: For small to medium sized animal.
Product dimensions: chest circumference 33 (44.5) cm; length 25 (30.5) cm. You will need: 100 (150) g melange yarn (A) (cotton / acrylic / mohair / lurex / polyester, 50 g / 80 m, 100 (150) yarn (mohair / acrylic / polyester , 50 g/180 m) blue (B); knitting needles No. 6.5 long; tapestry needle. Knitting density: stockinette stitch 12 stitches x 14 rows = 10 x 10 cm, before work, fold threads A and B.
COMPLETING OF THE WORK:
Connect threads A and B. Cast on 30 (42) sts, knit k1, p1 with rib. 5 cm, finish 1 p. on faces side.
1st and all r. on the inside side : out. p. 2nd r. (knit side): k2, add 1 loop, knit until 2 sts remain, add 1 st, k2. (= 32(44) p.) Rows 3-16: rep. 1st and 2nd 6 more times = 44 (56) sts. Knit stocking. knitting 25 cm, finish with the 1st row on the wrong side.
Armholes: Next row (front side): knit 5 (7), join the threads of the second skeins A and B and bind off 5 (7) p., knit until 10 (14) p. remain, join the threads of the third skeins A and B and close 5 (7) sts, knit. to the end of the river The product is divided into 3 parts. Knit each part of the chul separately. elm. Another 4 cm, finish r. on the inside side.
Collar: Next row (knit side): knit knit. first part and cast on 4(6) sts, knit part 2 and cast on 4(6) sts, knit. to the end = 42 (54) p., knit stocking. elm. another 20.5 (22.5) cm, knit 1, purl 1. 5 cm. Close the loops without tightening. Sleeves:
connect threads A and B, cast on 16(22) sts, knit 1, purl 1. 5 cm, finish with the 1st row. on faces side Knit a stocking. elm. another 11.5(15) cm from the type-set p. Close the item without tightening.
Assembly and processing: Wedge the parts. Sew the sleeve seams. Sew the sleeves into the armholes. Sew the product so that the seam is under the belly.
Here's another beauty, but there are no diagrams on them
The jumpsuit can be knitted using this pattern.
| Size: XS – S – M. Finished product dimensions: Chest circumference: approximately 28 30 – 40/44 – 4852 cm. Back length: approximately 24/26—32/34—40 42 cm. |
Approximate sizes for dogs: XS = Chihuahua, S = Bichon Frize, M = Cocker Spaniel.
You will need:
-Drops Eskimo yarn from Gamstudio: 50 g red color No. 08 -50 g orange melange color, No. 19 -50 g lilac melange color, No. 20 -50 g pink color. No. 26 - DROPS 7 mm knitting needles - or a size suitable for the specified knitting density - DROPS 7 mm crochet hook - 2-4-4 wooden DROPS buttons with a diameter of 20 mm. No. 535
Knitting density: 12 p. x 20 rows with a “rice” pattern = 10 × 10 cm.
Rice pattern: 1st row: *K1. p.. 1 p. P.*. repeat between *-*. 2nd row: purl stitches with knit stitches, and knit stitches with purl stitches. Repeat these 2 rows.
Alternating stripes : knit in the following sequence:
5-7-8 cm in red
1.5-2-3 cm pink
4-5-6 cm orange melange color
1.5-2-3 cm lilac melange color
3-5-6 cm pink
1.5-2-3 cm in red
3-5-6 cm in lilac melange color and then knit in orange melange color until the end of the product.
Back: knitted from the bottom up, towards the neckline. Cast on 11-15-19 sts on 7mm needles with red yarn. Knit with a “rice” pattern with the appropriate alternation of stripes - see above - while casting on new sts on each side in every 2nd row: 2 times 2 sts and 2-3-5 times 1 st - 23-29- 37 p. At a height of 21-28-36 cm, close off the middle 5-7-9 p. for the neckline. Divide the knitting and finish each side separately - make all further measurements from this place.
Left side : = 9-11-14 sts. Bind off 1 st in the direction of the neckline in every 2nd row 2-2-4 times = 7-9-10 sts. At a height of 9-10-12 cm, bind off the loops . Right side: knit symmetrically to the left side.
Crochet : use lilac melange and a 7 mm crochet hook to tie all the edges of the cape - start from the top corner of one of the sides at the neckline as follows: 1 tbsp. 5/n in the first p., 2 air. p., *skip about 1.5 cm, 1 tbsp. b.n. in the next paragraph, 2 air. p.*, repeat between *-* and finish the connection. Art. to the beginning of the row.
Strap for belly fastening : cast on 7-9-10 stitches on 7 mm needles in lilac melange color from the left edge of the cape, starting approximately 6-8-10 cm below the neckline (cast on from stitches knitted with knitting needles so that the hook border is above). Knit with a “rice” pattern about 10-15-20 cm - try the cape on the dog to determine the exact length (the strap will stretch a little when worn, so do not make it too long), close the loops.
Sew 1 -2-2 buttons on the strap and 1 -2-2 buttons on one side of the neckline. Make accordingly buttonholes from air arches. P.
here is a link for sewing clothes for dogs.www.zoo-world.ru/content/blogcategory/158/204/
Principles of knitting dog clothes
Knitting overalls for a mini Yorkie boy
Recommendations for knitting clothes for dogs exist specifically for each product. But there are basic rules that will answer the question of how to knit clothes for any dog:
- Before you get to work, you need to decide on the knitting density. To do this, knit a sample of the pattern and count the number of loops contained in 1 cm. The number will differ depending on the chosen yarn;
- after taking measurements of the dog, you need to decide on the size and determine the appropriate number of loops according to the width of the product;
- Be sure to try on the product while knitting, this will allow you to immediately adjust the size of the fabric.
Note! To knit dog clothes you will need very little yarn. You can use leftovers from other items or dismantle an old unnecessary item.
Model selection
Before crocheting or knitting clothes for a dog, you need to decide on the model. It all depends on the pet’s physique, skills, and individual preferences. There are the following types of warm clothes knitted for dogs using do-it-yourself patterns:
- sweater;
- overalls;
- vest;
- coat.
The simplest option is knitting a vest. Other models require more serious skills. But it should be borne in mind that this item is more suitable for autumn, since it does not have sleeves. For winter frosts you need to knit a sweater or coat.
Taking measurements for knitting
Sweater for a dog: how to knit for beginners
This is the most responsible process. The appearance of the finished clothing and how it will fit on the dog depend on correctly measured volumes and lengths. If the dog is very active, it is problematic to cope alone, it is better to turn to someone for help.
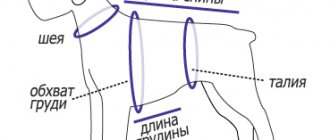
Basic measurements you will need when knitting dog clothes:
- chest girth. Measured at the widest part of the chest;
- neck girth. On the contrary, they measure in the narrowest place;
- back length. Measure from the beginning of the neck to the tip of the tail;
- paw length Measure from the armpit to the ground. The parameter is useful for products with sleeves or panties;
- paw girth The parameter is measured at the widest part of the limbs;
- distance between paws. This size is important when knitting overalls.
To take measurements correctly, you need to use the table
How to choose the right clothes for your pet?
If the dog owner decides to purchase a factory-made outfit for his four-legged friend, he should know about the intricacies of choosing dog clothing. First of all, you need to think about the comfort of the animal, and only then about beauty.
If it is not possible to try on clothes for a Yorkie, especially when purchasing online, then it is enough to know the dog’s parameters, including the following criteria:
- girth of the widest part of the Yorkie's neck;
- distance from withers to tail;
- the volume of the dog’s chest and waist (plus 5 free centimeters);
- length of paw to big toe.
When choosing clothes in a store where you can touch and inspect them, as well as try them on, you should heed the advice. What you should pay attention to when buying an outfit for a small dog:
- Determination of fabric quality. You need to wrinkle the material and see if the design cracks. Low-quality dyes, when exposed to moisture and sun, stain the animal’s fur.
- Location of seams. The internal stitching should not stick out too much, rub or hurt the dog.
- Unnecessary decorations. It is better to exclude additional pockets, belts, and a hood that do not provide functionality from the Yorkie’s wardrobe; such accessories interfere with the dog’s walking.
- Choice of clasp. If the dog has long hair, it is better to choose clothes with buttons or Velcro, for example, Yorkie hairs often get caught in the zipper. For trimmed dogs, any type of fastener is suitable.
What to knit clothes for your pet from
DIY dog clothes: patterns
When choosing yarn, you need to take into account the properties of the material, the particular conditions of washing and drying the finished product. The main synthetic fibers are:
- acrylic (PAN). If the yarn is of high quality, the items made from it are light, retain heat well, and practically do not shrink after washing;
- viscose. If the threads consist entirely of viscose, during wear such items do not hold their shape well and are stretched.
Note! Natural threads are hypoallergenic, but more difficult to care for. Products made from such yarn should be washed at low temperatures and dried without the use of heating devices.
The following types are distinguished:
- linen. Durable yarn. Things made from it are durable and of high quality, and are little susceptible to shrinkage after washing;
- cotton. Pleasant to the touch, quite durable, but not elastic. Cotton yarn is heavy;
- wool. The warmest yarn. But woolen items do not last long, they form pills and shrink heavily after washing.
Pros and cons of knitted clothes
Knitted clothes for small dogs have a number of advantages:
- it is simple and convenient;
- it can be worn at any time of the year;
- In winter, knitted items provide excellent protection from the cold and also have good ventilation;
- they are elastic, easy to put on and create comfort when worn, taking the shape of the pet’s body;
- Knitted clothing is seamless, so wool tangling and chafing are eliminated.
Among the negative aspects, one can note the fact that knitted clothes cannot be cleaned, but must be washed. During washing, clothes made of wool can “shrink”, and if the composition contains a lot of acrylic, then, on the contrary, they can stretch out.
Video: “Knitted sweater for a dog”
Masterclass with detailed step-by-step description! How to knit a sweater for a dog using an example.
How to knit a jumpsuit for a small dog with knitting needles
A warm overall is a full-fledged dog suit that protects the front and back parts of the body. Perfect for miniature breeds that freeze in cold weather.
Knitting a jumpsuit for a small dog is not difficult
The procedure for knitting overalls for a small dog:
- For the hind legs, you need to cast on 30 chain stitches from different balls, then knit 5 rows with a 2x2 elastic band. Then knit 12 rows in stockinette stitch and 3 rows in rib stitch. Close 4 loops (p.) on the inside, and 10 stitches on the outside. A total of 16 sts should remain.
- Cast on 14 stitches and connect the legs together. A total of 46 stitches are obtained (2×16 + 14). Next, knit 6 rows with an elastic band, 18 rows with stockinette stitch. Then cast on 14 loops from each edge. A total of 74 stitches are obtained (46 + 2×14). Next 6 rows are knitted according to the pattern: 18 sts - rib stitch, 38 sts - stockinette stitch, 18 sts - rib stitch. Next, knit 12 rows in stockinette stitch.
- For the front legs, knitting begins in the same way as the hind legs. You need to cast on 30 air loops from different balls, then knit 5 rows with a 2x2 elastic band. Then knit 14 rows in stockinette stitch.
- To knit raglan, the parts are connected to each other. To do this, knit 15 stitches together with the edge (chest), 30 stitches (sleeve), 44 stitches (back), 30 stitches (second sleeve), 15 stitches (breast). The total is 134 sts. This is how 2 rows are knitted. From the third row they begin to reduce the number of loops. To do this, in every second row, decrease 1 stitch, not reaching 2 edge stitches.
- When 70 stitches remain on the knitting needles, knit 4 more rows, decreasing only at the beginning. A total of 58 stitches remain. Then knit 4 rows with an elastic band and close 4 stitches from each edge.
- When 50 stitches remain on the knitting needles, start working on the hood. Knit in stockinette stitch. In the middle, make an expansion 4 times: add 1 stitch to the 2 middle sts in every fourth row. A total of 58 stitches are obtained. Knit 10 rows without additions. Then they begin to decrease 2 loops in the middle in every second row. This is done 7 times. A total of 44 stitches remain. Knit 5 rows with an elastic band and bind off all the loops. The sleeves are sewn together and the zipper is attached.
Melange sweater
Dog weight: 12-15kg.
We will need:
- melange yarn, composed of 77% acrylic, 20% wool, 3% polyamide (50g per 70m) – 150g;
- knitting needles No5 and No6.
Patterns:
- cutting: 2l.x2i.;
- persons Ch.: alternate p. persons p. with a row of purl.
Density: face. Ch. 12p. for 19 rub. will be 10cm by 10cm.
Description
Back
Using knitting needles No. 5, cast on 50 stitches. and knit 8p. cutting Let's go to sp. No6 and persons. Ch.
At an altitude of 36 rubles. (19 cm) on both sides we decrease the loops, retreating 2 stitches. from the edge: 2l., 2p. in 1 sheet, faces. to the extreme 4 p., 1 simple broach, 2 l. In 2 rubles repeat the decrease.
On the remaining 46p. let's continue working. Having knitted 58r. (30cm), move on to cutting with knitting needles No. 5. We knit 16 rubles. (this is 8cm) and closed. P.
Tummy
Using knitting needles No. 5, cast on 26 stitches. and do 8 rubles. cutting Let's go to sp. No6 and persons. Ch. From 36r. (19cm) on both sides we decrease by 1 stitch, as described for the back. We repeat the decrease through the row. There are 22 stitches left, on which we knit evenly. From 58r. (30 cm) using knitting needles No. 5, we knit a sweater for a dog using cut knitting. We knit 16 r. (8 cm) and close. P.
Mittens
Sp. No5 dial 26p. and knit 12 rubles in the round. (6cm) cutting. We do not close the loops. We knit the second sleeve in the same way.
Assembly
We sew the upper sections of the cutting. We sew the sleeves with a loop stitch. We make the side seams.
Step-by-step description of knitting a sweater for a pet
It is not necessary that the hand be full. To knit a simple sweater for a Chihuahua, some basic skills are enough. A pattern and knitting pattern for a simple sweater for a dog won’t even be useful. An elementary lesson will help you figure out how to knit a sweater for your pet.
Materials you will need:
- warm melange yarn;
- knitting needles No. 4;
- bobbin threads;
- scissors;
- needle.
For your information! Knitting begins with a collar with 1×1 or 2×2 rib. It should not be knitted too tightly so that it is easy to put on and take off. The average collar width for small dog breeds is 5 cm. After the end of the collar, the main part begins.
The main fabric is knitted in stockinette stitch. Starting from the third row, add 2 loops in each subsequent row. You need to add until the width of the product is equal to the circumference of the dog’s chest + 2 cm for allowances. At this stage, it is recommended to first try the sweater on your pet to make sure it is the right size. Next, knit 3 more rows without additions.
Knitting holes for paws
To make holes for the paws, you need to skip the required number of loops corresponding to the size. To do this, knit the first 3 cm, cover the next 6 cm, then knit to the second armhole. When a sleeve of the appropriate size is obtained, air loops are added and then knitted with a single piece of fabric. The edges are tied. You can use a hook for this.
Then, to narrow the product towards the bottom, you need to decrease 2 loops in every seventh row.
Important! As you knit, you need to regularly try on the product for the future owner.
When the length of the fabric is sufficient, you need to finish the product by knitting the edge with a 1x1 or 2x2 elastic band. To assemble the sweater, the edges are sewn together with threads.
A dog in a knitted sweater feels comfortable
Manufacturing instructions
More precise instructions for knitting clothes depend on the model chosen. Even novice craftsmen can create knitted clothes for Chihuahuas using patterns using their own hands. There are several general rules that must be followed when knitting clothes for a dachshund with your own hands according to patterns:
- Depending on the type of yarn chosen, it is necessary to count the number of loops that will be distributed in 1 cm. Next, you need to calculate the number of loops depending on the measurements taken. Of course, their number will be small if you plan to knit a vest or blanket for a small dog. To do this, you need to knit a small piece of the pattern.
- Each part of the product must be knitted separately, and then connected to each other using a needle and bobbin threads. But when creating a vest, you can knit the item in the round.
- The blanket can be knitted with a continuous fabric without interrupting the process.
- When the knitted clothes for dogs according to the patterns are almost ready, you can try on the product, and then add the collar and elastic at the bottom.
If the master is not confident in his skills and does not want to waste new yarn, then you can knit clothes for a Chihuahua using knitting needles according to the pattern from any unnecessary thing. There are interesting options for converting old house clothes into costumes for pets.
For example, you can easily make a similar thing for a dog from a children's sweater. To do this, you just need to sew it in a little depending on the size of the animal, and also insert elastic bands at the neck, waist and sleeves.
If you didn’t manage to knit a masterpiece the first time, don’t be upset, because you can easily unravel the failed item and try to knit it again. But when a good thing comes out, the animal will look extraordinary and attractive, and the main thing is that it will be warm in rainy, dank and frosty weather.
Dress for a small dog: knitting options
Yorkshire terriers and other small dogs look adorable in tiny dresses. The dress can be knitted in regular stockinette stitch and additionally decorated with crocheted flowers, bows or frills.
The dress itself can be of the following types:
- classic. With sleeves and skirt. You can add buttons or knit openwork patterns. Usually the dress is knitted according to a pre-made pattern;
- with ruffles. Ruffles will add volume and elegance. They can be knitted on the sleeves, skirt or collar;
- tunic dress. A shortened model without a pronounced transition to the skirt. It is recommended to knit from insulated yarn with the addition of mohair;
- sundress. Sleeveless strappy dress. Knit from cotton or acrylic yarn in an openwork pattern. Great for summer walks and going out.
Yarn and accessories
Once the model has been determined, everything necessary for work should be prepared. So, the following accessories will be useful in the process:
- Yarn (both acrylic and wool containing are suitable).
- Knitting needles or crochet hook (depending on preferences and skills).
- Reel threads.
- Needle.
- Scissors.
- Thimble.
- Tape measure.
- A pen and a small sheet of paper (for notes while taking measurements from the animal).
In some models, accessories may be useful: hooks, buttons, buttons or a zipper. It is recommended to prepare all this in advance. Bobbin threads must be selected to match the selected yarn. It is not recommended to skimp on the materials needed to make clothes.
Patterns may vary depending on measurements.
Knitting kit for a dog: jumper and helmet
When walking in windy weather, special attention should be paid to protecting your pet's ears and head. A hat and hood will help you cope with this task. The helmet hat does not fall off the head and does not creep over the eyes; it covers not only the top of the head, but also the neck. The hood provides additional insulation. To knit a jumper and a hat-helmet for a small dog, you will need:
- 200 g yarn;
- straight and double needles No. 2.5.
Important! Knitting is done from top to bottom.
Cast on 46 stitches on straight knitting needles and knit 2 rows in garter stitch. Then knit 20 rows with a 1×1 rib. Then they move to the front surface. In the first row, 3 loops retreat from the edge, in the second - 4 loops, in the third - 5 and so on, add 1 loop on both sides in each row 15 times. The total is 28 rows from the elastic band.
For armholes, 10 stitches in stockinette stitch (for the chest), 12 stitches are cast off (for the armhole), 32 loops in stitch stitch (for the back), 12 loops are cast off (for the second armhole), 10 loops in stitch stitch (for the chest) and knit a row separately on every part. Then knit through all the loops, restoring 12 loops of each armhole. In total, you should get 72 rows from the elastic band. At the end, knit 4 rows with an elastic band and close all the loops.
For the sleeves, cast on 28 stitches along the edge of the armholes on stocking needles and knit 18 rows in the round with a 1×1 elastic band, cast off all stitches.
To connect, the middle seam of the jumper is made, the collar is left unsewn.
For the helmet, cast on 86 stitches on straight needles and knit 12 rows in stockinette stitch. For ties, you need to close 14 loops at both ends in the 4th row from the beginning of knitting.
After completing the 12th row, you need to divide the fabric into 3 parts: 2 × 15 loops for the side parts and 28 loops for the top part. Next, knit 4 rows, decreasing 1 loop in every second row 14 times on both sides of the upper part of the fabric. Close all loops. A seam is made in the middle of the cap. Having laid a small fold, the hood is hemmed to the hat.
We knit clothes for dogs with our own hands in step-by-step lessons
Symbols in diagrams:
- air loop - air loop
- st/s/n – double crochet
- st/b/n – single crochet
- connect/st – connecting column (half single crochet)
- n. - loop
This sweater is very easy to knit with your own hands, it is easy to put on and fastens with a button at the neck of the belly strap. To work you will need:
- Basic yarn: about 200-250 g for a small dog.
- A small amount of yarn in a contrasting shade for edging.
- Hook number 6 or 6.5.
- Large button approximately 2.5 cm in diameter.
If the dog is large, you can change the size of the sweater by adding rows (1 row of sc/b/n is approximately equal to 8mm). You can also reduce the size. Be sure to try on the sweater as you go!
We knit a sweater collar.
We cast on 23 in/p, knit the 1st row with st/b/n from the 2nd loop from the hook. At the end of the row, VP and move to the 2nd row. Up to the 50th row inclusive we continue to knit st/b/n. Then st/b/n behind the back wall, in/p, at the end the thread is not secured.
Leaving the hook in the last loop, we combine the first and last rows with half-columns. In this way we connect all the rows, closing the collar. At the end of 2nd stitch, do not fasten the thread.
We knit the main part of the sweater.
Along the rim of the collar we knit 48 sts/s/n, leaving the remaining columns of the collar free. We knit 2 single rises and move to the next row. Up to the 22nd row we continue to knit the same st/s/n. Here, if necessary, you can add rows, increasing the size. In the next row we make a decrease to the required amount, knitting st/s/n through one loop. We knit a few more rows and secure the thread.
We knit a sweater strap.
We knit from the end of the 15th row from the collar along the edge of the product 13 st/s/n. We start each next row with 2 high rises. Starting from the 21st row, we make a hole for the button, skipping st/s/n and knitting in/c. It's better to make 2 holes. In the last row we knit st/s/n without gaps.
We knit a finishing row along the edge of the product, including the untied part of the collar.
At the level of the 15th row from the collar, sew on a button.
Knitting raglan for dogs: pattern with description
When knitting raglan, the sleeve is not separated from the shoulder part of the front and back. First, the neck of the product is knitted with an elastic band. To get a raglan, you need to divide the number of loops into 3 parts: for the back, front and legs. The number of paw loops is divided in half. For convenience, it is recommended to use knitting markers; they will delimit the details.
Then you need to make an extension of the product using yarn overs. 2 loops before the first marker, a yarn over is made, 2 purl loops are knitted, a marker is thrown over, 2 more purl loops and a yarn over. These steps are repeated with each marker. Due to the yarn overs, the fabric will expand.
Raglan knitting pattern for dogs
To calculate the width of the sleeves, you need to calculate the number of loops based on the circumference of the paws. These loops are moved to the second knitting needle; they will be needed after completing the knitting of the main part. To keep the sleeve free, you need to knit 5-10 additional loops. Next, knit in the round with a 2×2 elastic band to the required length.
Features of sewing winter overalls
Both the first and second options can be made for winter. It is insulated using a fleece lining, fleece and synthetic fillers (sintepon, holofiber). The lining is cut and sewn in the same way as the main part, and then both parts are carefully sewn together from the wrong side.
You can sew the top with lining in several places (along the chest, waist or across) so that the jumpsuit fits well and does not “fidget” in different directions. In the winter version, the sleeves, neckline and tail cutout must be placed on soft elastic cuffs so that they fit more closely to the animal’s body.
The item can be decorated with fur, buttons, rhinestones and appliqués. Make sure that the animal cannot reach the decorative elements, bite off and swallow them.
How to knit a blanket and beret for a dog
A blanket is the simplest clothing option. It can be made without a pattern. Even a beginner can handle it. It can be knitted in satin stitch or with openwork patterns.
The easiest variety to execute is the triangular blanket. It is suitable for small dogs. Knitting starts from the tail. At this point a loop is made that is put on the dog's tail. Next, add loops evenly. The length of the blanket should slightly exceed the length of the animal's back. Fasteners (buttons, Velcro) or ribbons are sewn to the remaining corners to secure the cape on the stomach.
For your information! The blanket can be rectangular in shape. To prevent the edges of the cape from bending, several loops on both edges are made into scarf loops.
To make a beret, knit a chain of 4 chain stitches and close it in a circle. Then knit 12 rows with a single crochet, adding 8 loops in each row. Next, knit 4 rows with a decrease in the number of loops. Then all the loops are closed and the edge is tied in a “crawfish step”. You can sew a pompom to the center of the beret.
The blanket will be an excellent option for walking in cool weather.
If you plan to make a striped beret from yarn of several colors, it is recommended to knit 3 rows of each color.
Summer T-shirt
Such clothing will be more decorative than protective from bad weather. Therefore, you can take any material to sew it. The easiest way is to take a small children's T-shirt and cut out the exact size of your dog right on it. After leaving a few centimeters at the edges to accommodate the seams, calculate the maximum chest circumference beyond the elbows and cut the T-shirt along the front or back. Sew the product on the sides and measure it on your dog. You can decorate the product with sequins, stripes, rhinestones, laces and so on.
Knitted shoes for small dogs
Knitted shoes are light and comfortable. It does not rub or hinder your pet's movements. At the same time, it does an excellent job of keeping the dog’s paws warm. With shoes on, your pet can stand on cold ground for a long time and remain healthy.
To ensure your boots last a long time, it is recommended:
- insert insoles made of thick fabric into the shoes;
- the sole is made of waterproof thick material;
- knit the rest of the shoes in a circle with yarn in the direction from the sole upwards;
- Strengthen your socks with a leather or nylon insert to prevent your dog from tearing your shoes with his claws.
Note! Strong threads are used to knit shoes. Any knitting style is suitable.
Miniature dog breeds need extra care, especially during cold season. The above detailed information will help you learn knitting for dogs without any problems. Tips on choosing styles and selecting yarn will guide you among the many options.
Video “Knitted sweater for Chihuahua”
From this video you will learn how to knit a warm jacket for a dog yourself.
Recommended Posts
Standard height and weight of the Cane Corso breed by month
Weight of a puppy and an adult Labrador by month
Weight and height of a German Shepherd puppy by month
TOP 40 best hunting dog breeds with names, descriptions and photos
38 best dog breeds for apartments according to reviews from breeders and owners
The best hunting helpers: TOP-30 hound dog breeds with names and photos