When breeding chickens, it is necessary to think in advance where they will be kept from the first days of life. For these purposes, breeders often use brooders - special devices that create all the conditions necessary for the growth and development of chicks. They can be easily made in a home workshop using ready-made instructions.
Brooder: what is it and main functions
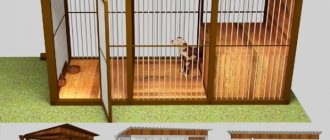
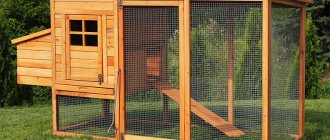
A do-it-yourself brooder for raising chickens is a special box where newly hatched birds are placed to be kept for the first two months after birth. This design replaces the maternal conditions for the chicks - it gives them warmth and comfort.
Nursery for newborn chicks
Chicks often experience anxiety and stress in the first weeks of life; life without a hen is quite difficult for them. Therefore, for their full growth, the construction of a brooder is necessary for every farmer.
A standard brooder consists of a drinking bowl, a container for feeding and drinking, a device for maintaining an acceptable level of humidity, a thermostat, a ventilation system, and bedding for comfortable movement of birds.
Important! If the farmer takes into account all the rules for constructing the structure during the process, the brooder will turn out to be warm and as comfortable as possible.
Purpose and types
People begin to think about building or purchasing a brooder when there are no hens taking care of their offspring. Many farmers do not breed purebred birds, but crosses, the representatives of which lack maternal instinct.
More often these are meat birds. For such crosses there are summer and winter options.
Therefore, to produce offspring, you need a brooder for broilers, which differs from the one intended for chickens only in name. Thanks to the special design and equipment, in any device it is possible to create the conditions that are optimal for a given breed or cross.
Chickens are kept in these houses for no more than a month. In one room measuring 100x50x50 cm you can keep no more than 35 chicks aged from 0 to 30 days.
Grown-up babies are seated in two brooders.
Cages for raising young animals vary in size and materials. The simplest structures are made from cardboard boxes.
Purchased brooders are more convenient to use, but not every novice poultry farmer has the funds to purchase them.
What is a good brooder?
A good brooder is a structure built from high-quality material and meeting all the requirements for keeping hatched birds. How to identify a good brooder:
- Floor. It should be completely dry and not slippery. If the cold reaches the floor and provokes the formation of ice, the chickens can almost immediately get sick and lag behind in development.
- Waste tray. This part must be in the box for keeping chickens. The tray is usually located under the brooder itself; it is periodically taken out, cleaned and put back in place. This is necessary in order not to disturb the residents of the isolated box. In the first 50 days of life, they will need maximum comfort and peace of mind.
- Ventilation. This element must be carefully thought out - there should be no drafts in the brooder. Newly hatched chicks are usually very sensitive to slight cold, so they need complete internal insulation. But fresh air must be supplied constantly.
Poultry brooder
- Humidity. It is advisable to equip the structure with devices to maintain acceptable humidity inside the box, but it is important to ensure that its level is kept at a stable level and does not rise higher.
- Thermostat. It should be set to an acceptable and not very high temperature. At elevated levels, the health of the chicks may deteriorate.
The optimal size for a home brooder is 1.5 by 1.5 meters. However, here you need to match the number of chickens available to the farmer.
Attention! It is important to consider that each box should contain about 50-80 chicks, no more.
Requirements
A brooder actually helps replace a hen for chickens, being a small box in which they are kept in the first weeks of their life if they are bred in artificially created conditions. When making it yourself, attention should be paid to the following parameters:
- Dimensions . Depends on the number of chickens, since per 1 sq. m should not come more than 25 individuals. Taking into account the fact that they will be kept in a brooder until they are 2 or 3 months of age, at least 0.1 square meters should be allocated for one individual. m area. A standard “house” can often contain 50 one-day-old chicks. Its acceptable dimensions are:
- length – 100 cm;
- width – 50 cm.
height – 50 cm;
Thus, the dimensions of a standard box for housing 50 chicks are 100x50x50 cm. If you plan to keep broilers or more than 60 chickens, you can increase the width and length to 60 cm and 1 m, respectively, with a height of 50 cm.
Taking into account these parameters, a home master can assemble a brooder using the following scheme:
If necessary, you can make several similar buildings and stack them on top of each other to get a battery where you can breed a large number of chickens.
Key nuances and parameters that a home craftsman should take into account when making a brooder are given in the following video:
Criteria by which a finished structure is selected
Livestock stores today sell chick boxes of various types. In order not to make a mistake with your choice, it is recommended to focus on the following criteria when purchasing:
- Size. It is advisable to focus on a large-sized structure, especially if the farmer raises fast-growing poultry species.
- Floor. It is worth carefully examining the floor and examining it for slipperiness. It is advisable that it be covered with a plastic mesh with special compartments to prevent damage to the chicks' legs.
- Waste compartment. It must be present in the finished design. You can find the compartment under the bottom of the brooder.
A purchased box for chickens should have a spacious drinking bowl and a feeding bowl. It is advisable to purchase new brooder models that are equipped with air conditioners and heaters.
Important! There should be an adjustable heater inside the structure. It is desirable if it is made of ceramics.
What are they?
The simplest one is a box of impressive size kitchen appliances. Here, too, everything depends on the number of chickens. There are few chickens, only a dozen or two - a box from a small refrigerator will do.
Heating equipment is also simple. This is a three-liter jar (or two) with an ordinary incandescent light bulb. The one with the size of the flask will allow you to lower it into the jar, that is, which will fit through the neck.
You can use lamps with a metal reflective lampshade. Usually the box is closed from above not completely, but partially, so that air can escape freely.
It is clear that such a brooder will only help the poultry farmer in a heated room, for example in a room. You can’t put such a cardboard device in a barn. After all, its functions are minimal: to limit space and heat.
A more complex device is a box in which a microclimate is maintained. Such brooders can have different “fillings”. The price depends on its complexity and modernity. You can purchase a factory brooder in an online store.
Chick brooder with thermostat
In the spring of 2016, this model for residents of the Altai Territory (when purchased in a Barnaul online store) cost 8,990 rubles. A lot, however...
In the photo below, the brooder is two-story. This is not bad for raising quail. After all, even adult birds will still sit in cages.
But for chickens, from which one flock will later be created, this is bad. Because the chickens will know their own and theirs. They will hardly be able to become a single team.
What materials and tools are needed to build a brooder?
To build an insulation box for chickens, you will need the tools that almost every farmer has in their arsenal. In additional cases, you may need some parts that will have to be purchased. For example, if the owner decides to make a brooder in some more complex way.
Do-it-yourself chicken brooder - what tools you will need:
- jigsaw (can be replaced with a saw);
- centimeter or tape measure for measuring products;
- hammer and nails;
- screwdriver;
- pliers;
- pencil for marking.
Choosing material for a brooder is an equally important step. You can build a poultry house from almost any available materials. For example:
- thick cardboard;
- wooden blocks;
- strong boxes.
You can also make a brooder from an old box, an unnecessary bedside table, or a wooden barrel. It is desirable that the material be durable. The thicker the walls, the less likely it is that the chicks will get blown out and get sick. Therefore, many farmers do not recommend using cardboard in the process, even if it is multi-layered.
Tools for making a structure
How to build a brooder with your own hands
At the stage of designing and creating a drawing of the future house for raising chickens, its dimensions are determined. You can make a long brooder consisting of several rooms connected by holes with doors.
But a small house is enough for a novice poultry farmer. You can take the dimensions of the factory brooder model you like best as a guide.
Selecting wall material
For reusable structures, you need to choose wear-resistant and easy-to-clean materials. It is important that they do not absorb water and odors, do not change their properties under the influence of heat and light, and do not emit toxic substances when heated.
These requirements meet:
- Moisture-resistant plywood (it is recommended to use sheets 25 mm thick for constructing a brooder);
- chipboard;
- OSB.
As connecting elements, you can take bars with a cross section of 30x30 mm. All wooden materials are coated with special antiseptic solutions.
To make the walls of the chicken room easier to clean, the internal surfaces can be covered or covered with thin linoleum or polycarbonate.
Choosing flooring material
For the floor you will need a galvanized mesh with a mesh size of 10x10 mm or 12x12 mm. It is convenient for chickens to move on such a surface, and droppings and leftover food will fall down. This ensures cleanliness and reduces the risk of disease in young animals.
Those who are already quite experienced in keeping chickens are sure that the galvanized mesh proposed above is not the best choice for flooring. For reasons:
Related publications
Where to make money shortening links?
Oct 19, 2020
Kornev Farm
Aug 21, 2020
- Due to the small cross-section, droppings often get stuck in the cells, which dry out and accumulate.
- It is difficult to remove it from metal rods and you have to use scrapers.
- The chickens will certainly begin to peck their droppings.
In this regard, experienced poultry farmers advise installing a floor made of mesh with a mesh size of 10x20 mm or 12x20 mm.
The rod should have a cross-section of 1.5 or 2 mm. Chickens move on this mesh without difficulty, and droppings easily fall through the holes.
Selecting pallet material
It is advisable to make the pallet from galvanized steel. To do this, all 4 sides of the metal sheet are cut and bent upward, forming the sides. You don’t have to weld the corners, but fill the gaps with a moisture-resistant sealant.
Suitable for tray and plastic devices. If necessary, you can simply place a piece of PVC panel under the mesh floor (used for wall cladding).
Ventilation
For chickens, an influx of fresh air and the absence of dampness are important. Therefore, high-quality ventilation is necessary in the house. It can be arranged on the principle of natural air draft, ensured by the presence of two holes in the walls of the room.
- One should be located at a distance of 5-10 cm from the floor.
- The second is on the opposite wall and at a distance of 5-10 cm from the ceiling (roof of the brooder).
- The cross-section of the holes is 30-50 mm.
A forced ventilation device is relevant for large houses. To do this, you will need a fan, which is installed under the cover.
Lighting and heating
Infrared lamps are used as a heating element. To control the temperature, a thermostat is installed.
- For a standard size brooder (100/50/50 mm) a 250 W lamp is required. It is placed on one of the walls, in its upper part.
In a small space, such a powerful lamp will get very hot and needs a heat-resistant socket.
- To control the daylight hours, you will need a switch, which is installed on the outside of the wall on which the lamp is located.
How to make a door
The brooder door can be hinged or sliding. It is easier to make the first one, but it requires devices to hold it open. This could be a hook or latch.
The door can open in any direction: top-to-bottom or left-to-right and vice versa. This structural element must be made of durable material: metal, wood, plastic. But it’s easier to make a wooden frame and cover it with polycarbonate.
Features of the design of a brooder for chickens
Thermal insulation boxes for hatched chicks can be made from almost any material. However, it is worth considering that fragile structures will have to be changed over time. Why you need to do this:
- material wear;
- passage of moisture and cold;
- the impossibility of fully cleaning waste inside the brooder.
In addition, cardboard structures do not protect chicks well from drafts and cool quickly. It is also much more difficult to set the desired temperature and high-quality lighting.
To make your task as easy as possible and not have to change the bird box every 2-3 weeks, it is better to use durable materials during the construction process, and also equip the room itself with all the equipment necessary for the development of chickens:
- heating control system;
- devices for full lighting;
- feeders and drinking bowl (2-3 pcs.).
Important! The material from which the chicks' housing is made should be easy to wash and clean from dirt. Such procedures must be carried out regularly to make life easier for young chicks. Cardboard structures will simply deteriorate if washed frequently.
How to temporarily replace the brooder?
If the chickens are already on hand, and it takes some time to make a “house” for them, the breeder has to decide the issue of their temporary placement. To do this, you can use a box from household appliances, which will only need to be slightly modified:
- Insulate the bottom so that it is non-slip. To do this, it can be covered with 2-3 layers of gauze or a sheet of corrugated cardboard.
- Cut a viewing window in the wall of the box at a convenient height, and then tighten it with transparent plastic film. This will allow you to look at the chicks at any time without opening the box or disturbing them.
- Create a heating and lighting system in the box. To do this, you can use a liter jar with a screw-on metal lid. On its inner surface, you need to fix a small metal socket with bolts and screw in the light bulb. It is advisable to install a non-flammable gasket, for example, textolite, between the cover and the cartridge. To ensure air exchange inside the jar, the lid should be pierced several times. Next, fill the container 1/3 with fine sand, and wrap the bottom with a cloth or put a thick sock on it, otherwise the chickens may get burned.
If the box is large, you need to place several similar jars of sand in it.
You can buy a brooder in a store for 6,000-10,000 rubles, or you can make it yourself using ready-made drawings and available materials. After assembly, it will need to be equipped with an incandescent lamp, feeders and drinkers. If you have a large flock to raise, you can build multi-tiered chicken cages.
0
0
Copy link
Drawings for making a brooder
To make a brooder for chickens, you need to follow all the drawings and rules developed by professionals. This way the result will be as productive as possible.
Plywood manger
How to make a brooder with your own hands for raising chickens, step-by-step instructions:
- Prepare a sheet of plywood of the required size (thickness should be within 1 cm).
- From one end of the plywood, use a saw to separate a piece measuring 50 by 150 cm.
- From the remaining sheet, also separate 3 identical pieces (size 100 by 50 cm) and cut them with a saw. The top, bottom and rear wall of the structure will be made from these parts.
- From the first cut piece, saw off the side partitions (50 by 50 cm), fasten them together.
- Using a lath, build a waste tray, which should be located under the brooder. Its approximate size is 98 by 47 cm.
- Place a plywood sheet (100 by 50 cm) under the rail and nail it to the base of the product.
- Equip the cut-out side partitions with slats to support the floor covering.
- Build doors for the brooder. Their size should be within 45 by 32 cm. They can be made from slats with plaster mesh sewn into them.
- Cut a hole in the ceiling for the cable.
- Install the cable and socket, connect the dimmer and plug.
- Connect the temperature measuring device to the rear side.
- Install additional parts: drinking bowls, feeders.
Now you can screw on the lamp with a reflector and launch the chicks into a new home.
Ready home for chicks
Brooder with glass roof
How to make a brooder for broilers and chickens with your own hands with a glass roof:
- Assemble the frame according to the scheme described above (replace the roof with glass of the required size).
- Make a frame from the slats into which you can insert glass.
- Make a waste compartment from plywood and slats according to the above scheme.
- Make a hole in the side of the brooder for ventilation; it should be mesh.
- Insert the glass and attach the door with hinges.
- Install the cable and cartridge, temperature measuring device, dimmer and plug.
- Provide feeders and drinkers.
Cracks and spaces between walls can be filled with various rags.
Important! You cannot fill the voids with construction foam - the chickens will start pecking at it and get poisoned.
Brooder made of cardboard or plywood
How to make a brooder for ducklings and chickens with your own hands, detailed instructions:
- Prepare cardboard or plywood (thickness at least 10 mm), a sheet of the required dimensions.
- Saw the prepared sheets into five identical parts (two for the side walls, one for the back panel, the other two parts for the roof and bottom).
- Assemble the structure. You need to start from the floor; it should be attached to the side walls using slats.
- Attach the roof and door (should open outward).
- Install a pallet under the structure itself.
- Make a hole for ventilation.
Equip the brooder with all the necessary equipment and launch the birds into it.
Attention! If you make the doors double-leaf, it will be easier to care for the chicks.
How to collect
In order to properly manufacture and assemble a brooder, you need carpentry skills as well as tools. The production process includes:
- frame assembly;
- fastening walls, floors, ceilings and doors;
- installation of lamp and thermostat.
The heater and light source can simply be installed in a finished brooder, but it is better to provide for them at the installation stage.
To build a bird house you will need:
- plywood sheet;
- wooden beam with a cross section of 2x3 cm;
- galvanized mesh with cells 10x10 mm;
- PVC panel or galvanized iron sheet;
- self-tapping screws;
- piano-type hinges.
From this material you can build a brooder measuring 70x50x50 cm. This area can accommodate 20 chickens up to 14 days old. If there is a removable bottom and a heating system, the height of the inner wall will be about 40 cm. On days 15-16, the young animals are usually transferred to a pen or cage.
Work begins with the preparation of all the components, from which the house is then assembled:
- The timber is sawn into four pieces 40 cm long.
- 2 pieces are cut out of plywood. the sides of the brooder, measuring 48x50 cm, 3 rectangles 70x50 cm - one each for the floor, ceiling and back wall.
- Guides are prepared for the excrement collector and the removable bottom (2 pieces - 68x2 cm in size and 4 pieces - 46x2 cm).
- For the front part of the house, 4 parts are prepared:
- top (64x5 cm);
- bottom (64x6cm);
- 2 sidewalls (40x5cm).
- 2 doors (40x30 cm) are attached to the finished structure.
Frame elements of a pull-out tray:
- 2 pcs. – 66x2 cm;
- 2 pcs. – 48x2 cm;
- 2 pcs. – 68x2 cm;
- 2 pcs. – 46x2 cm.
Litter collection elements:
- front part (70x9.5 cm);
- plywood slats - 2 pcs. – 67.5x2 cm, 2 pcs. 65.5x2 cm, 2 pcs. , 2 pcs. 45.5x2 cm. 47.5x2 cm.
The algorithm for assembling all the parts is as follows:
- Guides for the manure container, as well as the removable bottom, are attached to the sides and rear wall of the house. To the smaller side of each side panel, using self-tapping screws, screw 46x2 strips tightly to the edge, not reaching 1 cm from the sides.
- They do the same with the back: a 68x2 cm bar is attached along a wide cut, moving 1 cm away from the sides. Then, at a height of 2.5–3 cm, parallel to the first guides, the rest are attached.
- Stiffening ribs are placed on the side parts of the brooder. For this purpose, the elements of the wooden beam are fixed tightly to the top and side edges of each, above the guides. Then they are connected with self-tapping screws to the back side. When all the elements are prepared and fastened correctly, a single groove for the pallet is obtained.
- The frontal parts of the brooder are attached to the finished frame: first of all, the side ones (40x5 cm), and then the upper and then the lower parts are placed on them, from the inside, with an overhang of 2 cm. A gap is formed at the bottom for the pallet.
- Hinges are installed along the front of the sidewalls and the doors are screwed. After this, the bottom and ceiling are attached.
Doors can be mesh. With them it is more convenient to look after the chicks, and the house will be better ventilated. For installation. To make mesh doors:
- Take plywood 5 mm thick, as well as 2 pieces of mesh measuring 40x30 cm. Planks are made from plywood - 3 cm wide, 24 and 40 cm long, 2 pieces each. on the door.
- The planks are fastened with self-tapping screws along the perimeter of the mesh, forming a kind of sandwich. After this, they hang it from the hinges on the house.
- Separately, a removable mesh bottom is made. The principle is the same as for doors - a mesh is placed between the frame elements and sequentially secured with self-tapping screws.
- The manure container is assembled from slats and PVC sheets in the likeness of a sandwich, like the doors and bottom. Afterwards the front part is placed.
- At the final stage, a heating lamp and a temperature controller are installed in the brooder.
In the first days, the lights in the house are not turned off, and the temperature is kept at +32...+33C, subsequently reducing it by 2 °C per week.
As an option, sometimes a “warm floor” system is installed along the rear wall for heating, and lamps are used only to maintain daylight hours.
Organization of lighting and temperature
You can warm up your homemade structure using an incandescent lamp. Infrared film can also come in handy. In the first month after the birth of the chicks, lighting in their housing should be 23 hours a day.
How to install a thermostat
To construct a heating system, you can use a cable, a plug and a cartridge. To do this, you need to connect the cable to the socket at one end, and connect the other end to the plug. Place the cartridge on the roof. Next, you need to plug the device into a power outlet.
It is worth considering that the temperature should not be too high, otherwise the chickens will not be able to breathe normally.
Brooder lighting
Device
All structures for raising young animals, both purchased and homemade, must consist of the following elements:
- Walls, floor and roof;
- Lamp for lighting and heating;
- Feeder;
- Drinking bowl;
- Openings for air exchange;
- Tray for collecting litter;
- Door.
An important element of equipment for a brooder is a thermostat. Universal devices for this purpose are equipped with sockets and temperature sensors. Can work in conjunction with cooling devices. You can buy an analog or digital thermostat.
Installation of equipment for microclimate control is simple: plug the device into an outlet and set the required temperature on the panel. Automation will monitor its maintenance. If necessary, the cooler or heater will start operating. The range of adjustable temperature in the brooder is from +16°C to +40°C.
Recommendations for making a feeder and drinker
Constructed housing for chickens is only half the battle. For their comfortable existence, you will need to build drinking bowls and feeders. Many farmers advise installing bunker-type feeders. They help to disturb little residents to a lesser extent, since in this case the feed is supplied from outside.
As for drinking bowls, it is recommended not to use vacuum devices, as they can be carriers of infection.
Important! Farmers are advised to use nipple cups equipped with drip catchers. They are considered the safest.
Preparation for manufacturing the structure
Placing small chicks in boxes or crates is considered inappropriate. They are short-lived, and it is simply impossible to carry out cleaning and high-quality disinfection in a packaging box. Maintaining temperature and maintaining humidity is also a problem. And even wooden boxes do not protect against drafts.
Making a high-quality brooder with your own hands is not difficult, even for a person not familiar with carpentry.
Tools and materials
A good brooder is designed to last for many years, so the materials used are wear-resistant, durable, and do not change their properties either under the influence of temperatures or high humidity. Plywood or thin board (up to 2.5 cm) is suitable, fiberboard/chipboard - for the walls. Beam 3 x 3 cm - on the frame. The strength, durability and wear resistance of chipboard and fiberboard are much lower than that of high-quality plywood sheets.
The table will help you accurately navigate the materials:
| No. | Material | Application | Note |
| 1 | Several slats and wooden blocks | Cage base, frame, floor frame | Bar thickness 3 x 30 cm |
| 2 | plywood sheet | Ceiling, bottom under the mesh, walls | Thickness up to 2.5 cm |
| 3 | Fine mesh metal mesh, pallet | Suitable for both doors and floors. Through it, garbage, excess feed, and droppings will spill into the tray. | The metal is galvanized or painted. Cells 1 x 1 cm |
| 4 | Plastic mesh | Only for doors | Cells 1 x 1 cm |
| 5 | Infrared or simple incandescent lamp | For heating and lighting the brooder. Install on one side, the other side should be a little cooler | Power is about 60 W. Additionally required: cable, reflector, socket, plug |
| 6 | Automatic dimmer (thermostat), thermometer | For control and regulation of light and temperatures | Automatic dimmers are expensive and unprofitable for homemade brooders |
| 7 | Fasteners | Self-tapping screws are applicable if the structure will be disassembled for the winter. Nails are used to fasten a non-demountable structure. Using staples and a stapler, attach the mesh to the wooden frame | |
| 8 | Slate | To create a canopy or roof when chickens are outside | |
| 9 | Oilcloth | They line the pallet with it | |
| 10 | Metal corners and additional fittings | The corners securely fasten the structure. Additionally: door hinges, latch for locking the cage | Do not cover the brooder with a “stick” or a block with a nail. A simple store latch is suitable for many years of use. |
To build a brooder, you will need tools that any home craftsman will have. An additional advantage will be the presence of email. jigsaw and metal scissors.
Walking and sanitizing cages
From time to time, chickens should be taken out into the fresh air if the outside temperature allows it. Sunlight has a beneficial effect on their health and promotes the production of vitamin D. It also causes the death of harmful bacteria that develop in the box with the chicks.
If the weather is not favorable for walks, then they do not need to be organized until the chickens are two months old. In case of frost or severe dampness, this can be postponed for an even longer period, since the absence of sun will affect the body of young birds less negatively than cold.
It is necessary to know how to care for chickens to ensure their normal growth. But we should not forget that you also need to keep their cage or box clean. You can clean it as it becomes dirty, but do not start this process. Ignoring this rule leads to the appearance of intestinal diseases and mass mortality.
Thus, by considering the main aspects of how to keep chickens after the incubator, and strictly observing them, you can raise your own livestock with virtually no losses.
Cage floor
Many people make the floor from the materials used for the walls and ceiling. To make it easier to remove droppings, you need to use a plastic mesh with a mesh size of 10 x 10 mm or use a welded mesh made of galvanized wire with a mesh size of 10 x 25 mm.
The floor must only be dry and not slippery. If this condition is not met, the chickens may get sick.
An interesting option is to manufacture strips of asbestos-cement sheets 50...60 mm wide, spaced at a distance of 10...12 mm. The chick's foot will not fall through, and the droppings will be swept down as the chicks move.
For rigidity, wooden slats or profile steel pipes are placed below. They do not allow the mesh to sag. The supports need to be fixed using self-tapping screws; then it is easy to remove and wash the coating if disinfection is necessary.
A tray is installed under the floor. Vertical walls are needed around the perimeter of the tray, then a draft will not penetrate from the outside to the inside. The tray must be made of galvanized sheet. It is even easier to use a sheet of cellular polycarbonate, it is quite rigid. When washed with water and detergent solutions, it does not change its properties. The perimeter with honeycombs is protected with adhesive transparent tape (scotch tape).
The floor for the chicken brooder in the “sleeping” compartment will have to be made solid. The same materials are used as for the walls. During operation, film or newspaper will be useful. They are removed when the chicks move into the feed area.
How to maintain a chicken room?
Building a brooder for raising chickens is not so difficult; it will be more difficult to learn how to raise healthy and strong individuals in it. To do this, it is important not to forget to follow certain rules for caring for the cell and its inhabitants:
- The food is fed once a day.
- When installing a nipple drinker, water is added as needed; in other cases, it is changed several times a day.
- Temperature and lighting are adjusted according to the age table.
- Cleaning is carried out regularly, no more than once every 5 days, but it all depends on the number of chickens.
- It is important to constantly check that the floor in the brooder is dry, there should be no accumulation of droppings and splashing water.
A brooder is a simple design that does not require carpentry or construction skills. Making it, if all the materials are available, will take only a few hours. The result is a warm, functional and durable home for more than one generation of chickens.
The most popular brooder heating systems
Naturally, when choosing a brooder heating system, each chicken breeder proceeds from his own preferences, financial capabilities and experience. Of course, you can organize the maintenance of the desired temperature using ordinary incandescent lamps of appropriate power. However, this method is the most uneconomical, and also unsafe (since a regular incandescent lamp is quite easy to break).
Today the most popular devices for heating a brooder are:
- red lamps with a mirror reflector;
- ceramic infrared lamps;
- artificial “mother hens”.
Each of these devices has its own advantages and disadvantages.
Red heating lamp
A very common method of heating the air in a brooder when raising chickens is a lamp that emits energy in the red and infrared range. It emits warmth and soft light at the same time. It is certainly impossible to say unequivocally that this is a universal “2 in 1” device. Although many experts claim that it practically does not interfere with the chicks’ sleep (it is quite enough to find water and food at any time), if the required temperature is exceeded, the heating element must be periodically turned off (manually or using automatic thermostats). That is, in order to maintain normal lighting conditions in accordance with the recommendations outlined above, you will in any case have to use an additional lighting device along with a red lamp.
Important! For the safe use of such heaters, it is necessary to purchase only lamps whose cylinders are made of special tempered glass. Among the advantages of such heaters it is worth noting:. Among the advantages of such heaters it is worth noting:
Among the advantages of such heaters it is worth noting:
- they have a fairly long service life - about 5000 hours;
- low cost.
Infrared ceramic lamp
Currently, instead of a lamp, an infrared ceramic heater is increasingly used. In its design, it is very similar to a regular lamp with a standard E27 socket. Compared to a conventional red lamp, such a heater has the following advantages:
- longer period of continuous operation - from 10,000 to 30,000 hours;
- high efficiency – up to 98%;
- increased impact resistance, vibration and moisture protection.
The power of such heaters offered by manufacturers varies widely - from 25 to 200 W. Therefore, you can easily select ceramic heat emitters for brooders of various sizes. If desired (and also for more uniform heating of the entire space), several heat emitters can be used simultaneously. The cost of such devices (depending on power) is about 400–600 rubles.
Artificial "mother chicken"
A very useful addition to the main brooder heating system will be a special device, which is a low-power heated plate on four mounting legs. Such a device practically does not increase the ambient temperature. However, by leaning against its warm surface (that is, by climbing under it), the chicks have the opportunity to warm up in the same way as when raised naturally by a mother hen. As the chicks grow, the distance between the brooder floor and the surface of the heater increases. Thus, it is convenient to use throughout the entire period of raising chicks in a brooder until they are transferred to the chicken coop.
The size of the “artificial mother” depends on how many chicks you plan to place in the brooder. Standard models are designed for simultaneous raising of 20 (power - 18 W, cost - 4000-4500 rubles) or 50 (66 W and about 6000 rubles, respectively) chickens. If desired, you can use several of these devices simultaneously in one brooder.
The only condition that must be observed when using such a device (as recommended by the manufacturers): the floor area of the box for raising chicks must be at least twice the size of the heater. Then the chicks can bask under it or be in a free area, depending on the time of day or when the ambient temperature changes.
The design of such devices is designed to operate 24 hours a day, 7 days a week. Since the power consumption of these devices is insignificant, this does not lead to a significant increase in energy costs.