- home
- Rat
- Care
06/20/2019 Every creature should have its own comfortable corner. For a rat, a cage is a place that protects from irritants and dangers. You don’t have to buy a house for a rodent: you can make it yourself. Your love for the tailed creature will help you make a home for a small pet.
Drawing plan
The first step in manufacturing is selecting the desired sample, drawing up a drawing and calculations.
There are many examples on the web with suitable designs for the job. They are made of several floors, because the animals run and climb well. The size and type of cell depend on the number of inhabitants.
For a pair of rodents you will need a house with dimensions of 600x400 mm for the base, and 600-1000 mm for the height. For boys, 1-2 floors are enough: they are calmer and more sociable, and prefer to climb the floors using the owner’s hand. Girls are more mobile and shy; they will be happy with 3-6 floors.
The chance to make a rat cage with your own hands involves interior design of the home.
Places for ladders, booths, hammocks and beds provide rodents with comfort and travel through the racks. It is necessary to select a location for the doors in advance. This will speed up cleaning, help catch the animal when it “escapes” and simplify access to the sick rodent.
As a result, you will get something like the following masterpiece:
Cage for boy rats
This is what a cage for girls looks like:
Before making a house for rats at home, take care of the means at hand.
Drawings and dimensions
Before you start making a cage for your pet, you need to choose a suitable project, make all the calculations, and draw up a drawing. On the Internet it is easy to find a variety of cell models, the designs of which can be taken as a basis for work. Rats jump well and climb wire walls, so homemade cages are usually made multi-story. The size and type of structure directly depend on the number of tailed residents.
For one or two animals, the minimum dimensions of the home should be 60x40 cm at the base, 60-100 cm in height. If you plan to keep boys, you can make a wider, lower cage. Males are distinguished by a calm disposition and sociability; they rarely rise above the 2-3rd floor of the cage, preferring to climb onto the owner’s shoulder. Female rats are more fearful, more active, less willing to make contact with people, but they like to climb to heights, so a high cage of 4-5 floors will be more comfortable for them.
Drawing with dimensions of a vertical cell with floors
Self-production also makes it possible to carefully consider the internal arrangement of the rat’s home.
Specially designated areas for ladders, houses, hammocks, and beds will help provide animals with comfortable conditions and quick movement across floors. Select in advance the places where the doors will be located - this will facilitate the cleaning procedure, help you quickly catch your pet, and also allow you to gain access to a sick animal if necessary.
You can buy a plastic container in the store as a pallet.
Required funds
The main material for a homemade house is wood: it absorbs bad odors well. Inexpensive plywood, boards or chipboards are easy to process, safe and last a long time. However, wood is not the best option for rats. Rodents love to chew on wooden structures, and the cage will not last long.
A good choice would be a structure made of mesh or rods. Galvanized or enameled metal does not give in to rat teeth and rust. To assemble the parts you need a soldering iron, flexible wire and the following tools:
- Roulette;
- Markers;
- Ruler;
- Nippers and pliers;
- Hammer;
- Metal scissors;
- File.
A homemade rat cage needs a base - a tray. It should be easy to clean and not leak liquid. A plastic tray of the required size or one made from PVC leaves will do. To attach the joints you will need silicone glue. The rest of the materials and tools are sold at the hardware store, including gloves for work.
When selecting a mesh, take into account the size of the cells so that the rodent does not crawl out through them.
If you decide to make a cage from scrap materials using wood, old furniture - a closet or shelves - will help you.
What structures cannot be used
Many rat breeders mistakenly believe that any jar or box is suitable for small animals to live in. However, it is not. To protect your furry from stress and discomfort, you should not place your pet in the following types of housing:
- Glass jars, aquariums and terrariums - such containers have solid walls, so soon after moving in the rat will feel a severe lack of air. There are many examples of rodents simply suffocating in aquariums.
- Carton boxes. The rat will run away from such a dwelling at the first opportunity. In addition, air exchange in boxes is also difficult.
- Plastic containers are only suitable for keeping the rat inside temporarily, for example during transport. Because after 30-40 minutes the animal will also begin to suffer from a lack of oxygen.
Also, you should not choose low cages designed for keeping mice or small hamsters as a home for a rat. Rats are quite freedom-loving, so they do not do well in confined spaces.
DIY rat masterpiece
After the drawing, preparation of the workplace begins. You can make a frame by bending the mesh or cutting out parts for fastening. The work stand will be a flat, hard surface protected from damage.
Making a metal masterpiece for a rat includes the following steps:
- When bending the cage, the drawing is performed as a single development. The parts are cut out with scissors and the folds are marked.
- You can bend the mesh evenly in the following way. The material must be placed on the edge of a hard surface, pressed with a board and hit with a hammer several times along the marked fold line.
- Other parts for assembly are cut out with scissors according to the drawing, and the edges are filed with a file so that the rats do not get hurt.
- The roof and walls are connected with pieces of wire 40-50 mm long. To do this, the wire is joined in half, fastening the two parts, and the ends are wrapped around the connected rods. The protruding ends are pressed with pliers and sharpened with a file.
- Holes for doors in the shape of squares are cut out in the walls (on the roof and floors).
- Doors and shelves are made from separate pieces and attached to the walls with flexible wire. For variety, you can put ladders between floors;
- Door locks are made from a bent piece of wire, a metal plate or a clamp.
Door lock made from a paper clip
The frame of a large cage can be strengthened with a metal corner profile, and holes can be drilled in its walls to attach the mesh to bolts or wire. Such a frame can easily withstand heavy weight.
After the frame comes the turn of the pallet. Its dimensions are checked twice to eliminate errors. For manufacturing you will need a PVC sheet 4-5 mm thick. The base is cut from the sheet, slightly larger than the frame, and the edges are 100-150 mm high. The sides are glued to the base and secured at the corners, and the joints are coated with silicone.
Briefly about the main thing
Even for inexperienced craftsmen, there will be no problems with the question of how to make a cage for rabbits if you strictly follow all the instructions and recommendations.
To build a rabbitry, the dimensions of the future structure are first determined. It is advisable to start work by completing a drawing. Then a timber frame is constructed.
The next stage is the design of the floor. It can be made of metal profile, fine mesh cage or wooden slats.
After this, the plywood walls of the cage are made. The work is completed by decorating the roof and installing a tray where waste from the cage will fall.
A drinking bowl, feeder and hay barn are installed in the finished cage.
Ratings 0
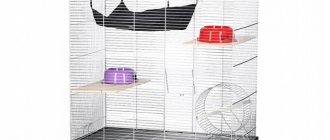
Metal shelving cage
A do-it-yourself rat cage made of metal is a little more complicated than the previous one, but lasts longer.
You will need:
- Metal racks (pallets);
- Screeds;
- Net;
- The latches;
- Metal scissors;
- Corners for doors;
- Metal profiles.
- Drawing;
- Bolts.
All necessary details are selected in advance. The parameters of the racks and profiles are checked against the drawing, and the fun begins.
The mesh is attached to the rack with flexible ties (you need to leave a little space for them), which are passed through the holes of the profiles. The profiles are pre-attached to the racks with bolts. The protruding “antennae” of the cell are cut off with scissors.
In place of the doors (the same metal mesh), the corners are attached to the profiles using ties. It wouldn’t hurt to have a couple of latches for reliability, plus high sides of the racks (so that less garbage falls down).
Theoretical beginning
If the question is asked: “How to make a cage for a rat with your own hands”? – then it’s worth starting with theory. Namely, from the outline of the diagram. After all, without a drawing, not a single carpenter will get down to business. In this case, the diagram will help take into account the materials used.
Just about them. For the job you will need wooden blocks about three centimeters thick, nails, screws and galvanized iron mesh with a diameter of no more than twenty millimeters. Rats crawl well even in the narrowest places, so holes with a large diameter will not keep the animal locked up. When constructing, you need to consider the correct size of the rat cage. The height must be at least eighty centimeters. This parameter will facilitate the construction of a second floor. In addition, rats do not like cramped spaces. The width of the cage will be at least forty centimeters. You need to place toys and tunnels somewhere. The length of the cage will not exceed seventy centimeters. With such dimensions, the animal will not feel cramped. The rat will run and frolic. A little advice. These data are given for the residence of one rat. If in the future a friend or girlfriend joins the animal, then you need to increase the area of the structure from the very beginning. Not twice, of course, but you need to add ten centimeters to the above data.
Working with galvanized mesh
In addition to the frame, the rat cage must also contain a lattice, which, in fact, will keep the animal locked up. Otherwise, the apartment of the happy owner will be in chaos and destruction. Just like any house, a cage consists of four walls, a floor and a ceiling. Almost everything except the pallet will be created from galvanized mesh. And this means that you have to work hard. First you need to mark the walls. They should be as tall and wide as a frame. That is, everything should fit together perfectly. The marks have been set - let's get to work. To cut the mesh accurately, you need good and sharp tools.
Wire cutters are suitable for this task. Galvanized mesh must be cut step by step, section by section. You constantly need to measure what is cut off: parallel walls must be the same. Otherwise, the cell will bend in different directions like a wave. But this will not increase comfort in any way, and the appearance will be sloppy. Well, if the walls are already cut, they should be prepared for further use. First, sand down all edges, tips and nicks. Protruding shoots should also be removed. Sanding work can be done with sandpaper. He will do this task well. Secondly, the cut galvanized mesh needs to be painted. This will protect the cage from rusting and from quickly losing its presentation. You can paint the mesh with regular enamel.
Interior arrangement
The conditions in which a pet is kept have an impact on its mood, well-being and character. It is very important to set up a rat's cage without harming it.
First you need to take care of the filler: wood shavings, compressed corn filler or non-colored paper will do.
The following items must be present in the cage:
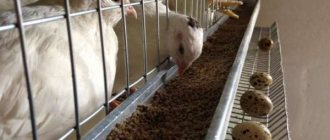
- Food bowls: heavy ceramic or metal hanging;
- Drinking bowl. A ballpoint with a metal spout will come in handy. It is attached to the outside of the mesh, and the spout is pushed inside;
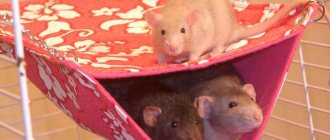
- Hammock. Soft hanging hammocks are very popular with rats;
- House: serves as a place where the rodent hides or rests;
- Toilet: ceramic or plastic dishes in the corner of the rack.
The best distance between drinkers is 150-200 mm. They are installed on different shelves, and the rat can easily jump to them or reach them by standing on its paws.
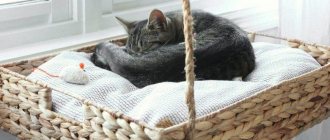
A plastic or lattice plate on the floor is a place for your pet to rest. This makes it easier for him to observe what is happening in the room and at the same time relax.
For entertainment, rats like swings, ropes with a knot at the end, wooden toys, etc. Walking balls and a running wheel are not suitable for pets (due to curiosity and a long tail).
Important stage
A rat cage is more than just a house. This is a place where the animal rests body and soul. That is why it is so important to maintain harmony when building this cage. After all, a lot depends on the rat’s house.
For example, will the pet be comfortable? That's what makes it fun. Will the little rat be playful or withdrawn? Will he live a long and happy life? When building a house, many factors need to be taken into account. Size, shape, toys, add-ons and more. Therefore, it is important to adhere to simple rules: accuracy and quality.
How to do it?
Making a homemade hamster cage at home is not difficult. You can even make a home from scrap materials that are likely to be found in every home. Here you can learn about several optimal options that are standards for building a hamster cage.
Plastic bottle cage
To make a home for a hamster from plastic bottles, you will need 3 bottles with a capacity of 6 liters.
- First you need to cut off the neck, leaving about 8–10 cm from the lid.
- Cut out the middle of the lid (threaded washer).
- Make holes in the side of the bottle equal to the diameter of the neck cap. Similar holes need to be made in only two bottles, and in the last one, holes must be made on both sides. In order to connect the bottles, you will have to insert the cut neck through the hole on one of them, but so that it also passes through the hole of the second bottle.
- To secure the bottle from the inside, secure the neck with a threaded washer.
- Similarly, attach the third bottle to those two.
- At the bottom of the bottles, make small holes for the rope so that the house can be moved or hung somewhere if necessary. Pass a strong rope through the hole you made.
Thus, you can make a three-room “apartment” for your pet.
If you need to clean and clean one of the “rooms”, then you can easily disconnect the bottle from the other by unscrewing the washer.
From the box
The second simple way to make a cage is to create it from an ordinary cardboard box, for example, a shoe box. However, the bottom of the box will have to be filled with sawdust or special filler. Also, you should not make a cage out of a small, low box, otherwise the animal can easily leave the territory of its “apartment”. Prefer large, spacious boxes with taller sides.